Upgrades
The SolarSpeeder has been designed to be upgraded with two extra options, one being the
“Impatience Switch” (for those who just can’t wait for the SolarSpeeder to trigger on it’s own),
and the other being the “Diode Voltage Upgrade” to supercharge your SolarSpeeder, at the
expense of a longer charge time.
The “Impatience” Switch
Are you the type of person that reads the last page of a detective novel first? Or opens all
your Christmas gifts in early November? If so, the Impatience switch will be a
must-have
option
to install on your SolarSpeeder. It simply is a manual trigger that activates your SolarSpeeder,
bypassing the voltage trigger. Kinda handy when you need to show off your creation to an
impatient audience. And it’s easy to build - got a paperclip? Good - let’s start!
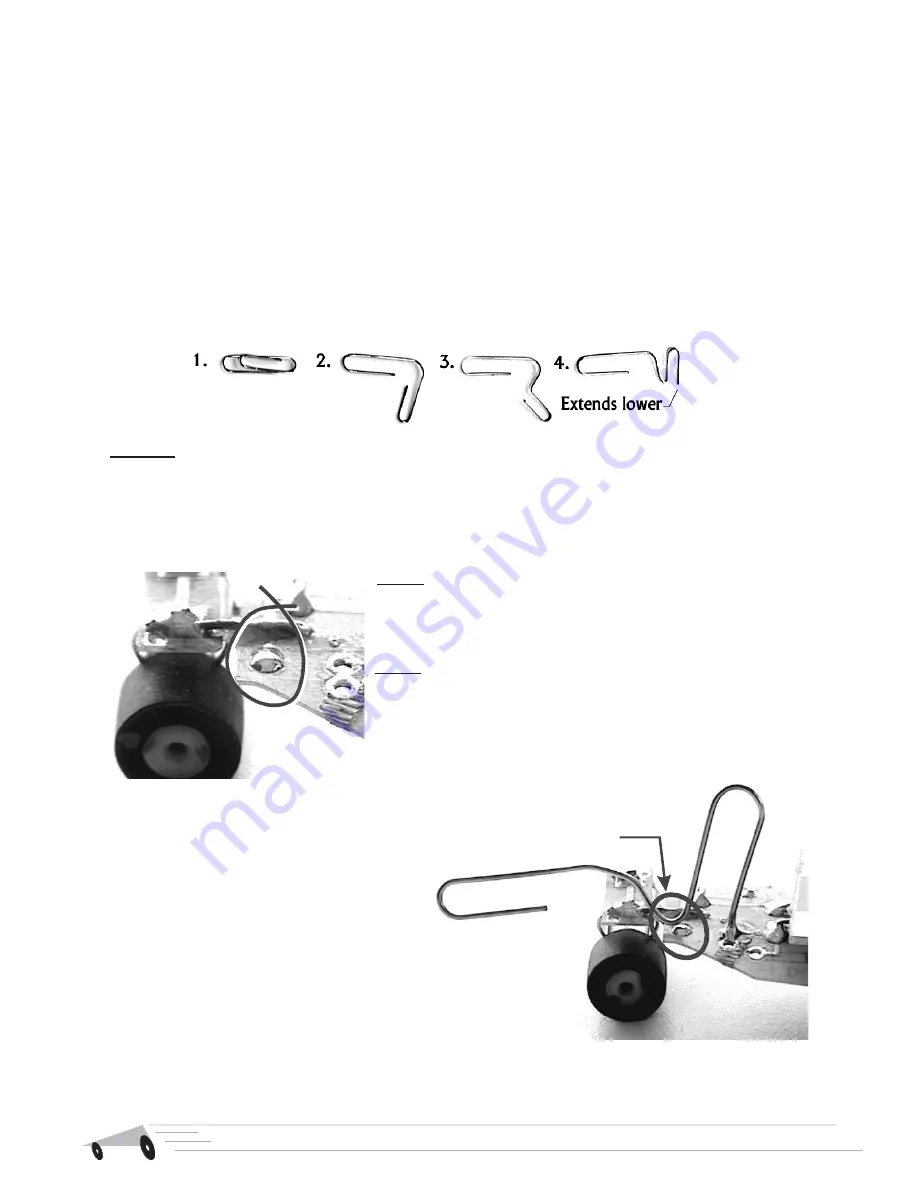
Step 1 - 4: Pretty straightforward - just follow the steps so that your paperclip looks like this one. The only
thing to watch is that the right end of the paperclip in step 4 should extend down a bit so that it can go in
the hole of the SolarSpeeder PCB.
Step 5: The next step is to place a solder blob on the pad indi-
cated. This will be the contact pad that the switch will touch to
activate the SolarSpeeder.
5.
Step 6: Solder the clip to the pad shown. Bend the clip so it just
clears the pad you put a solder blob on in step 5. The closer it is
without touching, the better.
There - now to activate your So-
larSpeeder manually, simple press down
on the end of the paperclip. The elbow
bend in the clip will contact the solder
blob, and activate the SolarSpeeder.
This clip also acts as a shorting gate for
solaroller racing. Hold it down to drain
all
the power from your Speeder, and
release it to start the charging cycle.
6.
The wire elbow comes
close, but doesn’t touch the
solderpad. When it touches -
ZOOOM!
10


