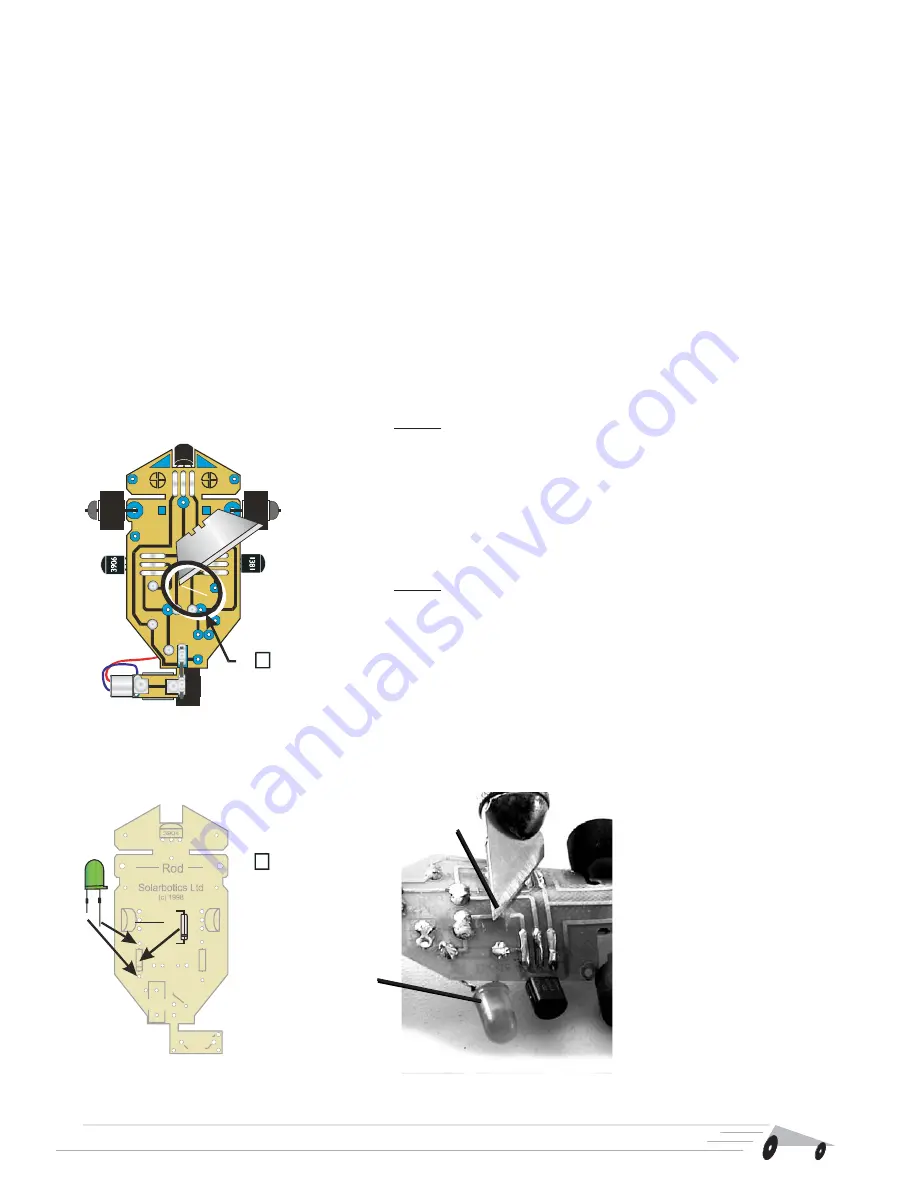
Diode Voltage Upgrade
This option allows you to trick your SolarSpeeder into storing more energy than usual
before it triggers. This means instead of 3 meter runs, you’ll be going somewhat farther, more
like 4 meters or more, but at the expense of a longer charge time. If you’re looking to get as
much performance out of your SolarSpeeder as possible, this upgrade is for you!
You have two options when performing this upgrade, one being to use a regular old diode
(little glass cylinder with a stripe on one end), or a regular old Light Emitting Diode (LED). Both
can be easily found in practically any discarded electronic device. Each one offers a difference
effect in what they will do for your SolarSpeeder. By itself, the SolarSpeeder will wait until it has
stored about 2.2 volts before firing. A regular diode will trick the SolarSpeeder into waiting for
2.4 volts, and a LED will force it to trigger at about 2.8 volts. More stored power means a
quicker and longer running SolarSpeeder, but also means a longer charge time.
Step 1: Using a sharp knife or razor, trim through the vertical trace
under the green soldermask that runs up from the “-” pad. Make
sure that trace gets fully cut through. Hold it up to the light to see if
you can see fully through where the trace is cut.
Doing this disconnects the 1381 voltage trigger from “viewing” the
voltage being stored.
Step 2: Install the LED (adds ~ 0.7 volts), OR the diode (adds ~
0.3 volts).
If you are installing the LED, make sure the shorter leg (the one
nearest the flat spot on the LED) goes into the lower hole. If you
don’t have enough space to fit the LED under the PCB, you can
solder it on the topside, or bend it out to the side where it won’t rub
the ground.
If you are installing the diode, make sure the end with the stripe
around it goes into the lower hole.
Note Cut
LED
There - that’s it. Assum-
ing your SolarSpeeder
worked before this modi-
fication, it will now store
up a bit more power be-
fore activating.
If it has stopped working,
chances are your LED/di-
ode is in backwards, or you
have a bad solder connec-
tion.
11
+
-
Make cut
through trace
TOP
1
Solar
Speeder
1.1
1381
3906
Op
t.
D
io
d
e
Mt
r
Re
d
Opt.
Switch
Mtr Blk
Clip
R
e
si
st
o
r
+
-
Solar
Speeder
1.1
1381
3906
Op
t.
D
io
d
e
Mt
r
Re
d
Opt.
Switch
Mtr Blk
Clip
R
e
si
st
o
r
+
-
OR
BOTTOM
2
Install the
LED or
diode


