
67
Bonfiglioli (formerly Vectron)
Connect the inverters to each other
•
Where to connect: Terminal strip inside the inverter.
•
3-pin wiring.
Procedure
1. Get access to the inverter interface.
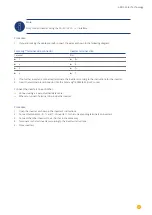
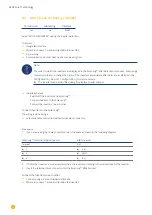
2. If you are making the cable yourself, connect the wires as shown in the following diagram:
Terminal strip inside the inverter
Terminal strip inside the inverter
RS485 terminal
RS485 terminal
►
1 A (Data+)
►
2 A (Data+)
►
6 GND
►
6 GND
►
3 B (Data-)
►
4 B (Data-)
3. Connect terminals on inverter 1 to the corresponding terminals on inverter 2.
4. Connect the other inverters to each other in the same way.
5. If no further inverter is connected, terminate the inverter:
Set the DIP S1 switch for the terminal resistor to ON.
6. Insert the terminal block connector into the Solar-Log™ RS485 socket.
Allocate communication address
•
Recommendation: Continuous numbering starting with 1 going to 30.
•
Setting: Using the inverter DIP switch.
•
Procedure: Start according to the inverter’s instructions.
Note
A maximum of 20 inverters can be connected per RS485 bus.
Summary of Contents for Solar-Log
Page 1: ...1 Components Connection Manual V 4 2 3 Solar Log EN ...
Page 20: ...20 01 Inverter ...
Page 398: ...398 Appendix 113Appendix 113 1 SMA mixed wiring Fig SMA mixed wiring ...
Page 402: ...402 02 Meter ...
Page 444: ...444 03 Battery Systems ...
Page 456: ...456 sonnen Note Only one battery system can be connected to a Solar Log device ...
Page 463: ...463 04 Heating rods ...
Page 470: ...470 05 Heating pumps ...
Page 478: ...478 06 Sensors ...
Page 488: ...488 07 Pyranometer ...
Page 495: ...495 08 Smart Plug components ...
Page 502: ...502 09 Power Charging Stations ...



![Lambrecht Ser[LOG] Operator'S Manual preview](http://thumbs.mh-extra.com/thumbs/lambrecht/ser-log/ser-log_operators-manual_3390951-001.webp)


