417
Solar-Log™ PRO
4.3.1
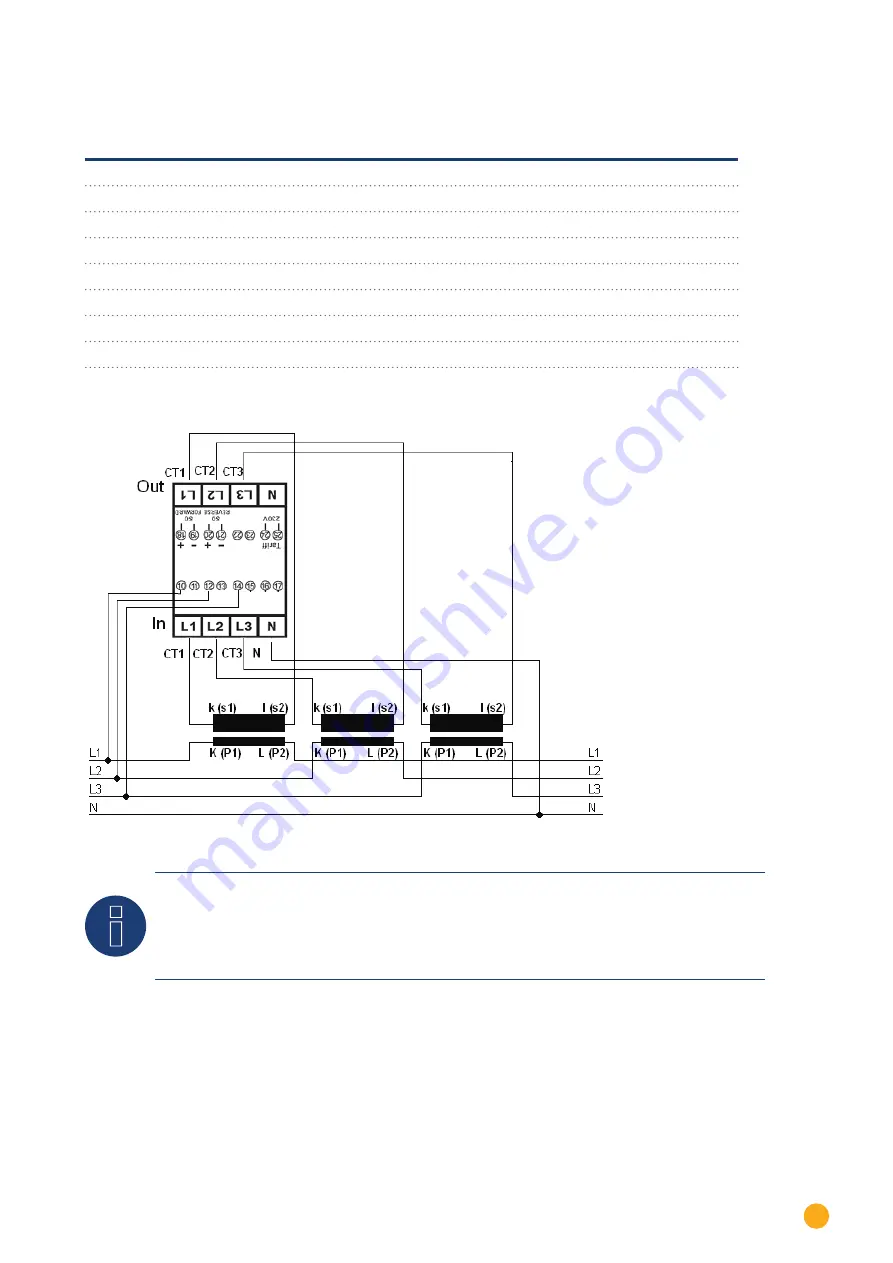
Connection diagram
according to circuit type 1000 (DIN 43856)
CT 1 (in) terminal k (s1) / (out) terminal l (s2)
10 Volts Phase 1 (10/11 internally bridged)
CT 2 (in) terminal k (s1) / (out) terminal l (s2)
12 Volts Phase 2 (12/13 internally bridged)
CT 3 (in) terminal k (s1) / (out) terminal l (s2)
14 volts phase 3 (14/15 internally bridged)
Terminal "N"
Neutral conductor connection "N"
Terminal 18, 19
S
o
pulse output "FORWARD" (terminal 18 = "+")
Terminal 20, 21
S
o
pulse output "REVERSE" (terminal 20 = "+")
Terminal 22, 23
ModBus connection terminal 22 -> A, 23 -> B
Terminal 24, 25
External tariff switching (230V AC)
The SO signal for the supply is not used when a meter is
connected to the Solar-Log™.
Fig.: Pin assignment
Note
We recommend using a fuse to safeguard the connection lines for the voltage measurement in
accordance with the local laws and regulations and with appropriate isolating switches and overload
protection devices.
Summary of Contents for Solar-Log
Page 1: ...1 Components Connection Manual V 4 2 3 Solar Log EN ...
Page 20: ...20 01 Inverter ...
Page 398: ...398 Appendix 113Appendix 113 1 SMA mixed wiring Fig SMA mixed wiring ...
Page 402: ...402 02 Meter ...
Page 444: ...444 03 Battery Systems ...
Page 456: ...456 sonnen Note Only one battery system can be connected to a Solar Log device ...
Page 463: ...463 04 Heating rods ...
Page 470: ...470 05 Heating pumps ...
Page 478: ...478 06 Sensors ...
Page 488: ...488 07 Pyranometer ...
Page 495: ...495 08 Smart Plug components ...
Page 502: ...502 09 Power Charging Stations ...


