background image

21

en

5�2�3  Connecting the inverter to the PV generator

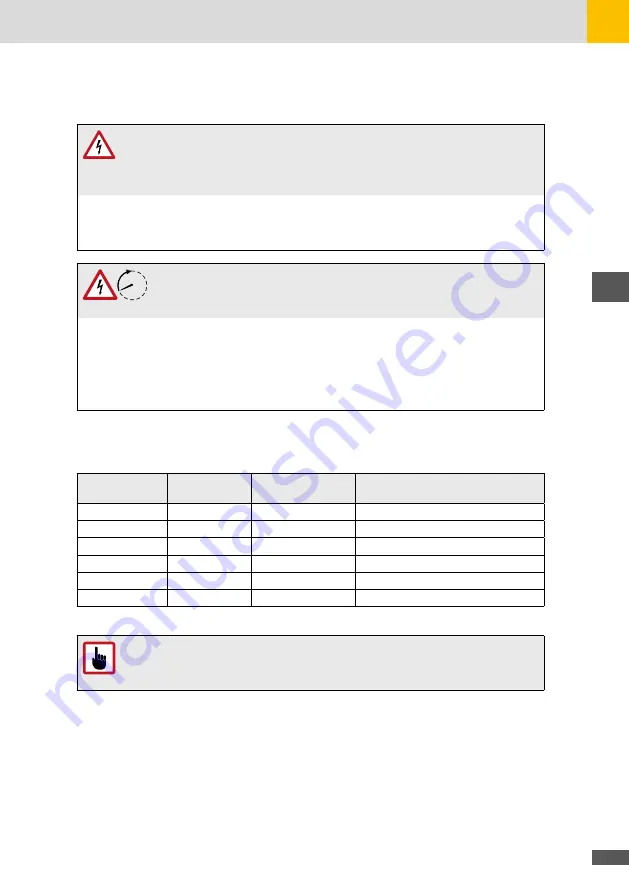
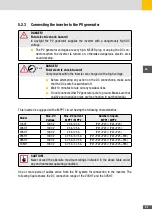
DANGER!
Fatal electric shock hazard!

In daylight the PV generator supplies the inverter with a dangerously high DC 
voltage.


The PV generator voltages are very high. NEVER plug or unplug the DC con-
nectors when the inverter is turned on, otherwise dangerous electric arcs 
could develop.

10 min

DANGER!
Fatal electric shock hazard!

Components within the inverter are charged with a high voltage.


Before attempting any action on the DC connections, make sure 
that the DC switch is switched off


Wait 10 minutes to rule out any residual risks  


Do not connect either PV generator pole to ground. Make sure that 
positive and negative poles are free floating to earth potential. 

This inverter is equipped with a MPPT circuit having the following characteristics:

Model

Max� DC 

Voltage

Max� DC Current 

MPP1 / MPP2

Number of inputs 

MPP1 / MPP2

17SHT

1000 V

25 A / 25 A

(PV1+PV2) / (PV4+PV5)

20SHT

1000 V

25 A / 25 A

(PV1+PV2) / (PV4+PV5)

22SHT

1000 V

25 A / 25 A

(PV1+PV2) / (PV4+PV5)

25SHT

1000 V

37.5 A / 37.5 A

(PV1+PV2+PV3) / (PV4+PV5+PV6)

28SHT

1000 V

37.5 A / 37.5 A

(PV1+PV2+PV3) / (PV4+PV5+PV6)

30SHT

1000 V

37.5 A / 37.5 A

(PV1+PV2+PV3) / (PV4+PV5+PV6)

CAUTION!

Never exceed the absolute maximum ratings indicated in the above table under 
any environmental operating condition.

One or more pairs of cables arrive from the PV system for connection to the inverter. The 
following figure shows the DC connection range of the 20SHT and the 30SHT:

Summary of Contents for 17SHT

Page 1: ...Instruction Manual SolarMax SHT series 17SHT 20SHT 22SHT 25SHT 28SHT 30SHT...

Page 2: ...SolarMax Produktions GmbH Zur Sch nhalde 10 D 89352 Ellzee E Mail info solarmax com SolarMax Produktions GmbH 2020...

Page 3: ...he installation location 14 4 3 Mounting the inverter 15 5 Electrical Connection 17 5 1 Safety 17 5 2 Connecting the inverter to the mains 17 5 2 1 Integrated RCD and RCM 17 5 2 2 Connection instructi...

Page 4: ...4...

Page 5: ...ustrial electronics technicians 1 3 Where to keep this manual The plant operator must ensure that this instruction manual is available to the relevant per sons at all times If this original document i...

Page 6: ...onductors to the inverter are de energized before starting any work on the inverter or the input conductors DANGER Fatal electric shock hazard Components within the inverter are charged with a high vo...

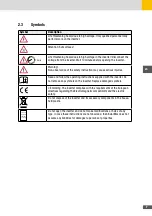
Page 7: ...llow the operating instructions supplied with the inverter Do not remove any symbols on the inverter Replace damaged symbols CE marking The inverter complies with the requirements of the European dire...

Page 8: ...IP rating IP65 Ambient temperature 25 60 C Compliency VDE AR N 4105 VDE 0126 1 1 CEI 0 21 SolarMax Produktions GmbH Zur Sch nhalde 10 89352 Ellzee Germany www solarmax com Fig 1 Label of SolarMax 30S...

Page 9: ...ltage not OK ON PV voltage OK 2 Grid indicator Blink Grid voltage absent or out of range It is not possible to connect the inverter to the grid ON with blinks every 30sec Normal operation The LED is n...

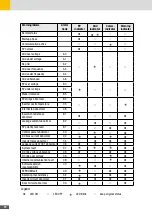
Page 10: ...l B3 Inverter overtemperature C5 Internal fan abnormal C8 Insulation resistance abnormal B1 Leakage current abnormal B2 PV polarity reversed B7 Control power abnormal C0 DC bias current abnormal C2 In...

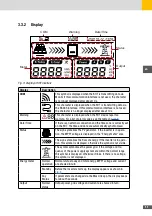
Page 11: ...time and date are automatically synchronised Status The sign symbolizes the PV generator If the inverter is in opera tion the MPPT voltage is displayed in the Energy meter area The sign symbolizes the...

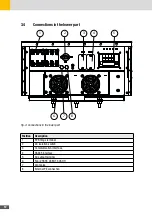
Page 12: ...3 4 5 6 8 7 Fig 4 Connections in the lower part Position Description 1 PV Strings terminal 2 DC Isolation switch 3 Communication interface 4 RS485 interface 5 AC output terminal 6 Fan 25SHT 28SHT 30S...

Page 13: ...nts Verify the presence of all the parts listed below and that the inverter does not show any visible damage Contact immediately the dealer in case of any parts missing or damaged G H K I Fig 5 Scope...

Page 14: ...now Install the inverter in an easily accessible location so that the maintenance work can be carried out easily Do not install the inverter in a place where personnel are likely to come into contact...

Page 15: ...system or substruc ture A mounting system is not included All commercially available mounting sys tems are suitable which guarantee permissible mounting The inverter is attached to the wall or to a mo...

Page 16: ...t the inverter on the monting bracket and tighten the inverter with rear panel using screws as shown in the following figure 4 Using a mounting system tighten the fixing screws on the back of the unit...

Page 17: ...icular for the section of the conductors the fuses and the Protec tive Earth PE connection 5 2 Connecting the inverter to the mains 5 2 1 Integrated RCD and RCM The SHT Series inverters are equipped w...

Page 18: ...5SHT 28SHT 30SHT 10 25 16 OT terminals requirements The inverter requires M6 OT terminals and a cable with the maximum cross sectional area of 25 mm2 Connecting AC Cables 1 Remove the external isolati...

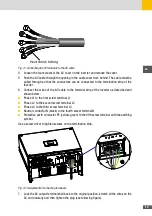
Page 19: ...l strip of the inverter as described and shown below Phase L1 to the first screw terminal L1 Phase L2 to the second screw terminal L2 Phase L3 to the third screw terminal L3 Neutral conductor N black...

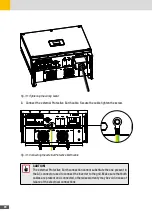
Page 20: ...Connecting the external Protective Earth cable CAUTION The external Protective Earth connection cannot substitute the one present in the AC connector used to connect the inverter to the grid Make sur...

Page 21: ...rator pole to ground Make sure that positive and negative poles are free floating to earth potential This inverter is equipped with a MPPT circuit having the following characteristics Model Max DC Vol...

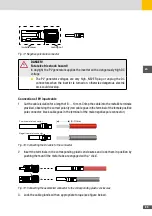
Page 22: ...the inverter to the PV gener ator In particular PVC and H07RN F non tinned cables are NOT recommended The PV cables must be terminated with the Amphenol H4 MC4 compatible provided with the inverter If...

Page 23: ...mm Crimp the cable into the metallic terminals provided observing the correct polarity red cable goes in the terminal of the female positive pole connector black cable goes in the terminal of the mal...

Page 24: ...bottom of the inverter and push them until they are locked by a click of the plastic side tabs PV PV PC Fig 22 Connecting the assembled cable to the SHT inverter 6 After connecting the PV strings ensu...

Page 25: ...ndicate a successful grid connection the inverter is connected and ready for operation Powering OFF the inverter To take the inverter out of operation carry out the following steps 1 Switch off the ci...

Page 26: ...e inverter via WLAN When the inverter is switched on it generates a local WLAN network access point Any mobile device smartphone tablet can connect to the Access Point The name of the WiFi network SSI...

Page 27: ...sicher dass kein weiteres mobiles Ger t mit dem Wechselrichter verbunden ist Go to your phone s Setting WLAN and select the inverter WiFi access point the SSID name shows the inverter serial number th...

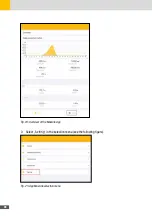
Page 28: ...28 Fig 24 Overview of the MaxLink App 2 Select Setting in the selection menu see the following figure Fig 25 App MaxLink selection menu...

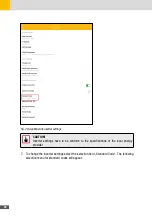
Page 29: ...gs 4 Enter the administrator password to change inverter data Use the password admin see the following figure 5 Select buttton Login as Administrator Fig 27 Login to the inverter 6 If the login was su...

Page 30: ...ings CAUTION Inverter settings have to be conform to the specifications of the local energy provider 7 To change the inverter settings select the selection field Standard Code The following selection...

Page 31: ...er operating conditions If the proposed measures do not eliminate the fault contact the SolarMax Service Centre Problem Ma nahmen zur Stprungsbehebung All the LEDs are turned off Check if the DC disco...

Page 32: ...C and AC If the abnormal behaviour persists contact your dealer or the SolarMax service center via email or hotline 8 2 SolarMax Service Center If you have technical questions or difficulties our Serv...

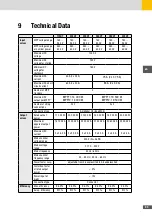
Page 33: ...19 500 W Number of string connections 2 x 2 3 x 3 Connection type Amphenol H4 type MC4 Output values Rated output power 17 000 W 20 000 W 22000 W 25 000 W 28 000 W 30 000 W Maximum apparent output po...

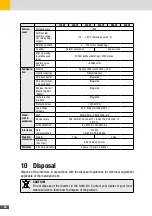
Page 34: ...id protection interface Integrated Protection class I IEC62103 Overvoltage category PV II Mains III IEC62109 1 Stand ards guidelines EMC EN 61000 6 2 EN 61000 6 4 Device safety VDE AR N 4105 IEC61727...

Page 35: ...24 months from purchase date but max 30 months after delivery of device by SOLARMAX Junction Box 32HT2 60 months from purchase date but 72 months after delivery of device by SOLARMAX Deviating writte...

Page 36: ...replacement material available at a reasonable expense SOLARMAX is authorized to replace the defect device In this case the above mentioned terms of replacement are applicable 3 Duration of Guarantee...

Page 37: ...epage The purchase of a guarantee extension will be confirmed by SOLARMAX with a Guarantee Certificate Series Number of Product In case of a replacement this certificate will not be adjusted to the ne...

Page 38: ...hall exclusively be Augsburg Germany as far as this is permitted by law Appendix Country List Austria Belgium Bulgaria Czech Republic Denmark France Germany Greece Italy Liechstenstein Luxembourg Neth...

Page 39: ...39 en...
Page 40: ...7840 CH 41 315281165 ES 34 93 2203859 GB 44 20 38080346 IT 39 0418520076 FR 33 820 420 684 Fax 49 3733 50784 99 Mail hotline solarmax com SolarMax Service Center You will find all contact information...

Reviews: