background image

Subject to change | © 2019 SOLARWATT GmbH | AZ-TM-PMS-1339 | Rev 001 | Version: 12/2019

Page 39

or gross negligently did not know that no valid Warranty claim 

event was given.

5.  If  a  Warranty  service  of  SOLARWATT  is  unsuccessful, 

 SOLARWATT is entitled to repeat the same form of Warranty 

service or to provide a different service, unless this is unrea

-

sonable for the End Customer.

E  Exclusion of the Warranties

1.  The  Warranty  does  not  extend  to  Solar  Modules  that  are 

impaired, damaged or destroyed as a result of

a) being improperly stored or transported by the End Custo

-

mer or a third party,

b) not being installed or, if applicable, uninstalled or reinstal

-

led, in accordance with the SOLARWATT installation instruc-

tions and the recognized good engineering practices,

c) being operated in a manner inconsistent with the intended 

purpose and especially the instructions for operation in the 

assembly manual,

d) not being maintained properly, in particular not in accor

-

dance with the maintenance instructions in the assembly ma-

nual,

e) being improperly modified by the End Customer or a third 

party or being otherwise improperly manipulated, or

f) of force majeure (in particular lightning, fire or natural disas

-

ter). The insurance performance pursuant to the SOLARWATT 

Full Coverage remains unaffected in this respect.

2.  Insignificant  changes  or  changes  in  appearance,  in  parti

-

cular bleaching and discoloration of cells shall not constitu-

te a Warranty claim event pursuant to the Product Warranty 

pursuant to Section B. The Performance Warranty pursuant to 

Section C remains unaffected.

3. The Warranty is furthermore excluded if the End Customer 

manipulates or removes the serial number or type plate of the 

Solar Module.

4. The End Customer bears the burden of proof that the War

-

ranty has not been excluded due to the aforementioned rea-

sons. This does not apply to circumstances which lie within 

SOLARWATT‘s sphere of responsibility or that of SOLARWATT’s 

vicarious agents.

5. The End Customer‘s Warranty claim is not valid if the no

-

tification period set forth in Section G.3 is exceeded unless 

the End Customer has not culpably exceeded this notification 

period.

F  Transfer to a new owner

If the End Customer sells and transfers the title to the Solar 

Module on, this warranty is transferred to the new owner of 

the Solar Module to the extent of the remaining Warranty 

Term. The respective new owner is then considered the End 

Customer for the purposes of these Warranty Conditions. In 

this event, this Warranty expires for the prior End Customer.

G  Provisions on the assertion of Warranty claims

1. Warranty claims can only be asserted to SOLARWATT in wri

-

ting and by submitting a copy of the original invoice of the de-

aler/installer from which the solar module was purchased (wi-

thout prejudice as to whether they are part of the  SOLARWATT 

distribution  network).  For  this  purpose,  the  complaint  form 

for end customers is available online at http://www.solarwatt.

com. 

Further documents (e.g. photos, records, etc.) must be provi

-

ded at SOLARWATT‘s request.

2. The existence of a Warranty claim event due to the sponta

-

neous breakage of the glass without any external influences 

or due to a reduced output of a Solar Module must be verified 

by an expert appraisal performed by SOLARWATT, a third party 

commissioned by SOLARWATT or an independent testing in-

stitute approved for module certifications in accordance with 

IEC 61215.

3. If an obvious Warranty claim event occurs, the End Custo

-

mer must bring a claim in respect of this Warranty claim event 

as soon as possible and in any event no more than three (3) 

months  after  discovery  of  the  Warranty  claim  event.  Claims 

received after this time may be considered at SOLARWATT’s 

sole discretion. 

Recognizable transport damages should be reported using 

the  claim  form  for  transport  damages,  available  from  www.

solarwatt.com.

H  Notice for EasyIn 60M style solar modules

The EasyIn 60M style solar modules with the additionally sup

-

plied and/or optional SOLARWATT installation components to 

be purchased (seals, roof integration, enclosure frame) must 

be installed correctly and professionally according to the res-

pective installation instructions by the respective installer for 

protection from rain.

I  Limitation of liability

1. Any claims for damages or expenses against SOLARWATT 

irrespective of the legal basis (contract, tort or any other area 

of law) out of or in connection with the Warranty pursuant to 

these Warranty Conditions or Warranty services are excluded. 

SOLARWATT shall in no event and irrespective of the legal 

basis be liable to pay damages to the End Customer for loss 

of profit or revenue, loss of use, loss of data, cost of capital, 

down-time costs, cost of substitute goods, property damage 

external to the Solar Modules and any damage or loss arising 

out of such damage or any special, incidental, indirect or con-

sequential damage. This also applies if such damage occurs at 

a third party‘s premises. The insurance performance pursuant 

to the SOLARWATT Full Coverage remains unaffected in this 

respect.

2. The aforementioned limitations of liability do not apply if 

SOLARWATT is liable pursuant to product liability law, in cases 

of willful intent, gross negligence, injury to life, body or health, 

or breach of material contractual obligations, i.e. obligations 

that actually enable the proper execution of the contract in 

the first place and which the End Customer can regularly and 

fully expect to be met. Compensation for breach of material 

contractual obligations is, however, restricted to foreseeable 

losses arising from the type of contract, provided no willful 

intent or gross negligence is involved, there is no injury to life, 

body or health, and SOLARWATT is not liable under product 

liability law.

J  Final provisions

1.  These  Warranty  Conditions  are  subject  to  German  law  to 

the exclusion of the conflict of laws and the United Nations 

Convention on Contracts for the International Sale of Goods 

(CISG). This does not affect the End Customer’s rights under 

mandatory local law. 

2. If any individual provisions of these Warranty Conditions 

are or become invalid, the validity of the remaining provisions 

remains unaffected.

Summary of Contents for EasyIn 60M Series

Page 1: ...Important Installation and Assembly instructions Read the instructions before starting the installation of the EasyIn modules EasyIn 60M style EN Installation Instructions...

Page 2: ...r roof tile area 12 5 3 5 Optimum number of roof tile rows 12 5 3 6 Batten joints between rafters 12 5 3 7 Examples of batten layouts for a roof pitch of 30 65 12 5 4 Horizontal module field dimension...

Page 3: ...dule connection at the top module field edge 26 6 5 Side module connection 27 6 6 Cable ducting through the roof 28 6 7 Installation of the roof top enclosure frame 29 7 The principle of rear ventilat...

Page 4: ...familiar with installation on the basis of their occupational qualifica tions Modules should be installed and connected only by trained authorized personnel These personnel must be familiarized with...

Page 5: ...perty which could consequently pose a risk to people IMPORTANT Failure to comply with the installation instructions results in the warranty and guarantee becoming null and void and to the exclusion of...

Page 6: ...must absolutely be avoided It is recommended that the SOLARWATT EasyIn modules are stored in a dry and frost free place in their original pack aging until they are installed Please also observe the wa...

Page 7: ...ass II Hail resistance Tested with simulated hailstones 25 mm at 83 km h Fire resistance test DIN ENV 1187 Installation location Upright as roof integration in pitched roofs on buildings up to 18 m hi...

Page 8: ...efore to be laid out and installed on a case by case basis by each install er A few helpful notes will be provided in this regard During the design process of the EasyIn system relevant structural pre...

Page 9: ...ture chosen As specified in the EasyIn planning sheet the minimum spacing between module field and eave must be complied with for the following reasons Increased wind load at the roof edges Construct...

Page 10: ...he eave and ridge and adapt it together with the batten spacing LA to the circumstances of your roof NOTE NOTE NOTE Figure 3 Layout of battens for modules and roofing frame Layout of battens for roof...

Page 11: ...65 B 310 mm for roofing frame 22 29 5 3 3 Battens 1 6 under each module Table 1 Shows another overview of the batten spacings and tolerances for the batten layout underneath the solar module The refe...

Page 12: ...rows Table 2 on page 13 includes for each number of mod ule rows the respective optimum number of tile rows With this number of tile rows there are no dimensional overlaps of battens from the module a...

Page 13: ...132 94 Finkenberger Pfanne 150 0 0 7 296 332 124 88 1 Water seam on the top roof tile end ground down on tiles on batten U 2 Above batten U 5 4 Horizontal module field dimensions 5 4 1 Horizontal mod...

Page 14: ...222 7 237 8 252 9 267 10 282 11 297 12 312 5 4 2 Side batten ends in transition between module and tile field The following figures show the necessary batten projections on the left and right side of...

Page 15: ...Subject to change 2019 SOLARWATT GmbH AZ TM PMS 1339 Rev 001 Version 12 2019 Page 15 Figure 5 Figure 6 Figure 7 Figure 8...

Page 16: ...les or flat headed nails The final fastening is done by applying the counter batten Stricter requirements for fastening counter battens apply in the module field area These are described in Chapter 6...

Page 17: ...head screw 6 x 80 6 2 4 Start of installation with batten U and bat ten 1 First install batten U according to your layout plan As spacing A refers to the top edge of supporting board 98x20 batten 1 i...

Page 18: ...2 7 Laying batten 6 Aluminum guide rail 40x40 on the fastening plate The first aluminum guide rail must be laid with a spacing of 1 642 mm to the top edge of the supporting board 98 x 20 Here it is es...

Page 19: ...il 6 of module row 1 is used as a reference surface Battens 12 13 14 15 and aluminum guide rail 16 are to be arranged in the same way and must be fastened as described in Chapters 6 2 6 to 6 2 7 Compl...

Page 20: ...all any modules in the lowest module row the relevant lower enclosure frame must already be laid there Please always follow the relevant installation instructions for the enclosure frame NOTE NOTE NOT...

Page 21: ...to the batten using two wood screws 6 x 60 with the steepest angle possible between screw and roof batten Screw in the two other mounting brackets in the same way see Figure 19 IMPORTANT Please ensure...

Page 22: ...rse seal groove see Figure 22 The nib of the transverse seal clip see Figure 23 should protrude into the small notch on the transverse seal groove in order to fix the position of the transverse seal c...

Page 23: ...ch supported by using a transverse seal clip see Figure 25 and Figure 26 Figure 24 Figure 25 Small notch to secure the position of the transverse seal clip to the left and right mod ule field side 24m...

Page 24: ...es both the affixed spacers of module 1 ex pansion gap 2 mm Module 2 is held on the right side by module 1 and is fixed in position with only the 4 mounting brackets on the left side The mounting brac...

Page 25: ...n a specific instal lation sequence 1 16 which is shown in the figure with an example of a module field with 4 x 4 modules The installation starts in the bottom right corner with Module M1 and progres...

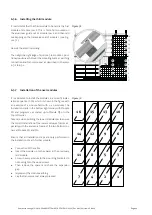
Page 26: ...nection at the top module field edge Shorten all projecting ends of the laid transverse seals on the left and right side of the module field around 3 mm next to the ends of the transverse seal clip Fi...

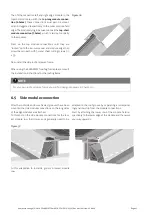
Page 27: ...oof enclosure frame When using the SOLARWATT roofing frame please consult the installation instructions for the roofing frame Figure 36 NOTE For your own roof enclosure frame you will find design prop...

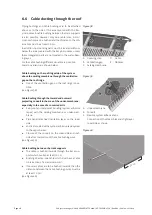
Page 28: ...re 38 Cable bushing through the inward and outward projecting conduit in the area of the under membrane especially in the case of a converted attic Rainproof and windproof bonding system adhesive tape...

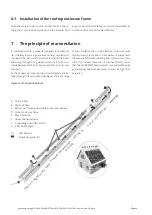
Page 29: ...the air heats up it rises due to its lower density and es capes through the ventilation openings at the roof s ridge or the ventilation tiles to be attached Colder air with higher density is sucked in...

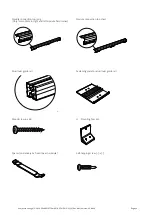
Page 30: ...red parts are in a due and proper condition NOTE If a SOLARWATT EasyIn roofing frame has been purchased also check the delivery of the roofing frame for completeness and correctness of all parts using...

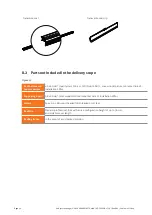
Page 31: ...31 Module connection top long Only for modules in right and left module field corner Module connection top short Aluminum guide rail Fastening plate for aluminum guide rail Wood screw 6 x 60 H Mounti...

Page 32: ...s 40 x 60 mm quality class S10 acc to DIN 4074 Part 1 max wood moisture content at time of installation 20 Supporting board 98 x 20 mm max wood moisture content at time of installation 20 Screws Spax...

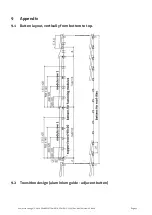
Page 33: ...Subject to change 2019 SOLARWATT GmbH AZ TM PMS 1339 Rev 001 Version 12 2019 Page 33 9 Appendix 9 1 Batten layout vertically from bottom to top 9 2 Transition design aluminium guide adjacent batten...

Page 34: ...Subject to change 2019 SOLARWATT GmbH AZ TM PMS 1339 Rev 001 Version 12 2019 Page 34...

Page 35: ...Subject to change 2019 SOLARWATT GmbH AZ TM PMS 1339 Rev 001 Version 12 2019 Page 35 9 3 Total spacing D and LA for different roof tiles...

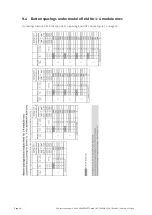
Page 36: ...2019 SOLARWATT GmbH AZ TM PMS 1339 Rev 001 Version 12 2019 Page 36 9 4 Batten spacings under module field for 1 4 module rows For spacings measured from the top side of supporting board 98 x 20 see Fi...

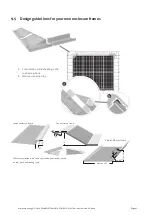
Page 37: ...own enclosure frames A Cross section metal sheeting in the top frame groove B Module connection top A B 25 Side enclosure frame Top enclosure frame Other measurements are to be specified operationall...

Page 38: ...ule as indicated by SOLARWATT on the respective Solar Module minus a toleran ce range of 5 under Standard Test Conditions irradiance 1 000 W m spectral distribution AM 1 5 temperature 25 2 C hereinaft...

Page 39: ...os records etc must be provi ded at SOLARWATT s request 2 The existence of a Warranty claim event due to the sponta neous breakage of the glass without any external influences or due to a reduced outp...

Page 40: ...happy to help you SOLARWATT GmbH Maria Reiche Str 2a 01109 Dresden Germany Tel 49 351 8895 0 Fax 49 351 8895 100 info solarwatt com Certified acc to ISO 9001 14001 und 50001 BS OHSAS 18001 2007 www so...

Reviews: