L
oad
( L )
L
oad
( N )
G
r i d
( L )
G r i d
( N )
Max. Input Voltage
Max. Short Current
Battery Voltage Range
Max. Charge/ Discharge Current
Installation Speci cation
Dimension (L*W*H)
Weight
Operating Temperature
Installation
600 V d.c.
20 A/ 20 A
80 - 480 V d.c.
30 A/ 30 A
185 mm * 533 mm * 437 mm
10 kg
-
35 ... + 60
°
C
Wall Mounted
614.00741.00
Rated Grid Voltage , Frequency
Max. Grid Input Current
220/ 230 V a.c., 50/ 60 Hz
40 A
Rated Grid Voltage , Frequency
Max.Load Current
220/ 230 V a.c., 50/60 Hz
32.6 A
Grid(L/N)
Load(L/N)
L2=L1+3mm
L=
12
mm
L
L=
12
m
m
L
L
L=
12
mm
L1
Grid(L/N)
Load(L/N)
Hexagon keys
Torque: 1.5±0.2 N
·
m
Hexagon keys
Torque: 1.5±0.2 N
·
m
Philips screwdriver
Torque: 1.5±0.2 N
·
m
Philips screwdriver
Torque: 1.5±0.2 N
·
m
Diagonal Plier
Crimping Plier
b)
a)
⑦⑧⑨⑩
b)
a)
⑦⑧⑨⑩
N N
6. Wiring Connection
7. Technical Parameters
Philips screwdriver
Torque: 1.5±0.2 N
·
m
Crimping tool
N-terminal adjacent
bridge*1
RJ 45 terminal
Diagonal Plier
Grid(PE)
Load
(L)
Load
(N)
GRID
(L)
GRID
(N)
BAT(+) BAT(-)
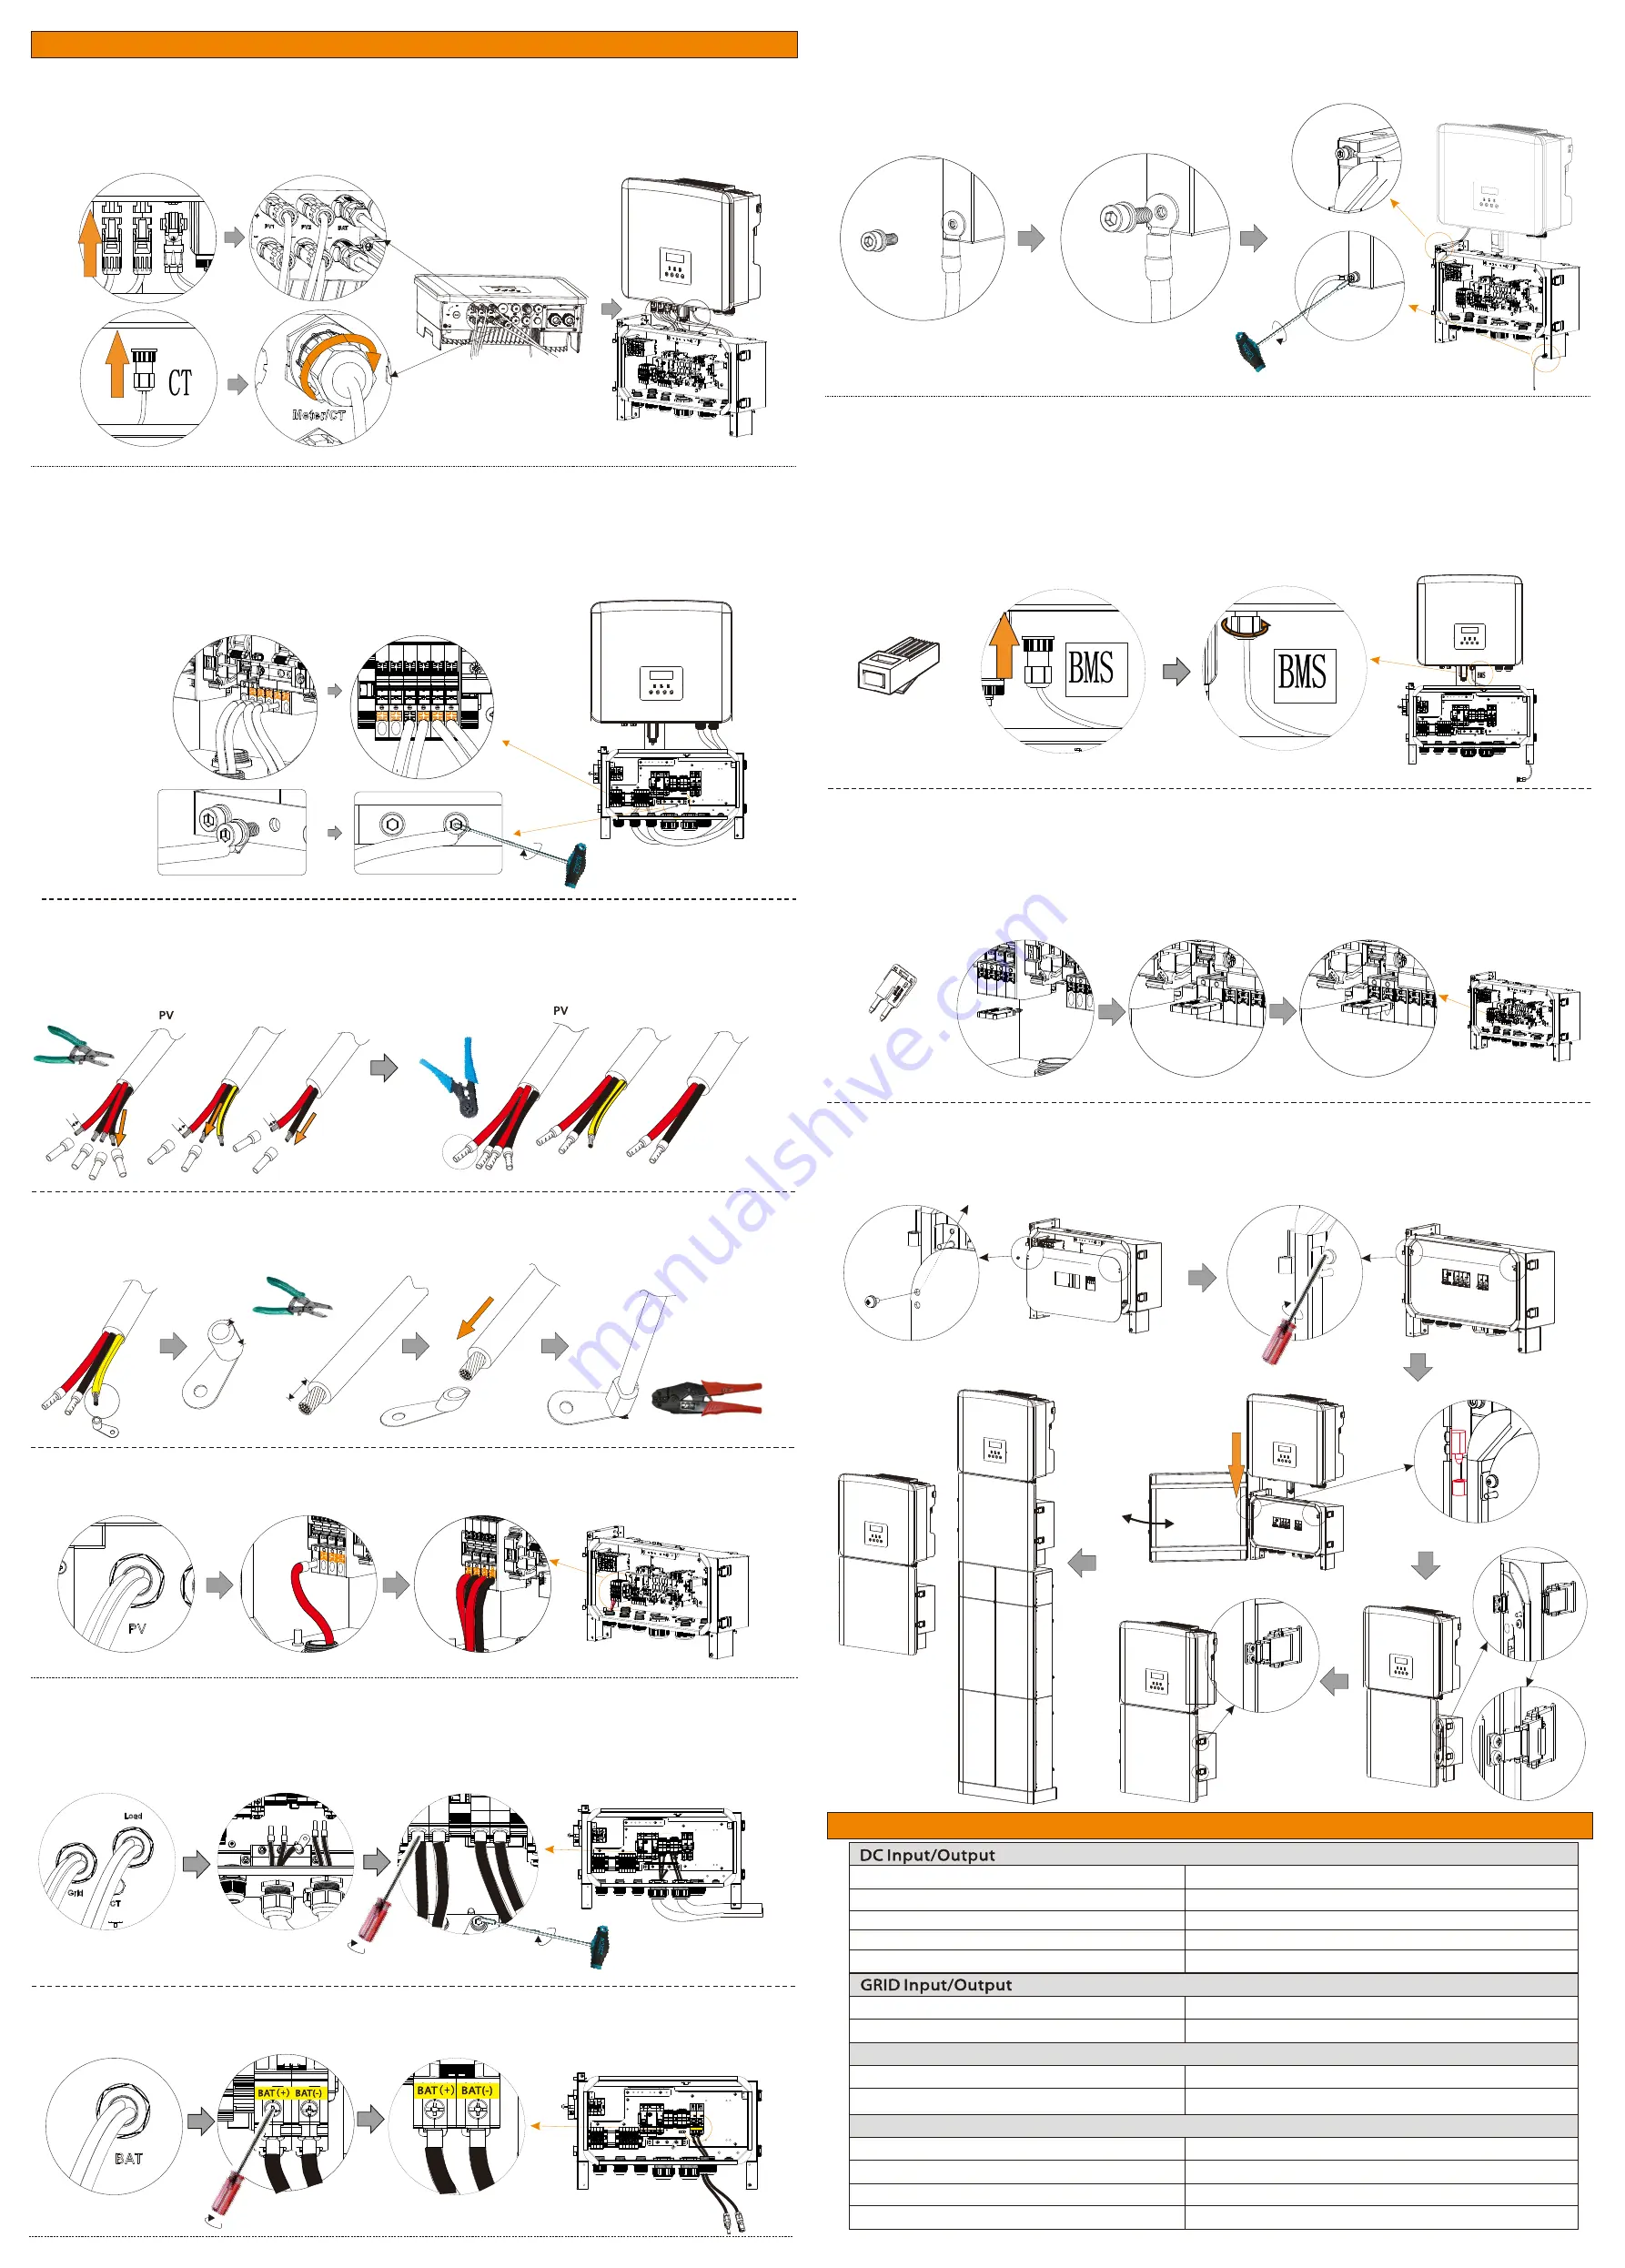
6.1 Inverter side connection
a) According to the PV1(INV )+/PV1(INV )-/PV2(INV )+/PV2(INV )-BAT(INV )+BAT(INV )-l line symbol on
X1-Matebox, correspond to the PV 1+/PV1-/PV2+/PV2-/BAT+/BAT- ports of the inverter.
b) Connect the CT cable of the X1-Matebox to the CT port of the inverter, and tighten the waterproof
plug.
1) Connect the Grid1 L/N and Off-grid1 L/N/PE lines between the inverter and X1-Matebox. The
connection method is as follows:
a) First, insert Grid1 L/N and Off-grid1 L/N into the X1-Matebox port rmly, and then gently pull to check
if they are connected properly;
b) Connect to the Grid (PE), use a hexagonal keys to tighten the screw;
2) PV (PV1
+/
PV1
-
PV2
+/
PV2
-)/
Grid (L/N/PE)/ Load (L/N) side connection
a) PV (PV1+/PV1-/PV2+/PV2)/ Grid (L/N/PE)/ Load (L/N) wire, remove the 12 mm insulation layer at the
end of the wire. Insert the European-style terminals respectively. The stripped terminals must be
inserted into the European-style terminals and nally pressed down with the crimping pliers.
b) Grid (PE) strip the grounding cable insulation (lenhth “L2”), insert the stripped cable into the R type
terminal, and then clamp it.
Pass the PV line through the PV port of the X1-Matebox, and then nd PV1+/PV1-/PV2+/PV2+ port.
insert the X1-Matebox. Force the wire harness directly into the hole to jam, gently twist not to loosen.
4) Pass the Grid/Load line through the Grid/ Load port of the X1-Matebox, then nd the Grid (L/N) and
Load (L/N) ports in the X1-Matebox, insert each line accordingly, and use the screwdriver to lock the
Grid (PE) is secured with an inner hexagon keys.
5) Pass the battery power wire through the BAT port of the X1-Matebox, then nd the BAT+ and
BAT- ports in the X1-Matebox, insert each wire accordingly, and use the philips screwdriver to lock the
screws.
There are two areas that need to be grounded, one between the inverter and X1-Matebox and the other
between the X1-Matebox and the battery.
-When the distance between the X1-Matebox and the battery is < 1 m, you can use the BMS
communication line in the accessory bag.
-When the distance between the X1-Matebox and the battery is > 1 m, you need to prepare the regular
network cable and nd the Rj45 terminal of the accessory package to make the cable.
The BMS port connection between the inverter and the battery (for the speci c connection method,
please refer to the inverter and battery quick installation guide)
-If the user requires wiring rules for neutral wires the standby power supply cannot be isolated or
switched. (for wiring Australia and New Zealand regulations AS/NAs_3000:2012)
- Firstly, nd N-terminal adjacent bridge in the accessory package.
- Forcibly insert N-TERMINAL adjacent bridge into the N-terminal hole and jam it. Gently twist and
do not relax.
6.6 Finally, use a Phillips screwdriver to install the baffle back, install the upper
cover, and then lock the buckle by hand.
6.5 N lines short circuit (applicable in Australia)
6.4 Battery’s communication wire connection
6.3 Ground wire connection
6.2 X1-Matebox side connection
Hexagon keys
Torque: 1.5± 0.2 N.m
LOAD
Max. MPPT Current
16 A


