2
/
3
DESCRIPTION
SP-1011DLR Soldering & Reworking Station is suitable for soldering and desoldering all type of surface mounted IC and prevents any
damage to the PCB or components. This tool is used in the fields of electronic research, teaching and production, especially in the
repairing and reworking on the electronic appliances and communication equipments.
TECHNICAL SPECIFICATION
STATION
SOLDER
HOT AIR SMD REWORK
INPUT VOLTAGE
220-2400VAC
VOLTAGE
24VAC
VOLTAGE
110-130VAC
220-2400VAC
POWER
CONSUMPION
60W+320W
POWER
60W
HEAT UP RATING 130W
CAPACITY
24L/MIN(MAX)
MAIN FUSE
3A
TEMPERTURE
160
℃
-480
℃
POWER
320W
AIR PUMP
DIAPHRAGM
HEATING ELEMENT
CERAMIC HEATER
TEMPERAT.
160
℃
-480
℃
OPERATING INSTRUCTIONS
Caution
:
Make sure that the four screws which are used to fasten the Diaphragm pump are removed from the control system
before use. Otherwise serious damages may be caused to the user and the system.
1.
Place the soldering iron and the hot air gun in the holder separately. Then connect the plug to the receptacle on the station and
turn clockwise to tighten the plug nut. Check that the power supply is corresponding to the specification on the type plate and
the power switch is on the “OFF” position. Connect the control unit to the power supply and switch on the power and then
switch on the soldering iron or the SMD rework unit at the power switch. Then a self-test is carried out in which all display
elements are switched on briefly. The electronic system then switches on automatically to the set temperature and displays this
value.
Caution:
When the power supply is connected (while the power switch is on the “OFF” position), the soldering iron and the hot air
gun will be on the pre-heating status, and the hot air gun will blow air automatically for one minute.
2
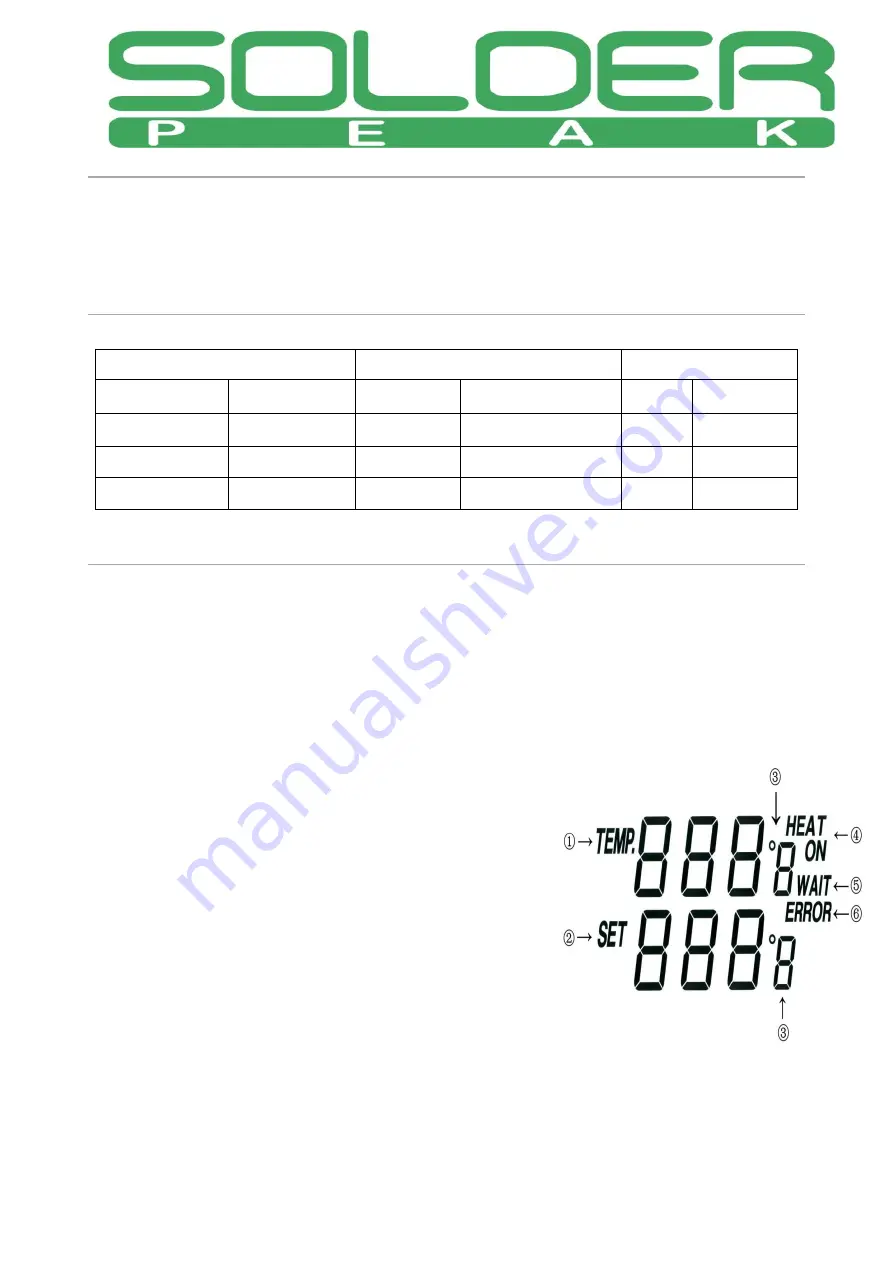
The display and temperature setting
The digital display:
①
shows the actual temperature of the soldering tip or the nozzle of the hot air
gun.
②
shows the setting temperature. Pressing the “UP” or “DOWN” button can switch
the digital display to the set point display. The set-point can be changed for ±1
℃
by
tapping the “UP” or “DOWN” button. Pressing the button will change the
set-point quickly. The digital display will return automatically to the actual value
and the iron will reach to the setting temperature quickly.
③℃
/
℉
display: Switching the temperature display from
℃
to
℉
by pressing
the “
℃
/
℉
”button and then the electronic system will display the actual
temperature
①
and setting temperature
②
in
℉
, and vice versa.
④
When the actual temperature on the soldering tip of the nozzle is less than the
set-point, “HEAT ON” will display and make the soldering tip or the nozzle
heating up.
⑤
When the absolute offset is more than ±10
℃
between the actual temperature
and the set-point on the soldering tip or the nozzle, “WAIT” will display. It means that the temperature electronic control
system is not in the stable situation, we should wait a moment to let the “WAIT” disappear.
⑥
When “ERROR” display, there may be a trouble on the system, or the soldering iron is not connected to the control system
correctly.
Summary of Contents for SP-1011DLR
Page 1: ...1 3 SP 1011DLR...


