


Dyaco Canada Inc. 2013
30
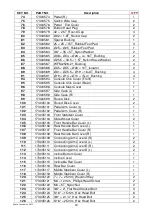
KEY NO.
PART NO.
Description
Q
’TY
127
173035127
1/4" × 3/4"_Hex Head Bolt
4
128
173035128
3/8" × 2-1/2''_Hex Head Bolt
1
129
173035129
M10 × 130m/m_Hex Head Bolt
1
130
173035130
3/8'' × 19m/m_Hex Head Bolt
4
132
173035132
3/8" × 3/4"_Hex Head Bolt
4
133
173035133
3/8" × 1-1/2"_Hex Head Bolt
2
134
173035134
5/16" × 1-1/4"_Hex Head Bolt
2
135
173035135
5/16" × 2-1/4"_Hex Head Bolt
4
136
173035136
M8 × 40L_Socket Head Cap Bolt
2
137
173035137
3/8" × 2-1/4"_Socket Head Cap Bolt
2
138
173035138
5/16" × 2"_Button Head Socket Bolt
2
139
173035139
M5 × 15m/m_Phillips Head Screw
41
140
173035140
M5 × 10m/m_Phillips Head Screw
12
141
173035141
M5 × 10m/m_Phillips Head Screw
6
142
173035142
Ø3.5 × 12m/m_Sheet Metal Screw
18
144
173035144
3.5 × 16m/m_Sheet Metal Screw
8
145
173035145
M6 × 10m/m_Phillips Head Screw
4
146
173035146
5 × 16m/m_Tapping Screw
14
147
173035147
5 × 19m/m_Tapping Screw
10
148
173035148
5 × 16m/m_Tapping Screw
9
149
173035149
Ø3 × 20m/m_Tapping Screw
4
150
173035150
M5 × 20m/m_Flat Head Socket Screw
4
151
173035151
Ø3.5 × 16m/m_Tapping Screw
4
152
173035152
Ø25_C Ring
2
153
173035153
Ø17_C Ring
5
154
173035154
Ø10_C Ring
2
155
173035155
M10 × 8T_Nyloc Nut
1
156
173035156
M8 × 7T_Nyloc Nut
1
157
173035157
3/8" × 7T_Nyloc Nut
13
158
173035158
1/4"_Nyloc Nut
4
159
173035159
5/16" × 7T_Nyloc Nut
5
160
173035160
3/8" -UNF26 × 4T_Nut
2
161
173035161
3/8" -UNF26 × 11T_Nut
2
162
173035162
3/8" × 7T_Nut
8
164
173035164
3/8" × 19 × 1.5T_Flat Washer
28
165
173035165
3/8" × 30 × 2.0T_Flat Washer
2
168
173035168
5/16" × 35 × 1.5T_Flat Washer
4
169
173035169
5/16" × 23 × 1.5T_Flat Washer
5
170
173035170
5/16" × 20 × 1.5T_Flat Washer
6
171
173035171
5/16" × 35 × 2.0T_Flat Washer
4
172
173035172
1/4" × 19m/m_Flat Washer
15
173
173035173
Ø17× 23.5 × 1T_Flat Washer
1
174
173035174
M8 × 170m/m_J Bolt
1
175
173035175
Ø25_Wave Washer
6
176
173035176
Ø17_Wave Washer
8
179
173035179
M8 × 20m/m_Carriage Bolt
1
180
173035180
3/8" × 2T_Split Washer
2


