background image

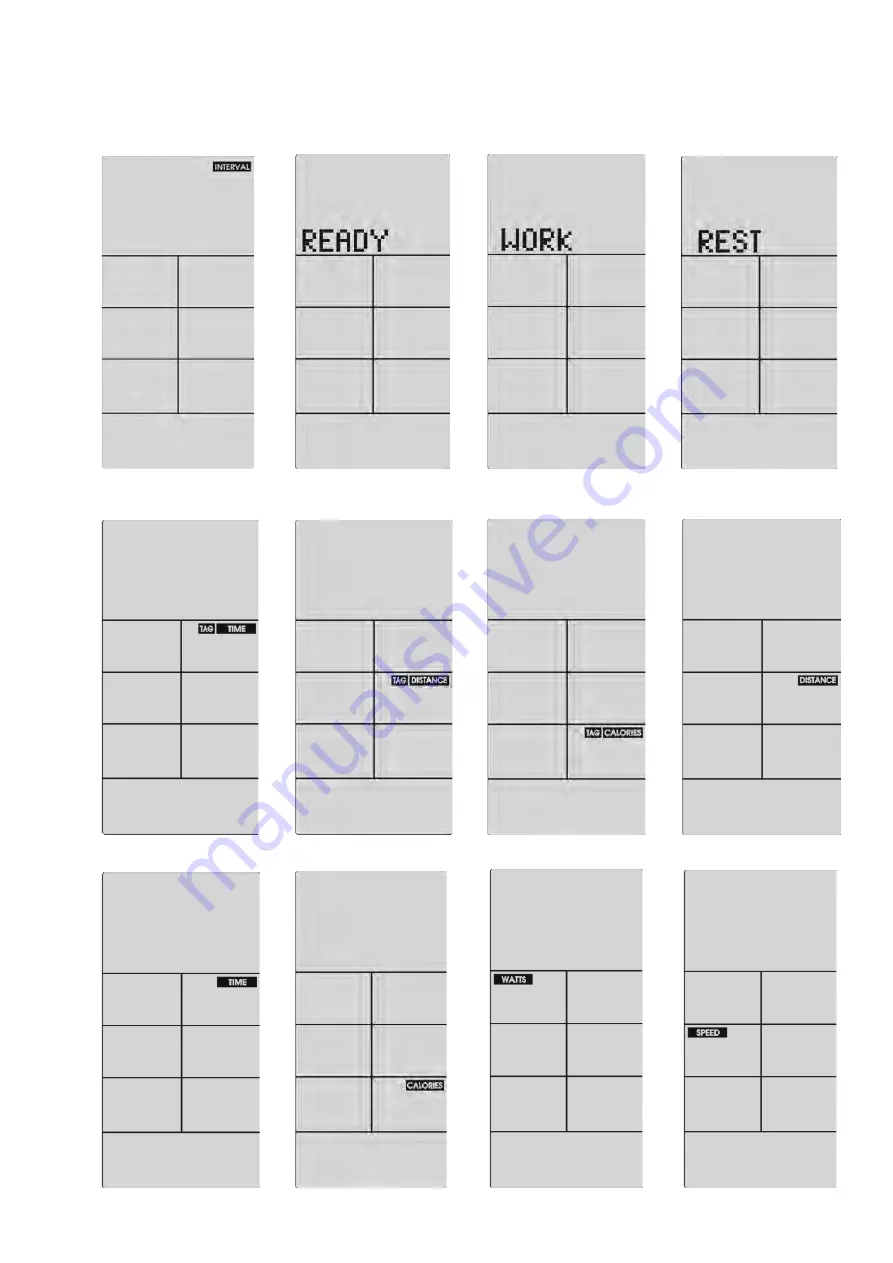
2. The icons of 

INTERVAL

, READY, WORK, REST, 

TAG TIME

,

TAG CALORIE

 , 

TAG DISTANCE 

,

ŕ

IME

,

DISTANCE

,

CALORIES

,

WATTS

,

SPEED

,

RPM

,

HEART RATE

 will flash by sequence in every 1s

(

Figure 4~Figure 17

).

If no input of key operation, RPM signal or pulse input for 5 minutes, computer will go to Sleeping mode.

Figure 4 


Figure 5 

Figure 6

Figure 7


Figure 8


Fig

Figure 10

Figure 11

Figure 12

Figure 13

Figure 14

Figure 15

ure 9 

14

Summary of Contents for SB800 AIR BIKE

Page 1: ... 1 ...

Page 2: ...5 BL F S Product Registration Important Safety Instructions Important Operation Instructions Assembly Instructions Operation of Your New Manufacturer s Limited Warranty 1 2 3 4 12 25 26 27 28 30 35 ...

Page 3: ...t the warranty contact Dyaco Canada Inc at 1 888 707 1880 Please take a moment at this time to record below the name of the dealer their telephone number and the date of purchase for easy contact in the future We appreciate your confidence in SOLE and we will always remember that you are the reason that we are in business Please complete and mail your registration card today and enjoy your new Air...

Page 4: ...s being used which could possibly scratch or damage the surface of your floor No changes must be made which might compromise the safety of the equipment It is recommended to have a minimum of 2 safe clearance around the exercise equipment while in use Do not allow children to use or play on the Keep children and pets away from this equipment at all times while exercising The should only be used by...

Page 5: ...TANT FOR INDIVIDUALS OVER THE AGE OF 35 OR PERSONS WITH PRE EXISTING HEALTH PROBLEMS READ ALL INSTRUCTIONS BEFORE USING ANY FITNESS EQUIPMENT WE ASSUME NO RESPONSIBILITY FOR PEROSNAL INJURY OR PROPERTY DAMAGE SUSTAINED BY OR THROUGH THE USE OF THIS PRODUCT SAVE THESE INSTRUCTIONS THINK SAFETY 4 ...

Page 6: ... body in shape and achieving a happier and healthier lifestyle Before reading further please review the drawing below and familiarize yourself with the parts that are labeled Read this manual carefully before using the Sole SB800 Air Bike Although Dyaco Canada Inc constructs its products with the finest materials and uses the highest standards of manufacturing and quality control there can sometim...

Page 7: ...ar L R Console tube Console J1 Screw M8 60 J2 Screw M8 30 J3 Spacer Ring J5 Screw M6 16 J6 Screw M10 20 J4 NUT M8 Tool Wrench Screw driver Metal fixing plate H2 Pedal right H1 Pedal left G 1 Foot Support G 2 End Cap Customized Wrench 15 6m m 5m m 4m m 13 7 1 6 ...

Page 8: ... STEP2 thefrontstabilizer B onto mainframe A andtight J6 Step 1 Loosen the two screws J6 from the paper strap STEP 2 the rear stabilizer C onto main frame A and J6 HOW TO ASSEMBLE REAR STABILIZER HOW TO ASSEMBLE FRONT STABILIZER USE TOOL PAPER TUBE STEP 1 STEP 1 USE TOOL J6 C J6 A PAPER TUBE STEP 1 B J6 A 6m m 6m m 7 ...

Page 9: ...epeat these steps to assemble the left side USE TOOL D2 I J2 J5 A17 FOOT SUPPORT USE TOOL G G1 D2 main frame A Next assemble the foot support G A Equip right swing handle bar D2 and then install one spacer ring J8 onto to Customized Wrench Fasten the Foot support with the Customized Wrench and then put on the End cap G1 5m m 4m m 13 17 8VLQJ the Customized WreQch IDVWHQ WKH RRW VXSSRUW ZLWK D FORF...

Page 10: ...e crank A8 and fasten with Step 3 Fasten the screw J7 onto the crank HOW TO ASSEMBLE THE PEDALS HOW TO ASSEMBLE THE CONSOLE TUBE J7 A8 USE TOOL Connect the cables E1 and A30 together then using screw J1 console tube E main frame Attention J1 E H2 A8 E1 A30 USE TOOL 5m m 15 5m m 9 ...

Page 11: ...all console onto console tube F2 The front stabilizer has built in transport wheels Stand at the rear and lift the machine up until the weight is transferred to the transport wheels You can now easily move the machine to a new location HOW TO ASSEMBLE THE CONSOLE HOW TO MOVE THE MACHINE USE TOOL F 1 F2 E1 E Screw driver 10 ...

Page 12: ...RVW OHYHU A32 HOW TO ADJUST S 7 POST AND SADDLE 326 7 21 Step 2 Pull up the adjustment bar A55 to adjust tR RXU SUHIHUUHG saddle position IWHU PDNLQJ WKH GHVLUHG DGMXVWPHQW release the bar WR VHFXUH LW LQ SODFH STEP 1 STEP 2 A32 A55 IWHU ILQGLQJ WKH GHVLUHG SRVLWLRQ SUHVV GRZQ WKH OHYHU WR VHFXUH LW LQ SODFH 11 ...

Page 13: ...ories with UP DOWN key WATT Display the power consumption during training Range 0 9999 PULSE User may set up target pulse value from 0 30 to 199 and the console buzzer will beep when the actual heart rate is over the target value during workout INTERVAL Intermitent rest workout mode TARGET HR Target Heart rate control training mode TIME INTERVAL TOTAL TIME TAG TAG TAG TAG CALORIES DISTANCE RPM HEA...

Page 14: ...peat it till finish 5 cycles INTERVAL 10 20 This program allows user to work 10s and rest 20s thrn repeat it till finish 5 cycles INTERVAL CUSTOM User self define the cycles of INTERVAL workout and set traget time Target Distance To preset Target Distance to training Target Calories To preset Target Calories to training Target HR To preset Target HR to training Target Time To preset Target Time to...

Page 15: ...ATTS SPEED RPM HEART RATE will flash by sequence in every 1s Figure 4 Figure 17 If no input of key operation RPM signal or pulse input for 5 minutes computer will go to Sleeping mode Figure 4 Figure 5 Figure 6 Figure 7 Figure 8 Fig Figure 10 Figure 11 Figure 12 Figure 13 Figure 14 Figure 15 ure 9 14 ...

Page 16: ... ĻPress START key one time system pause training for 30s Buzzer will sound for 0 5s in every 1s All displayed values remian on LCD for 3s and flashing in every 4s If user continue to stop training for 5 minutes buzzer sounds 2s and enter to Wake up mode Press START key to resume workout ļPress STOP key or finish training buzzer will sound 1s TIME will display workout time DISTANCE will display wor...

Page 17: ...display 08 08 Figure 28 The dot matrix will show WORK CYCLE TIME counts down for 10s then show REST flash in 1Hz ļNo signal input for 5 minutes buzzer sounds 1 short beep and enter to Wake up mode ĽPress START key one time system pause training for 30s Buzzer will sound for 0 5s in every 1s All displayed values remian on LCD for 3s and flashing in every 4s If user continue to stop training for 5 m...

Page 18: ...Figure 24 Figure 25 Figure 26 Figure 27 Figure 28 Interval 20 10 STOP PAUSE START 17 ...

Page 19: ...ounts down for 10s then show REST flash in 1Hz ļNo signal input for 5 minutes buzzer sounds 1 short beep and enter to Wake up mode ĽPress START key one time system pause training for 30s Buzzer will sound for 0 5s in every 1s All displayed values remian on LCD for 3s and flashing in every 4s If user continue to stop training for 5 minutes buzzer sounds 2s and enter to Wake up mode Press START key ...

Page 20: ...rom 4 00 minutes TOTAL TIME DISTANCE CALORIES WATTS SPEED RPM start count up CYCLE shows 01 XX Figure 38 ļCYCLE TIME will count down REST in dot matrix flash in 1Hz along with beeps Figure 40 At the last 3s the dot matrix switch to display READY Figure 40 and REST Figure 39 ĽSystem will continue step Ĺ ĺ repeatly Each time repeat will add one cycle till WORK starts and CYCLE TIME begin counts down...

Page 21: ...er will sound for 0 5s in every 1s All displayed values remian on LCD for 3s and flashing in every 4s If user continue to stop training for 5 minutes buzzer sounds 2s and enter to Wake up mode Press START key to resume workout ĻNo signal input for 5 minutes buzzer sounds 1 short beep and enter to Wake up mode ļPress STOP key or finish training buzzer will sound 1s TIME will display workout time DI...

Page 22: ... 5s in every 1s All displayed values remian on LCD for 3s and flashing in every 4s If user continue to stop training for 5 minutes buzzer sounds 2s and enter to Wake up mode Press START key to resume workout ĻNo signal input for 5 minutes buzzer sounds 1 short beep and enter to Wake up mode ļPress STOP key or finish training buzzer will sound 1s TIME will display workout time DISTANCE will display...

Page 23: ... 0 5s in every 1s All displayed values remian on LCD for 3s and flashing in every 4s If user continue to stop training for 5 minutes buzzer sounds 2s and enter to Wake up mode Press START key to resume workout ĻNo signal input for 5 minutes buzzer sounds 1 short beep and enter to Wake up mode ļPress STOP key or finish training buzzer will sound 1s TIME will display workout time DISTANCE will displ...

Page 24: ...re 53 ļWhen Heart Rate goes between 65 80 TARGET HEART RATE ACHIEVED and pulse icon will flash together Figure 54 ĽNo signal input for 5 minutes buzzer sounds 1 short beep and enter to Wake up mode ľPress START key one time system pause training for 30s Buzzer will sound for 0 5s in every 1s All displayed values remian on LCD for 3s and flashing in every 4s If user continue to stop training for 5 ...

Page 25: ...Figure 50 Figure 51 Figure 51 Figure 52 Figure 53 Target Heart Rate DOWN UP STOP PAUSE START ENTER 24 ...

Page 26: ...LQJV HDULQJ WKH WUDQVPLWWHU LPPHGLDWHO DJDLQVW EDUH VNLQ DVVXUHV RX RI SURSHU RSHUDWLRQ I RX ZLVK RX PD ZHDU WKH WUDQVPLWWHU RYHU D VKLUW 7R GR VR PRLVWHQ WKH DUHDV RI WKH VKLUW WKDW WKH HOHFWURGHV ZLOO UHVW XSRQ Note 7KH WUDQVPLWWHU LV DXWRPDWLFDOO DFWLYDWHG ZKHQ LW GHWHFWV DFWLYLW IURP WKH XVHU V KHDUW GGLWLRQDOO LW DXWRPDWLFDOO GHDFWLYDWHV ZKHQ LW GRHV QRW UHFHLYH DQ DFWLYLW OWKRXJK WKH WUDQVPL...

Page 27: ... 0 17 1 1 7KH VDIHW DQG LQWHJULW GHVLJQHG LQWR WKH DLU ELNH FDQ RQO EH PDLQWDLQHG ZKHQ WKH DLU ELNH LV UHJXODUO H DPLQHG IRU GDPDJH DQG ZHDU 6SHFLDO DWWHQWLRQ VKRXOG EH JLYHQ WR WKH IROORZLQJ 3HGDOLQJ VORZO DQG YHULI WKDW WKH LU 5HVLVWDQFH 6 VWHP SURYLGHV WHQVLRQ 7KH LU 5HVLVWDQFH 6 VWHP VKRXOG SURYLGH PDQ HDUV RI XVH 8VH D ZUHQFK WR YHULI WKDW WKH SHGDOV DUH WLJKWHQHG VHFXUHO I WLJKWHQLQJ LV UHTX...

Page 28: ...6 D2 G A37 A39 A43 J6 8 A41 A42 H1 A41 B C C1 2 C2 2 C4 C5 C3 2 B1 2 B2 2 B3 2 B4 2 B5 2 B6 4 A40 A40 A4 A75 A76 A77 A78 A79 A3 I A10 A11 A12 A13 A14 A15 A16 A16 A17 A17 A18 A18 A5 A19 A30 A20 A6 A22 A23 A24 A25 A26 A27 A28 A29 A31 A80 A32 A34 2 E E2 E1 J1 J2 2 J5 6 J3 J4 F F A38 H2 A8 J7 2 A7 I G A68 A70 A71 A35 2 A52 A73 A73 A74 A52 A82 A36 2 A67 27 ...

Page 29: ...6 20mm 1 A23 SCREW M6 12mm 6 A76 STEEL 4 A24 SLEEVE 19 12 05 50 3 1 A77 PAD 1 A25 BEARING 6001 2 A78 BRAKE PAD 2 A26 SPACER RING 1 A79 SPRING 1 A27 AXLE 12 155 1 A80 SCREW M6 10mm 2 A28 PLASTIC PIPE 1 A81 SENSOR WIRE 150mm 1 A29 PLASTIC PIPE 1 A82 PLASTIC COVER 1 A30 SENSOR WIRE 750mm 1 B FRONT STABILIZER 1 A31 BUSH 10 43 2mm 1 B1 END CAP 2 A32 FIX GRIP 1 B2 WHEEL 2 A33 HOLDER 1 B3 SCREW M8 40 2 A...

Page 30: ...IPTION Q TY J1 SCREW M8 60mm J2 SCREW M8 30mm F CONSOLE 1 J3 SPACER RING 2 F SCREW 4 J4 NUT M8 2 G FOOT SUPPORT 2 J5 SCREW M6 12mm 6 H1 PEDAL L 1 J6 SCREW M10 20mm 8 H2 PEDAL R 1 1 1 J7 2 I METAL FIXING PLATE 2 SCREW M6 8mm 100mm 29 ...

Page 31: ...en uptake MVo2 This is often referred to as your aerobic capacity The effort that you can exert over a prolonged period of time is limited by your ability to deliver oxygen to the working muscles Regular vigorous exercise produces a training effect that can increase your aerobic capacity by as much as 20 to 30 An increased MVO2 indicates an increased ability of the heart to pump blood of the lungs...

Page 32: ...u stop exercising or do not do your program often enough you will lose the benefits you have gained Regular workouts are the key to success Warm Up Every exercise program should start with a warm up where the body is prepared for the effort to come It should be gentle and preferably use the muscles to be involved later Stretching should be included in both your warm up and cool down and should be ...

Page 33: ... of gym or running shoes or sneakers Breathing During Exercise Do not hold your breath while exercising Breathe normally as much as possible Remember breathing involves the intake and distribution of oxygen which feeds the working muscles Rest Periods Once you start your exercise program you should continue through to the end Do not break off halfway through and then restart at the same place late...

Page 34: ...m until they are over your head Reach your reach behind you and pull your right foot up right arm as far upward toward the ceiling as Bring your heel as close to your buttocks as you can for one count Feel the stretch up possible Hold for 15 counts and repeat with your right side Repeat this action with your left foot up left arm STRETCHING Stretching should be included in both your warm up and co...

Page 35: ...nts can and hold for 15 counts HAMSTRING STRETCHES CALF ACHILLES STRETCH Sit with your right leg extended Rest the sole of Lean against a wall with your left leg in front your left foot against your right inner thigh Stretch of the right and your arms forward Keep toward your toe as far as possible Hold for 15 counts your right leg straight and the left foot on the Relax and then repeat with left ...

Page 36: ... SDUWV RWKHU WKDQ RULJLQDO DFR DQDGD QF SDUWV RU H WHUQDO FDXVHV VXFK DV FRUURVLRQ GLVFRORUDWLRQ RI SDLQW RU SODVWLF DOWHUDWLRQV PRGLILFDWLRQV DEXVH PLVXVH DFFLGHQW LPSURSHU PDLQWHQDQFH LQDGHTXDWH SRZHU VXSSO LI DSSOLFDEOH RU DFWV RI RG 3URGXFWV ZLWK RULJLQDO VHULDO QXPEHUV WKDW KDYH EHHQ UHPRYHG RU DOWHUHG 3URGXFWV WKDW KDYH EHHQ VROG WUDQVIHUUHG EDUWHUHG RU JLYHQ WR D WKLUG SDUW 3URGXFWV WKDW GR...

Page 37: ...36 ...

Page 38: ......

Page 39: ......

Page 40: ......

Reviews: