background image

 4 


Thank you for choosing a Soleus Air Portable Dehumidifier. This owner’s manual will provide you 
with valuable information necessary for the proper care and maintenance of your new product. Please 
take a few moments to thoroughly read the instructions and familiarize yourself with all the opera-
tional aspects of your new Dehumidifier.  
 
For your own records, please attach a copy of your sales receipt to this manual. Also, write the store 
name/location, date purchased, and serial number below: 


Store Name: ____________________________________________________ 

Location: ______________________________________________________ 

Date Purchased: _________________________________________________ 

Serial Number (located on back of unit): ______________________________


IMPORTANT INSTRUCTIONS 
 

Before installing and using your dehumidifier, please read this owner’s manual carefully. Store this manual in a 
safe place for future reference. 


1)  Always place the unit on a level surface.  

2)  Never use or store gasoline or other flammable vapor or liquid near this unit unless instructed by this   

manual. 

3)  Maintain at least 12-18 inches clearance space around this unit. Do not block or cover air inlet or outlet 

grilles. 

4)  The unit must be connected to a correctly grounded power supply. 

5)  Do not start or stop the unit by inserting or pulling out the power plug.  

6)  Do not use an adapter plug or extension cord. 

7)  Do not use the unit in the immediate surroundings of a bath, a shower or a swimming pool. 

8)  Do not insert anything into the air outlet. Do not obstruct air inlet or outlet grills unless instructed by this 

manual.  

9)  Do not let children play near this unit. 

10) Always inspect the cord for signs of damage before use. If the power cord is damaged, it must be replaced 

by the manufacturer or a qualified service technician.  

11) When cleaning the unit, always turn the unit off and unplug the power cord. 

Summary of Contents for DMC-115IP-210

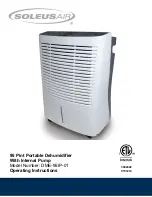
Page 1: ...3092402 V151214 95 Pint Portable Dehumidifier With Internal Pump Model Number DME 95IP 01 Operating Instructions ...

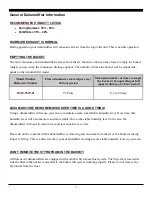
Page 2: ...ill become more and more stable Due to the stable humidity level in the area the dehumidifier will need to remove less and less moisture over time Please do not be concerned if the dehumidifier is removing less moisture from the air or the bucket is taking longer to fill up This is a direct result of your dehumidifier creating a more stable humidity level in your area DON T REMOVE THE STYROFOAM IN...

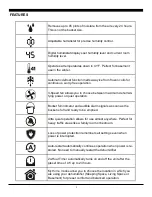
Page 3: ...peration Bucket full indicator and audible alarm signals as soon as the bucket is full and ready to be emptied Ultra quiet operation allows for use almost anywhere Perfect for heavy traffic areas like a family room or bedroom Loss of power protection remembers all settings even when power is interrupted Auto restart automatically continues operation when power is re stored No need to manually rest...

Page 4: ...his owner s manual carefully Store this manual in a safe place for future reference 1 Always place the unit on a level surface 2 Never use or store gasoline or other flammable vapor or liquid near this unit unless instructed by this manual 3 Maintain at least 12 18 inches clearance space around this unit Do not block or cover air inlet or outlet grilles 4 The unit must be connected to a correctly ...

Page 5: ...ACTURER SOLEUS HOME COMFORT HAS NOT CONDUCTED INDEPENDENT TEST TO THE INFORMATION AND THE SPECIFICATIONS PRESENTED HEREWITHIN PACKAGE CONTENTS 1 Portable Dehumidifier 1 Operating Instructions 4 Casters 1 Garden Hose Connector Extension Adapter 1 Internal Pump Drain Tub Kit Bucket Capacity 13 Pints Model Number DME 95IP 01 Dehumidifying Capacity 95 Pints per day Power Consumption Watts 740 Watts Ai...

Page 6: ...fier Fig 1 CONTROL PANEL DIGITAL DISPLAY INCREASE DECREASE Room Humidity Level Preset MODE Button Child Lock LED Indicator Bucket Full LED Indicator Power On LED Indicator Digital Humidistat Display MyHome MODE LED Indicators Fan Speed LED Indicators TIMER Button FAN SPEED Button Pump Mode Button Clean Filter LED Indicator Timer On LED Indicator FILTER Button POWER Button ...

Page 7: ...will light up on the control panel 4 Fan Speed Control Press the FAN SPEED Button to cycle through the different fan speeds High Medium and Low The fan speed can be visually distinguished by the fan speed indicators on the control panel 5 Timer Auto On To program the unit to automatically turn on press the TIMER button when the unit is off Each press of the button will change the timer setting to ...

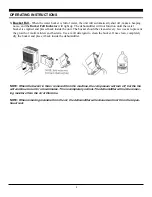
Page 8: ... weeks to prevent the growth of mold mildew and bacteria Use a mild detergent to clean the bucket Once clean completely dry the bucket and place it back inside the dehumidifier NOTE When the bucket is full or removed from the machine the compressor will turn off but the fan will continue to run for a few minutes This is completely normal The dehumidifier will not be remov ing moisture from the air...

Page 9: ...CAUTION DO NOT OPERATE THE DEHUMIDIFIER WITHOUT THE INCLUDED FILTER 8 MyHome Mode Preset location settings allow the user to easily move the dehumidifier room to room and select the corresponding mode for the location in which the dehumidifier is operating for optimum per formance Choose from Sleeping Space Living Space or Basement 9 Child Lock Mode To lock the control panel press the and buttons ...

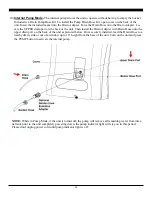
Page 10: ...e Drain Adapter with Drain Hose onto the upper drain port on the back of the unit as pictured below Once securely installed lead the Drain Hose to a nearby drain sink or out of a window up to 16 height from the base of the unit Turn on the unit and press the PUMP button to activate the internal pump NOTE While in Pump Mode if the unit is turned off the pump will remove all remaining water from int...

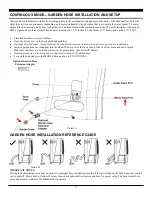
Page 11: ...d thread Optional Garden Hose Extension Adapter onto nozzle for easier hose installation Install a garden hose not supplied into the BELOW hose port in the back of unit lead to a floor drain and cut to length Make sure that there are no kinks or knots in the garden hose See Picture B Below Gently press down on the drain door so that it rests on top of the garden hose Turn on the unit and press the...

Page 12: ...OTE Place the dehumidifier away from a clothes dryer Use the dehumidifier to prevent moisture damage anywhere books or valuables are stored Use the dehumidifier in a basement to help prevent moisture damage The dehumidifier must be operated in an enclosed area to be most effective Close all doors windows and other outside openings to the room When frost builds up on the evaporator coils the compre...

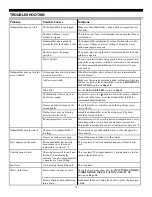
Page 13: ...utton to lower the percent humid ity desired in the room or set the dehumidifier to CO for maximum dehumidification Doors and windows may not be closed tightly Check that all doors windows and other openings are se curely closed Clothes dryer may be blowing moist air into the room Install the dehumidifier away from the dryer The dryer should be vented outside Room temperature is too low Moisture r...

Page 14: ...Please call Soleus Customer Service at 888 8 SOLEUS E4 Compressor Overheat Protection Please call Soleus Customer Service at 888 8 SOLEUS E5 Water Bucket Float Malfunction Remove the water bucket from the unit and ensure that the plastic float is properly installed The float should be seated at the top of the bucket and able to swing back and forth For more assistance or if the error code reappear...

Page 15: ...other appearance parts caused by wear Damage caused by repairs or alterations of the unit by anyone other than those authorized by Soleus Home Comfort Freight and Insurance cost for the warranty service Filter and Accessories ALL WARRANTIES INCLUDING ANY IMPLIED WARRANTY OF MERCHANT ABILITY ARE LIMITED TO ONE YEAR DURATION OF THIS EXPRESS LIMITED WARRANTY SOLEUS HOME COMFORT DISCLAIMS ANY LIABILIT...

Reviews: