background image


Thank you for choosing a Soleus Air Portable Dehumidifier. This Owner

s Manual will provide 

you with valuable information necessary for the proper care and maintenance of your new product. 

Please take a few moments to thoroughly read the instructions and familiarize yourself with all the 

operational aspects of your new Soleus Air Portable Dehumidifier. 


For your own records, please attach a copy of your sales receipt to this manual. Also, write the 

store name/location, date purchased, and serial number below:


Store Name: ____________________________________________________


Location: _____________________________________________________


Date Purchased: _________________________________________________


Serial Number (located on back of unit): ______________________________


Before installing and using your dehumidifier, please read this owner

s manual carefully. Store this manual in 

a safe place for future reference. 


1)


Always place the unit on a level surface. 


2)


Never use or store gasoline or other flammable vapor or liquid near this unit unless instructed by this manual.


3)


Maintain a 12

-

18 inch clearance space around this unit. Do not block or cover air inlet or outlet grilles.


4)


The unit must be connected to a correctly grounded power supply.


5)


Do not start or stop the unit by inserting or pulling out the power plug. 


6)


Do not use an adapter plug or extension cord.


7)


Do not use the unit directly by a bathtub, shower or swimming pool.


8)


Do not insert anything into the air outlet. Do not obstruct air inlet or outlet grills unless instructed by this 
manual. 


9)


Do not let children play near this unit.


10)


Always inspect the cord for signs of damage before use. If the power cord is damaged, it must be replaced by 
the manufacturer or a qualified service technician. 


11)


When cleaning the unit, always turn the unit off and unplug the power cord.


IMPORTANT INSTRUCTIONS


PURCHASE INFORMATION


Summary of Contents for DSJ-50EIP-01

Page 1: ...Dehumidifier must be upright for 24 hours prior to operating This ensures that the compressor will function as intended V 191217 4000234...

Page 2: ...manual carefully Store this manual in a safe place for future reference 1 Always place the unit on a level surface 2 Never use or store gasoline or other flammable vapor or liquid near this unit unle...

Page 3: ...s humidity level will become more and more stable Due to the stable humidity level in the area the dehumidifier will need to remove less and less moisture over time Please do not be concerned if the d...

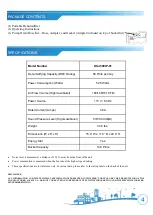
Page 4: ...OT CONDUCTED AN INDEPENDENT TEST TO THE INFORMATION AND THE SPECIFICATIONS PRE SENTED HEREWITHIN 1 Portable Dehumidifier 1 Operating Instructions 1 Pump Drain Hose Kit Hose Adapter and Gasket Adapter...

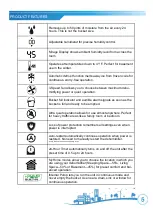
Page 5: ...quiet operation allows for use almost anywhere Perfect for heavy traffic areas like a family room or bedroom Loss of power protection remembers all settings even when power is interrupted Auto restart...

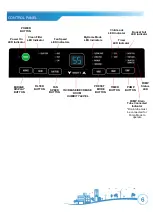
Page 6: ...cator Timer LED Indicator Fan Speed LED Indicators MyHome Mode LED Indicators Power On LED Indicator Child Lock LED Indicator Bucket Full LED Indicator PUMP BUTTON INCREASE DECREASE ROOM HUMIDITY LEVE...

Page 7: ...increments up to 24 hours Once the desired time is reached the unit will automatically turn on Timer Auto Shut Off To program the unit to automatically turn off press the TIMER button when the unit i...

Page 8: ...the bucket Once clean completely dry the bucket and place it back inside the dehumidifier NOTES When the bucket is full or removed from the machine the compressor will turn off but the fan will contin...

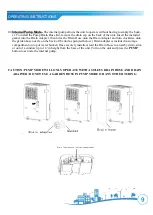
Page 9: ...to the garden hose nozzle on the back of the unit as pictured below Drain adapter is included in storage compartment on top of water bucket Once securely installed lead the Drain Hose to a nearby drai...

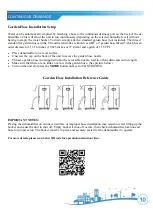
Page 10: ...he cap on the back of the unit to access the garden hose nozzle Thread a garden hose not supplied onto the accessible nozzle lead to a floor drain and cut to length Make sure that there are no kinks o...

Page 11: ...uce performance Use the dehumidifier in areas that have excessive moisture such as entry ways bathrooms basements and laundry rooms NOTE Place the dehu midifier away from a clothes dryer Use the dehum...

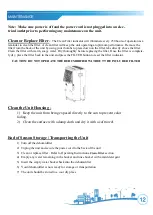
Page 12: ...ack in the unit and press the FILTER button to reset the filter indicator CAUTION DO NOT OPERATE THE DEHUMIDIFIER WITHOUT THE INCLUDED FILTER Clean the Unit Housing 1 Keep the unit from being exposed...

Page 13: ...ilter See the CLEAN FILTER section on Page 12 The Humidity Control may not be set low enough For drier air press the button to lower the percent humidi ty desired in the room or set the dehumidifier t...

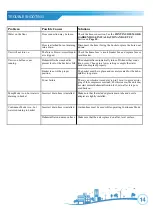
Page 14: ...hange to a lower setting or empty the water bucket and replace properly Bucket is not in the proper position The bucket must be in place and securely seated for the dehu midifier to operate Power fail...

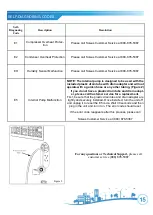
Page 15: ...is designed to be used with the included plastic drain tube with drain adapter and will not operate with a garden hose or any other tubing Figure 2 If you do not have a plastic drain tube and drain ad...

Page 16: ...l handling provisions in the instructions Damage to the finish of the case or other appearance parts caused by wear Damage caused by repairs or alterations of the unit by anyone other than those autho...

Reviews: