background image


GPS Fly 

CG12 


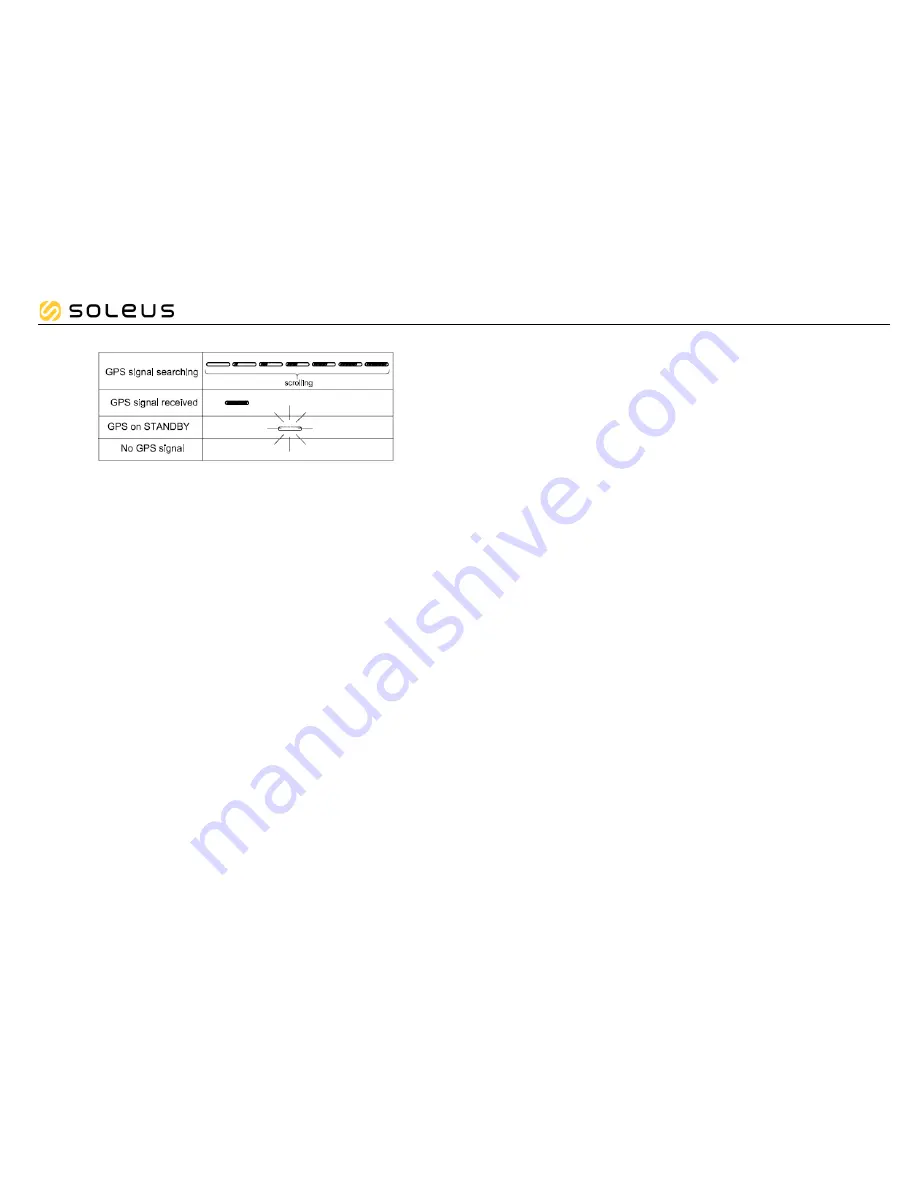
GPS signals and its meaning: 


Step 5) Go for a Run: 


5.1)  Using Run mode: 


5.1.1) 

Press  S7  or  S1  from  Time  mode  to  go  to  RUN  mode.  The  watch  will  display 
GPS/INDOOR. 

5.1.2) 

Press S1/S11 to select between GPS and INDOOR. 

5.1.3) 

Press  S5  to  confirm  selection.  If  you  select  INDOOR,  you  will  have  your  exercise 
without GPS data. If you select GPS, the watch will start searching for GPS signal; 
display the battery level, remaining Memory, and the GPS GO screen. 

5.1.4) 

Press S5 to change the views in 

ROW 1

.  Following are the views as you press S5:  

o


Chrono / GPS GO 

o


Pace

 / Distance / Chrono 

o


Speed

 / Distance / Chrono 

o


Calorie

 / Distance / Chrono 

o


Clock

 / Distance / Chrono 

o


Chrono

 / Distance / Chrono 

o


Distance

 / Distance / Chrono 

5.1.5) 

Press and hold S5 to change the views in 

ROW 2

.  Following are the views as you 

press & hold S5:  

o


Pace / 

Distance

 / Chrono 

o


Pace / 

Pace

 / Chrono 

o


Pace / 

Speed

 / Chrono 

o


Pace / 

Calorie

 / Chrono 

o


Pace / 

Clock

 / Chrono 

o


Pace / 

Chrono

 / Chrono 

5.1.6) 

Press S1 to start. If auto lap function is set, the watch will take lap automatically 
based on auto lap setting and there is a beep sound during taking of auto lap if 
the ALERT is 

ON

 in AUTO LAP setting. 

5.1.7) 

Press S1 to stop after completing your run. 

5.1.8) 

While  the  chronograph  is  stopped,  press  S5  to  view  your  current  data  before 
saving. Following are the views as you press S5: 

o


Stop / Chrono / Distance 

o


Calorie / Ave Pace / Max Pace 

o


Calorie / Ave Speed / Max Speed 

5.1.9) 

Press and hold S1 or


press S11


to save your data. 


Note: 

When the chronograph is stopped or reset, after 15 minutes if no key operation, the 

GPS will automatically turn 

OFF

 and return to time mode. 


RUN setting mode: 
 

You can set the AUTO LAP/ UNIT/ and USER in RUN mode

.   

You can also do this setting in 

SET

 mode.  


Press and hold S11 until AUTO LAP blinks.  


Press S1/S11 to toggle through between 

AUTO LAP

UNIT

, and 

USER


o


AUTO LAP setting in RUN mode: 

Ø


Press S5 while AUTO LAP is blinking. Auto lap 

will start to blink.


Ø


Press S1/S11 to change the setting. Auto lap preset settings are:  0.4, 1, 2, 3, 4, and 
5 KM.


Ø


Press S5 to confirm and set ALERT ON or OFF. 


Ø


Press  S1/S11  to  change  the  setting.  There  is  a  beep  sound  and  EL  on  for  10  sec 
every auto lap taking when ALERT is set to ON.


Ø


Press S5 to confirm setting and go back to Auto lap setting screen.


o


UNIT setting in RUN mode: 

Ø


Press S5 while 

UNIT

 is blinking. KM


will start to blink.


Ø


Press S1/S11 to change the unit.


Ø


Press S5/S7 to confirm setting and go back to UNIT setting screen.


o


USER setting in RUN mode: 

Ø


Press S5 while 

USER

 is blinking. MALE


will start to blink.


Ø


Press S1/S11 to change the gender.


Ø


Press S5 to confirm and set the AGE. Age digits will start to blink.


Ø


Press S1/S11 to change the age digits.


Ø


Press S5 to confirm and set the WEIGHT. Weight digits will start to blink.


Ø


Press S1/S11 to change the weight digits.


Ø


Press S5 to confirm and set the HEIGHT. Height digits will start to blink.


Ø


Press S1/S11 to change the height digits.


Ø


Press S5 to confirm and go back to USER setting screen.


Ø


Press S7 to exit


Summary of Contents for GPS Fly

Page 1: ... to prolonged exposure to extreme temperatures as this may result to permanent damage to your unit About GPS Global Positioning System GPS is a satellite based navigation system made up of a network of 24 or more satellites GPS works best in clear weather condition anywhere in the world 24 hours a day Tall buildings may interfere with GPS accuracy When 3 satellite signals are received the watch wi...

Page 2: ...t may take few minutes to acquire the satellite signals 4 1 Go outside to an open area away from tall buildings and trees Orient the GPS antenna towards the sky for best reception The antenna is located at the 6 o clock position of the watch Note In order to accurately navigate the GPS you need to have a good line of sight to the satellites 4 2 Stand still and do not begin moving while locating th...

Page 3: ...d Max Speed 5 1 9 Press and hold S1 or press S11 to save your data Note When the chronograph is stopped or reset after 15 minutes if no key operation the GPS will automatically turn OFF and return to time mode RUN setting mode You can set the AUTO LAP UNIT and USER in RUN mode You can also do this setting in SET mode Press and hold S11 until AUTO LAP blinks Press S1 S11 to toggle through between A...

Page 4: ... to view your current data before saving Following are the views as you press S5 o Stop Chrono Distance o Calorie Ave Pace Max Pace o Calorie Ave Speed Max Speed 5 2 8 Press and hold S1 or press S11 to save the exercise The watch will display SAVE FILE and will then go back to GPS GO screen Note When the chronograph is stopped or reset after 15 minutes if no key operation the GPS will automaticall...

Page 5: ...etting o Press S5 to confirm and set M D or D M format setting o Press S1 S11 to change the setting o Press S5 to confirm and go back to TIME setting screen MANUAL setting o While MANUAL is blinking Press S5 to enter o Set the HOUR by pressing S1 or S11 and then press S5 to enter o Set the Minute by pressing S1 or S11 and then press S5 to enter o Set the SECOND by pressing S1 or S11 and then press...

Page 6: ...s S11 to view the previous detail Following are the details when you press S1 S5 o Start Time End Time Distance o Chrono Distance Calorie o Chrono Ave Pace Max Pace o Chrono Ace Speed Max Speed o Lap 1 Lap time Lap Distance o Lap 2 Lap time Lap Distance o Up to last Lap time Distance o VIEW DEL DELETE ALL sub menus press S1 S11 to select Press S7 to exit Deleting Data All Data Enter data mode Pres...

Page 7: ...d EL on for 10 sec every auto lap taking when ALERT is set to ON Press S5 to confirm setting and go back to Auto lap setting screen Note Alert sub mode When alert is set to ON there will be a beep sound during taking auto lap When it is set to OFF there is no beep sound SETTING THE TIME TIME 1 Time 2 setting Press S5 while TIME is blinking The watch will display T1 or T2 Press S1 S11 to choose bet...

Page 8: ...percentage will start to blink Press S1 S11 to change to your desired value LCD Contrast range is from 10 to 100 Press S5 S7 to exit to CONTRAST setting screen Setting the Chime Press S5while CHIME is blinking The watch will display CHIME ON Press S1 S5 to change to CHIME OFF or OFF Press S5 S7 to confirm and exit to CHIME setting screen Note When Chime is ON there is an hourly Chime and the Key t...

Page 9: ...ng S1 S5 S7 and S11 together The date and time will be reset to default values You can set it again manually or automatically thru GPS Will my data and personal settings be lost after watch reset Your data and personal settings are saved in the flash memory and will not be lost after watch reset The battery indicator does not seem to be accurate Allow your GPS watch to fully discharge and then ful...

Page 10: ...GPS Fly CG12 ...

Page 11: ...PS watch manually in SET mode Ø Press the mode S7 button repeatedly until the GPS watch will display SET Ø Press S1 S11 to select which parameter to set Ø Press S5 to enter the selected parameter Ø Press S1 S11 to change or SET the value Ø Press S7 to exit ...

Reviews: