background image


UK Helpline No. 01274 693888 


ASSEMBLY INSTRUCTIONS 


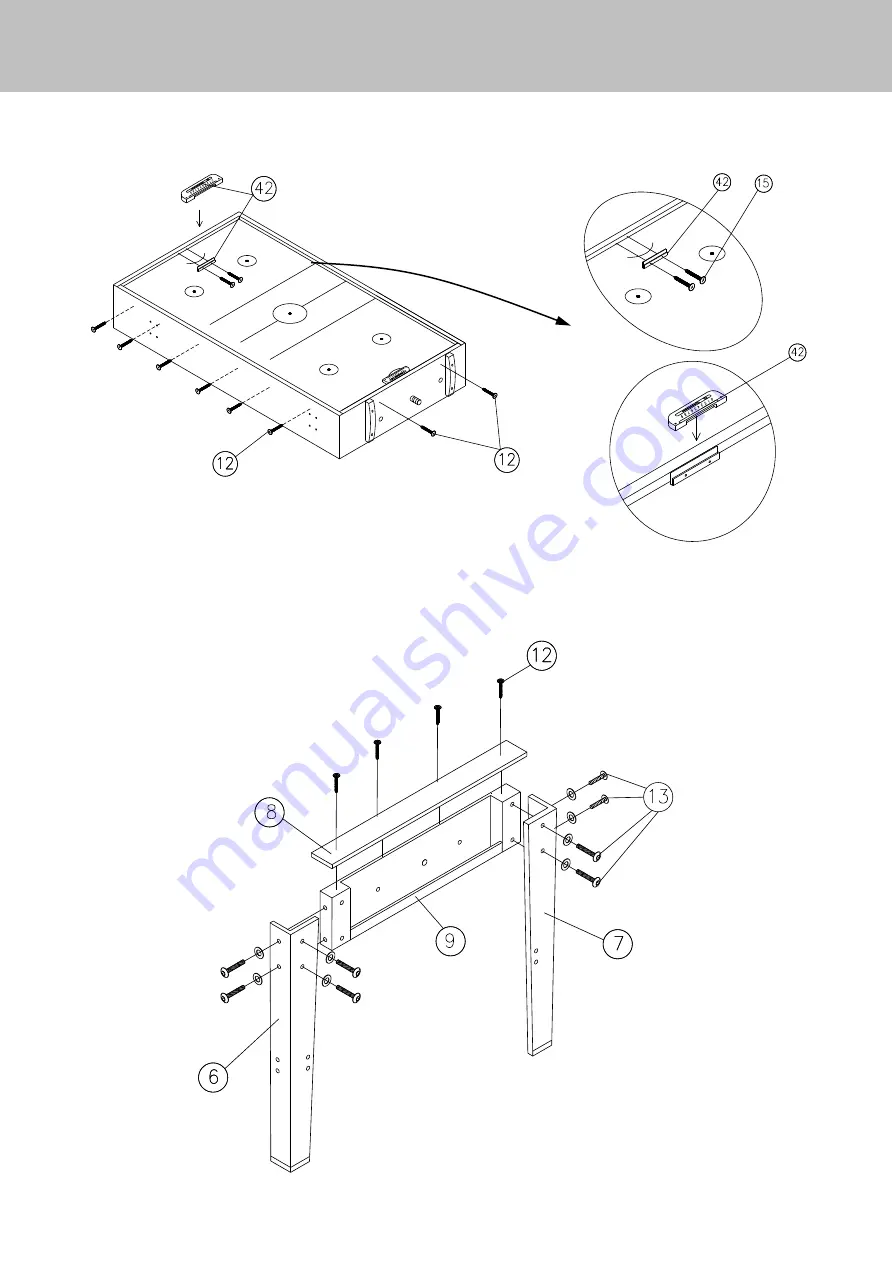
2. Turn the playing surface over and fix in place using 4x #12 screws. Fit the goal brackets to the 
ends of the table as shown. 

3. Assemble the legs. Carefully lay out the main parts of the leg assemblies, taking time to ensure 
they are the right way round, and assemble using the parts shown. When assembling, loosely 
tighten the fixings, and when they are all located and loosely fitted, go back and tighten them all 
securely.  

Summary of Contents for 7 IN 1 COMBO TABLE

Page 1: ...7 IN 1 COMBO TABLE Assembly and Use Instructions Assembly and Use Instructions 91407 UK ...

Page 2: ...ned for damage and or wear and tear 7 Replace defective components immediately and keep the equipment out of use until repaired 8 Warning the games table shall be installed on a stable base and properly levelled Always use the games table as indicated If you find any defective components while assembling or checking the equipment or if you encounter issues with the games table during use stop usin...

Page 3: ...lts assemble this game First carefully unpack every part and lay them out on a protective surface Please refer to the Parts List below to check that all parts have been included Please phone the UK Helpline should there be any issues ASSEMBLY INSTRUCTIONS NET SUPPORT 2EA HOOP 1EA SLIDE NET 1EA 1EA 1EA 1EA 4EA 2EA 2EA 2EA 2EA 2EA 1EA 1EA 3 5x30 FA 24EA 6X30 BOLT 40EA 2EA 3 5X12 FA 8EA 4EA 4X30 ROUN...

Page 4: ...ILLIARD BALLS 1EA BASKETBALL HOOP NET 1EA 1EA HOCKEY PUCK 2EA HOCKEY PUSHER 2EA TRIANGLE 1EA CHALK 2EA PADDLE BALL 1SET BACKGAMMON SET 1SET CHESS SET 1SET FELT PAD 2EA LEG LEVELER 4EA STEEL BRACKET 4EA BASKETBALL 2EA NET POST 1SET ADAPTER 1EA 1 SET PUMP 1EA MOTOR 1EA ...

Page 5: ...pline No 01274 693888 3 5x12 RWA 18EA ASSEMBLY INSTRUCTIONS 3 5X33 RWA 4EA 2EA 2EA 2EA 3 5x40 RWA 2EA 1 Fit the Motor to the underside of the Games Table using the parts shown Connect the adapter to the motor ...

Page 6: ...rackets to the ends of the table as shown 3 Assemble the legs Carefully lay out the main parts of the leg assemblies taking time to ensure they are the right way round and assemble using the parts shown When assembling loosely tighten the fixings and when they are all located and loosely fitted go back and tighten them all securely ...

Page 7: ...entral spindle to the table We recommend 2 people cooperate to complete this stage 5 Assemble the leg braces Carefully lay out the main parts taking time to ensure they are the right way round and assemble using the parts shown Fit all the fixings first only loosely and once all are fitted go back and tighten them all securely ...

Page 8: ...274 693888 ASSEMBLY INSTRUCTIONS 6 Attach the side brackets to the Table as shown taking care to align the screws Fit the net supports into the side brackets and carefully slide the side nets onto the supports as shown ...

Page 9: ...ONS 7 Assemble the net slide Carefully lay out the main parts taking time to ensure they are the right way round and assemble using the parts shown Fit all the fixings first only loosely and once all are fitted go back and tighten them all securely ...

Page 10: ...e table loosen and remove the two locking knobs Carefully turn the table over checking there are no children hands or fingers near the table and secure in place with both locking knobs before starting play Always check the fittings are secure before using the table ...

Reviews: