background image

PRODUCT MANUAL 

8-Zone RGB Remote Control

8-Z
one R

GB R

emot

e C
on

tr

ol

Toll Free: 866.592.3873

Email: sales@solidapollo.com

www.SolidApollo.com

COLOR FADING PROGRAMS:

The LED Wizard 8 Zone remote control has 10 predefined color changing programs. You can 

control the speed and brightness of any program.

Also, the unit uses smart ID technology to create an amazing color effect when more than 

one receiver is used.

How to use the Color Effects programs.

1. First select the zones you want to control (1-8).

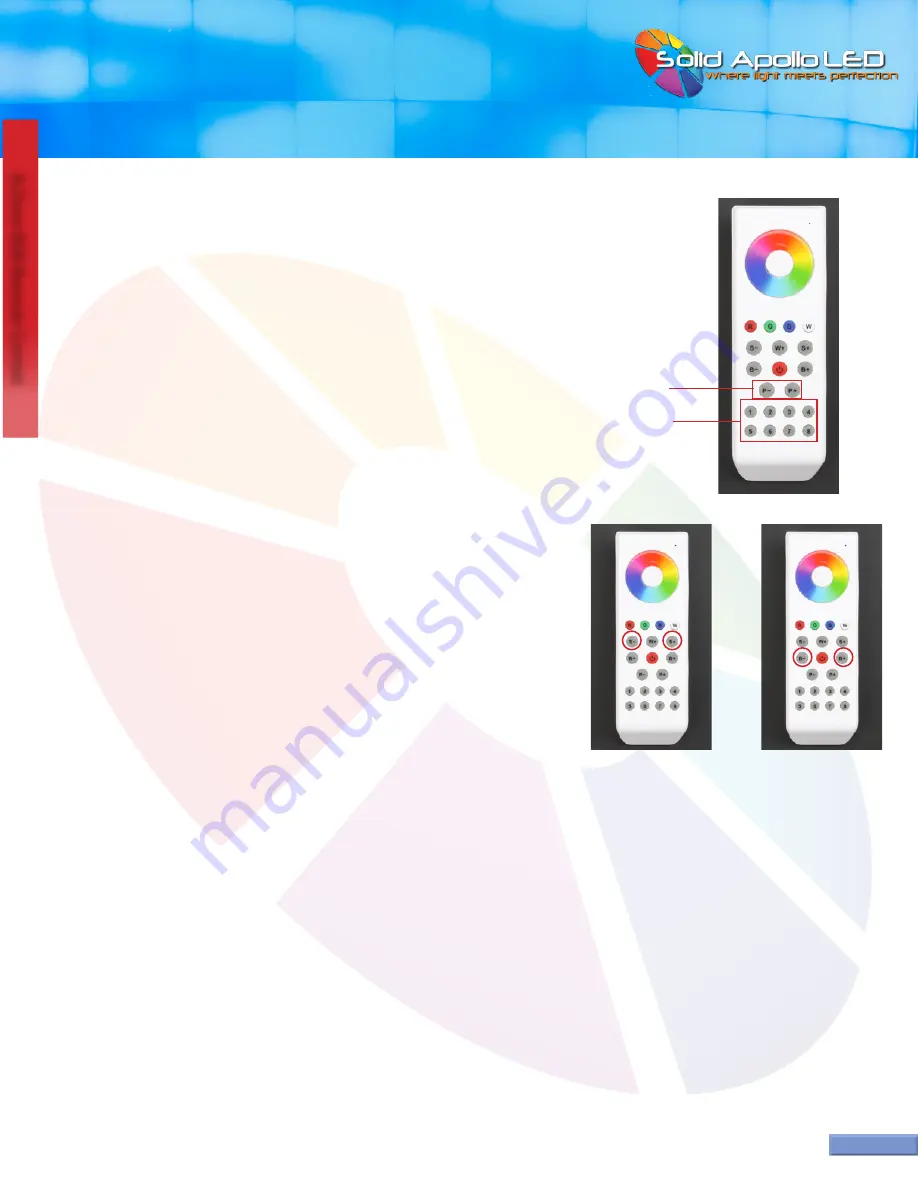
2. Press the “P+”  or “P-” button to start a color changing program.

3. If you press the “P+” or “P-”  button again you will pause the current color chase program.

4. If you press the “P+” button again, you will advance to the next program. If you press the 

“P-” button again, you will go back to the last program.

Here’s how it works:

Program1  ---Pause---Program2----Pause---Program3---Pause---Program4---Pause---

Program5---Pause---Program6---Pause---Program7---Pause---Program8---Pause---Pro

-

gram9---Pause---Program10 

Please Note: You can only navigate through 1 to 10 of the programs, when you 

reach either end (1 or 10) it will not cycle back through the programs if you con-

tinue to press “P+” or “P-”. 

Controlling Speed and Brightness of programs:

Once you selected the program of your choice, you can adjust the speed of the

program and brightness levels by using the Brightness and

 speed controls. 

1.


Use the S- and S+ on the remote to change and fine tune the speed at which the colors 

change in any of the programs. There are 16 speed levels. The fastest speed is 4 seconds for 

all the colors to cycle and the slowest speed is 256 seconds.

Changing Brightness:

2. Use the B- and B+ on the remote to change and fine-tune the brightness Levels of the 

selected program. 

Note: The B- and B+ also work when you have individual colors selected.

Press (P+ or P-) 

Buttons to Move 

through Programs

2, 3, 4

1.

1.

2.


Page 7

...continued on next page

EXTENDED CONFIGURATION

The 8 Zone controller can work with an unlimited number of receivers. For example, you can have 

5 receivers working in zone 1, 10 receivers working in zone 2, and one receivers in zone 3. Also 

you can have just one receiver on each zone. You can also create a chase effect of colors in just 

one zone. 

Example 1:

 For example,  if you installed 10 receivers controlled by the number“1” zone key on 

the remote control,  the 10 programmed receivers would initially react to button selection at the 

same time, but as each reciever is a different distance the reaction time is different, and when 

playing a color changing program, you would notice the lighting tied to each reciever would not 

be in sync. To prevent this, a “master and slave” programming is needed so that all the receivers 

will stay in sync with each other.

Example 2:

 Imagine in zone 1 you want to have 10 receivers. You will have 1 Master and 9 

Slaves. The master will transmit a synchronizing signal to all the slaves, so all the receivers work 

in perfect timing when showing a color changing program is used.

Summary of Contents for 8-Zone RGB Remote Control

Page 1: ... RGBW red green blue and white A wall holder is also included for secure and easy storage Control up to 8 Recievers 1 Included individually or as a group Brightness levels can be controlled for each individual color zone Built in Color Changing Programs with chase effects Memory Function remembers last setting if power goes out On Off switch of individual zones or all lights Full Brightness Contro...

Page 2: ...trol Philips Screwdriver Flat Head Screwdriver Wire Stripper To add power to the receiver first make sure the power supply uses the correct voltage 12 24V DC Then make sure the power supply is not plugged in Take the negative wire coming from the power supply and using theWire Stripper strip off approximately 1 4 of cover from the end of the wire Twist the exposed metal wire to help make a secure ...

Page 3: ... The negative wire has now been secured to the receiver and should not come out If it does come out repeat from step two and place the exposed metal wire further into the negative wiring slot 4 Repeat steps two through four for the positive wire from the power supply The positive wire will go into the positive wiring slot 5 Page 3 Toll Free 866 592 3873 Email sales solidapollo com www SolidApollo ...

Page 4: ...6 592 3873 Email sales solidapollo com www SolidApollo com Power Source LED RGB W Light Fixture Page 4 continued on next page On the backside of the controller open the battery cover door by pushing down on the upper door tab The door will open from the top Take three AAA batteries and install them in the correct orientation as noted inside the battery area Reinstall the battery door by inserting ...

Page 5: ...iver with its own zone Step 1 A Press the red power button in the remote control B Now press any button from 1 to 8 depending in which zone you want to assign to the receiver in this case we will press button 1 on the remote C QuicklyTap the learning button on the white receiver D Immediately start sliding your finger in the rainbow circle of the remote control if cor rectly done you will see the ...

Page 6: ...cted receivers This principle applies for the rest of the buttons Green Blue andWhite 2 Mixing colors You can create a mix of color by pressing 2 or more buttons For example if we wanttocreatea purplecolor weneedtouseREDandBLUEforthis Thereforepresstheredand then the blue color 3 Every time you press a color button you either turn on the color or turn it off Example If we press the red button we w...

Page 7: ... and fine tune the speed at which the colors change in any of the programs There are 16 speed levels The fastest speed is 4 seconds for all the colors to cycle and the slowest speed is 256 seconds Changing Brightness 2 Use the B and B on the remote to change and fine tune the brightness Levels of the selected program Note The B and B also work when you have individual colors selected Press P or P ...

Page 8: ...ed light on the reciever will blink to confirm the pairing is complete Note there can only be one Master receiver on each zone A D B HOWTO PROGRAMTHE SLAVE RECEIVER A Press the red power button on the remote B Choose the same zone the Master receiver was used in Tap the number do not hold C On the receiver tap the learning button D On the remote slide your finger clockwise on the color wheel until...

Page 9: ...d the wiring to and from the receiver matches the diagram on page 4 First check that the batteries are working on the remote when the remote is turned on a small red light will appear on the remote on the top right corner If the light does not come on replace the batteries as shown on page 4 If there is power going to the receiver and the lights do not shine when turned off and on the 8 Zone could...

Reviews: