background image

Nucleus

User Guide                                                                                                                                                       Page 35

Soft key Menus

To create a menu under a soft key switch, select the 

Soft key Set

for 

Default

User 1

or 

User 2

in the 

DAW

tab

and click on the on-screen key corresponding to the Nucleus

switch which you wish to use to access the new

menu. From the drop-down menu which appears, selecting 

Menu

sets that switch on Nucleus

as a menu

selector when the relevant 

Soft key Set

(

Default

User 1

or 

User 2

) is active. The new menu switch can now

be used to access a menu of eight additional functions via the eight V-Sel switches.

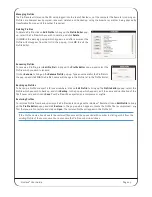
Assigning Functions Under Soft key Menus

Clicking the 

Show Sub keys

box to the right of the 

Soft key Setup

label will blank the scribble strip shown in the Remote,

leaving only those top row buttons which have been set to be menu selectors. The 

Show Sub keys

box will be checked

(

X

) to indicate that you are assigning functions within the sub keys of a menu.

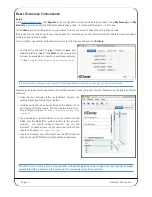
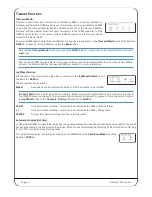
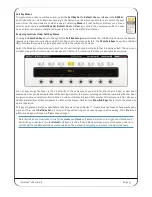
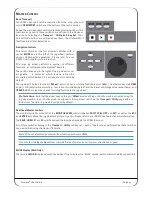
Select the Mode key whose menu you wish to edit, and it will go yellow to indicate that it is being edited. The on-screen
scribble strip will then contain dashes above each V-Sel switch, indicating that they are available for assigning:

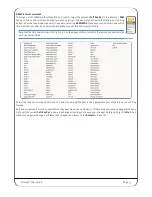
You can now assign functions to the V-Sel switch in the same way as you would for any other soft key, as described
previously. Once you have created the soft key assignments for this menu, selecting another top row button that has been
assigned as a menu selector will switch the on-screen scribble strip and V-Sel switches to that menu selector. Once you
have completed the soft key assignments within all the menus, deselect the 

Show Sub keys

box to return the window to

normal operation.

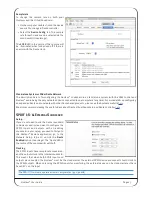
Soft key assignments must be saved before they become active on Nucleus

2

. If there are any unsaved changes when you

try to exit the current 

Soft key Set

, a pop-up will appear inviting you to save changes before exiting. Press 

No

to exit

without saving your changes, or 

yes

to save changes.

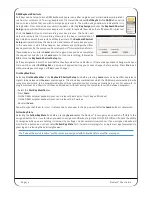
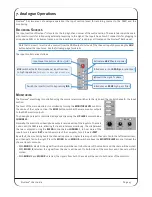
Note that the above illustration is true for the 

User 1

and 

User 2

soft key sets which use the right-hand Mode and V-

Sel switches on Nucleus

2

; for the 

Default

soft keys it is the left-hand Mode switches which are the menu selectors,

and the right-hand Mode switches are the sub keys. The method of assigning sub-menus is however the same.

Summary of Contents for Nucleus2

Page 1: ...Nucleus2 User Guide Nucleus2 This is SSL www solidstatelogic com ...

Page 2: ...M01C September 2016 Initial Release 82BN0M01D October 2016 Minor changes 82BN0M01E November 2016 OSX 10 12 IP address setup 82BN0M01F January 2017 Added Dante Via Network Architecture 82BN0M01G February 2017 Updated graphics ...

Page 3: ...Connections 15 Data Connections 15 Configuring Network Connections 16 Network Wiring 16 Assigning the Nucleus2 IP Address 16 Direct Network Connection Configuration Mac 17 Wider Network with a DHCP Server Configuration Mac 17 Direct Network Connection Configuration Windows 17 Wider Network with a DHCP Server Configuration Windows 17 Connecting Nucleus2 to Multiple Computers 18 Nucleus2 Internal Ne...

Page 4: ...ssigning Modified Functions to Soft Keys 36 Removing and Replacing Soft Key Assignments 36 Configuring Continuous Controller Layers 37 6 DAW Operations 39 Layer Select 39 Soft Keys 39 Channel Control 40 Channel Scrolling 40 Basic Channel Parameters 40 Channel Metering 40 Track Arming 40 Automation Control 40 V Pot and V Sel Control 41 Plug in Control Pro Tools Only 42 Master Control 43 Basic Trans...

Page 5: ...ogram Of course Nucleus2 s two analogue channels makes it more than a DAW controller Nucleus2 can be used to control DAW software using either HUI or MCU protocols These are the standardised control languages used by the majority of DAW software on the market today HUI is used by ProTools MCU by Logic and Nuendo Please refer to your DAW software s user guide if you are unclear which protocol you u...

Page 6: ...deliver uncompressed multi channel low latency digital audio over a standard Ethernet network DAW Digital Audio Workstation Software which emulates a recording studio such as ProTools Logic and Nuendo ipMIDI MIDI control data sent over Ethernet HUI Human User Interface The DAW control protocol used by ProTools and others Layers Different DAW programmes one of which can be controlled by Nucleus2 at...

Page 7: ... channel name and the bottom row the V Pot function When the centre section USeR switches are selected the digital display on channels 9 16 shows the soft key assignments for each corresponding Mode and V Sel switch V Pots and V Sel Switches Turn for the V Pot Press for the V Sel switch Functions are defined by the host application or by pressing a Mode switch When the centre section USeR switches...

Page 8: ... modifier keys Global DAW Control keys Note The function of switches in areas with asterisks are defined in the Nucleus2 Remote Default functions are shown Defines which layer is being edited in the Remote Defines the DAW being controlled Selects soft key sets for the Soft Key Setup display Soft Key Setup Enables single letter automation display Defines which DAW is transport master Select DAW to ...

Page 9: ...way in which audio is sent between Nucleus2 and the host DAW computer is dependant on the connectivity options associated with the DAW s being used The rest of this section describes the installation and connections involved in each option DAWs With a Dante Network Connection For software which can send and receive audio via any soundcard connected to the computer Nucleus2 can be connected directl...

Page 10: ... are sent using the left and right channels of the S PDIF Out and the S PDIF In feeds the monitor inputs If your S PDIF connections are coaxial usually using phono sockets simple coaxial to optical S PDIF converters will be required to connect the soundcard digitally to the Nucleus2 PRe pre amp outputs Using Nucleus2 s Digital IO Ethernet DAW control and Remote USB DAW keyboard commands Optical to...

Page 11: ...us2 PRe Pre Amp outputs and eXTeRNAL monitor inputs can be used to connect Nucleus2 to the soundcard inputs and outputs Note that the PRE amp outputs are sourced from the pre amp s Insert Send so are always active Ethernet DAW control and Remote USB DAW keyboard commands DAW Computer Recording Sources Mains Power Monitoring Headphones SeND Out and eXTeRNAL In MP3 Player External Sound Card ...

Page 12: ...connected to Nucleus2 simultaneously as described on Page 14 This configuration requires both a Network Router and USB switcher ethernet Dante Soundcard and Remote USB DAW keyboard commands DAW Computer Network Router DAW Computer DAW Computer USB switcher ethernet external Dante audio Recording Sources ...

Page 13: ...xt to your registered Nucleus2 console and download the latest support file for your OS Dante Virtual Soundcard Installation of the Dante Virtual Soundcard is optional if you intend to connect Nucleus2 to your DAW using only analogue or S PDIF audio connections you do not need to install Dante Virtual Soundcard To install the optional Dante Virtual Soundcard application To obtain a Dante Virtual S...

Page 14: ...icon to the Applications folder alias This will copy the application onto the computer To run Nucleus2 Remote locate and double click the Nucleus2 Remote icon in the Applications folder If required drag this icon to the Dock on the Desktop to provide quick and easy access If it is necessary to uninstall Nucleus2 Remote simply locate the Nucleus2 Remote icon in the Applications folder and drag it t...

Page 15: ...ual Soundcard shortcut on the Desktop Open Dante Virtual Soundcard from the Desktop icon Click on Licensing and enter the license that was generated in your Audinate account To find this again go to www audinate com login and go to My Products To uninstall Dante Virtual Soundcard run the Uninstall application located in the Dante Virtual Soundcard folder Dante Controller Installation of the Dante ...

Page 16: ...installer To install the ipMIDI driver locate the ipMIDI Setup application and double click this file to launch the ipMIDI installer Follow the instructions in the installer it should be safe to accept the defaults It will be necessary to restart the computer after the driver has been installed To remove the ipMIDI driver simply run the Uninstall application located in the ipMIDI folder ...

Page 17: ... Setup 1 Go to www audinate com 2 Go to Products Dante Via 3 Click on Buy Dante Via select your OS from the dropdown menu then click and download the installer At this point you can purchase a Dante Via license or use the free trial 4 Run the Dante Via installer and open the software please note that you will need to stop Dante Virtual Soundcard if it is already running You will also need to insta...

Page 18: ...s between your soundcard and Nucleus2 To do this expand the transmitter receiver I O by clicking on the signs then click on the channel cross points to route your soundcard channels to Nucleus2 and vice versa as shown below Page 14 Nucleus2 User Guide ...

Page 19: ... SPDIF Optical S PDIF stereo IO The outputs of the Nucleus2 pre amps feed the S PDIF output channel 1 is left channel 2 is right and the S PDIF inputs feed the External monitor connection Data Connections Both Network and USB connections must be made between Nucleus2 and the DAW computer s for systems using multiple computers see Page 16 NeTWORk Standard RJ45 Ethernet connector for DAW data and Da...

Page 20: ...w all traffic apart from UDP ports 21928 through 21947 which are used by ipMIDI and port 50081 which is used by the Nucleus2 Remote application Note that it may be necessary to use a separate Ethernet switch in place of the integrated firewall router switch as some of these can not support the high data transfer rate required The NetGear GS108 an eight port switch has been used successfully at SSL...

Page 21: ...r connecting Nucleus2 to a wider network a multi studio facility for example you will need to set the Mac Network setting Configure IPV4 to Using DHCP The same must be done in the Nucleus Remote Network Tab Both the Nucleus2 and your computer will then be assigned IP addresses automatically If using more than one ipMIDI controller console a pre configured switch is available from the SSL web store...

Page 22: ...itch a DHCP server will probably be available and so Nucleus2 would normally be set to use it rather than the default fixed IP address See Page 14 for details USB A USB switch will be necessary for switching the USB connection between computers This can best be provided by using KVM Keyboard Video Mouse switch with switchable USB ports If an automatic unit is obtained Nucleus2 can be configured to...

Page 23: ...CP server which assigns IP addresses to devices on the network automatically This link local address will be in the range 169 254 x x The Nucleus2 DAW control CPU doesn t do this so it must be assigned a fixed IP address The factory default for the DAW control CPU is a fixed IP address of 169 254 1 2 and can be reconfigured from the Nucleus2 Remote application Network Setup tab The factory default...

Page 24: ...ee Nucleus2 Layers is split across the six ipMIDI ports which means that your DAW must be configured to match the following Note that CC Layers only use the first MIDI port in their layer All CC data is sent on MIDI Channel 1 Setting which ipMIDI ports the DAW should use is performed using the MIDI controller configuration page of your DAW Below and overleaf are two examples using Pro Tools 8 and ...

Page 25: ...2 then provided that there is only one DAW Layer set up with an MCU based Profile Logic should automatically detect the two virtual controllers which will be shown in the Logic Control Surface Setup menu as shown above with the appropriate Nucleus2 ipMIDI ports assigned If Logic fails to detect the control surfaces then the controllers can be added manually via New Install menu and the appropriate...

Page 26: ... to configure your computer IP address before proceeding See pages 15 and 16 for details Now you need to connect the audio routes from the Nucleus2 to the computer This is achieved using the Dante Controller software Open Dante Controller after installation expand the routing matrix by clicking the button Click the two audio cross points between the Nucleus2 and your computer for the inputs and th...

Page 27: ...ee the Audinate website here We also recommend viewing the useful videos about Dante Virtual Soundcard and Dante Controller here SPDIF I O eXTeRNAL SOUNDCARD Setup If you do not need to use the Dante soundcard in Nucleus2 and instead want to configure the SPDIF inputs and outputs with an existing soundcard in your setup you need to first go to the Nucleus2 Remote application go to the Network Setu...

Page 28: ...Page 24 Nucleus2 User Guide Nucleus noun The central and most important part of an object movement or group ...

Page 29: ...locate a Nucleus2 unit the current status will be shown in red as No Nucleus2 Selected Click on Find Alternatively if the Remote has previously been used but it cannot find the Nucleus2 console it expected to locate the current status will instead display the message Nucleus2 SN nnnn is offline where SN nnnn is the ID of the Nucleus2 console expected If this happens first check your connections an...

Page 30: ...occurs and is used for configuring the selected Nucleus2 and its control protocol as described in this Section of the manual The Network Setup Tab The Network tab is used for configuring the Nucleus2 network connection as described in Section 4 The About Tab The About tab displays current software and firmware versions and provides links to support areas of the Solid State Logic website ...

Page 31: ...can also be created from the default Profiles using the Pro Tools default Profile for DAWs that support the HUI interface and the Logic default Profile for DAWs that conform to the MCU protocol Note that the default Profiles themselves cannot be edited Profiles are personalised by creating copies of a default Profile which can then be edited as described on the following pages The soft key sets in...

Page 32: ...simply re power Nucleus2 using the power switch on the rear of the unit Note that depending on the complexity of your setup you may also need to re find Nucleus2 in the Remote after the restart as described on Page 21 MCU User Display Configuration In order to cater for variations in the ways in which MCU protocol DAWs return channel data to the scribble strip displays there is a Flip Scribble Str...

Page 33: ...up Type a new name for the Profile into the pop up and click Ok The Profile s name will change in the Profile list in the Profile Editor Backing up Profiles To back up a Profile or export it for use elsewhere click on edit Profile to bring up the Profile editor popup select the Profile which you wish to back up and click Backup In the pop up which appears edit the name and destination of the file ...

Page 34: ...ation Jog Wheel Function The function of the centre section jog wheel is selected in the Jog Wheel Default area of the Remote s DAW tab The four options are as follows Wheel Sends basic control information which scrolls the timeline in most DAWs Pro Tools Users Note that the wheel does nothing in Wheel mode until Jog Shuttle mode is activated by default Jog Shuttle mode is assigned to the jog whee...

Page 35: ...defaults are in white boxes The MCU protocol defaults are in white letters below the HUI defaults Mode switch 16 labelled keyBID on the far right hand side also comes pre assigned to the Keyboard ID function This function is required for part of the USB set up as described in Section 4 The upper row of buttons left hand Mode switches can become menu selectors accessing eight sub functions assigned...

Page 36: ...ctions These are shown in the command list as Play Foot Switch and Record Foot Switch kVM Hot key This key located adjacent to the foot switch keys is only required on setups where there is more than one DAW computer connected to Nucleus2 The key can be programmed with a command to control an automatic USB KVM switch telling it to switch between computer ports When programmed it outputs a keyboard...

Page 37: ...o you within the selected Profile Note that the list shown below is for Pro Tools See the Appendix for a full list of the commands available for each supported DAW Select the required command from the list and its name will appear in the appropriate part of the Browser s soft key display Soft key assignments must be saved before they become active on Nucleus2 If there are any unsaved changes when ...

Page 38: ...rrent Soft key Set a pop up will appear inviting you to save changes before exiting Press No to exit without saving your changes or yes to save changes First key Modifiers Selecting First key Modifier in the keyboard Shortcut Setup box before pressing Learn causes any modifier key release signals to be delayed until Learn is pressed again This allows key combinations which the DAW computer would o...

Page 39: ... scribble strip will then contain dashes above each V Sel switch indicating that they are available for assigning You can now assign functions to the V Sel switch in the same way as you would for any other soft key as described previously Once you have created the soft key assignments for this menu selecting another top row button that has been assigned as a menu selector will switch the on screen...

Page 40: ...d the key release signals are sent in the reverse order In other words using HUI DAW protocol as an example if Shift All is the first command and Play the second then when the switch is pressed it will send the press of Shift All followed by the press of Play and when the switch is released it will send the release of Play followed by the release of Shift All This means that modifiers need to be p...

Page 41: ...olute controllers not as incremental devices and that the SeL and V Sel switches emulate latched switches sending appropriate on and off values as they change state Please refer to your MIDI device s manual for instructions regarding mapping these CC numbers within the MIDI device CC Displays When a Nucleus2 DAW Layer that is controlling a MIDI device is selected the bottom row of the scribble str...

Page 42: ...Page 38 Nucleus2 User Guide Blank page well nearly ...

Page 43: ...ports can be controlled simultaneously from one transport master The active layer is selected by pressing the DAW 2 and DAW 3 switches above the jog wheel DAW 1 is controlled when neither switch is selected SOFT keyS While most of the switches on Nucleus2 come with a function assigned many of them can be altered to trigger any DAW keyboard command or any command within the appropriate DAW protocol...

Page 44: ... track arming by pressing the centre section ReC switch see below automation using the centre section AUTO switch see below and for assigning plug ins to the Nucleus2 plug in editor using the centre section PARAM switch see Page 42 Channel Metering DAW channel meters are replicated at the top of each Nucleus2 channel strip above the Mode switch Track Arming The channel SeL switches can be used as ...

Page 45: ...2 user soft keys are selected Note also that the functions assigned to the Mode switches are programmed in the Nucleus2 Remote See Section 5 for more information Flip Mode Pressing the FLIP switch to the right of the left hand display triggers the HUI Shift command or the MCU Flip command and assigns the V Pot parameter to the fader Pro Tools users FLIP only works on Sends A to E In FLIP mode the ...

Page 46: ...g in to be controlled Insert Mode V Pot 16 scrolls the page between Inserts 1 4 and Insert 5 as indicated in the top row of the scribble strip In the Inserts 1 4 page Inserts 1 4 can be accessed by pressing V Sels 9 11 12 and 14 In the Insert 5 page Insert 5 is accessed via V Sel 9 The selected insert label will flash to indicate that it has been selected Channel 15 s V Sel switches Assign mode on...

Page 47: ...re FF RW and HUI only timeline scrolling resolution is controlled by the Timeline format and Nudge value respectively and TRACkS which assigns the channel scrolling function to the jog wheel Pro Tools Users Note that the wheel does nothing in Wheel mode until Jog or Shuttle mode is activated using the jog wheel switch Jog or Shuttle mode is assigned to the jog wheel switch via the Transport Utilit...

Page 48: ...ions deselect both USeR 1 or USeR 2 switches Each Mode switch can be run either as a simple soft key triggering any DAW computer keyboard command or any command within the relevant DAW protocol or as a menu switch each menu switch accesses a subset of soft keys laid out across the V Sel switches below Taking the V Sel assignments which will be active with no Mode switches selected in to account th...

Page 49: ...l is controlled independently using the HP LeVeL control below CHANNeL 2 Normally the monitor and headphone outputs receive a mix of the inputs to Channels 1 and 2 and the DAW return allowing for true zero latency monitoring The mix between the two is adjusted using the BLeND control below CHANNeL 1 to hear more of the inputs turn it towards DRy and to hear more of the computer turn it towards WeT...

Page 50: ...he processed signal to the stereo master within the DAW TALkBACk The Talkback input on the rear of the console feeds the headphone inputs when the momentary TALk switch is pressed The input has a built in mic pre circuit with gain adjustable between 20dB and 55dB via the flathead screw above the XLR socket The talkback feed triggers a 20dB drop in the Main and Mini monitor output levels this can b...

Page 51: ...site Switch Type Pro Tools Logic Nuendo Cubase Transport RTZ RTZ Stop Stop USB eND End LOOP Loop Cycle Cycle ONLINe On Line USB PUNCH Quick Punch Drop Punch PReVIOUS Prev Marker USB Previous NeXT Next Marker USB Next LAST CUe Last Marker NUDGe Keypad USB USB NUDGe Keypad USB USB Utility SHIFT Shift All Shift Shift OPT ALL Option All Option CTRL Control Control USB ALT CMD Alt Fine Alt USB eSC Func...

Page 52: ...Auto Suspend AutoS Audition Post AudPst Save Save RTZ RTZ Auto Enable Plugin Plugin End End Auto Enable Pan Pan On line Online Auto Enable Fader Fader Loop Loop Auto Enable Send Mute SMute Quick Punch QPunch Auto Enable Send Send Forward Forwrd Auto Enable Mute Mute Rewind Rewind Auto Mode Read Read Stop Stop Auto Mode Latch Latch Play Play Auto Mode Trim Trim Record Record Auto Mode Touch Touch N...

Page 53: ...Key 2 F2 Cycle Cycle Function Key 3 F3 Drop Drop Function Key 4 F4 Replace Rplace Function Key 5 F5 Click Click Function Key 6 F6 Solo Solo Function Key 7 F7 Forward Forwrd Function Key 8 F8 Rewind Rewind MIDI Tracks MIDITr Stop Stop Inputs Inputs Play Play Audio Tracks AudTr Record Record Audio Instruments AudIns VSel 1 VSel 1 Aux Aux VSel 2 VSel 2 Busses Busses VSel 3 VSel 3 Outputs Outpts VSel ...

Page 54: ...n Key 1 F1 Solo Defeat SolDef Function Key 2 F2 Shift Shift Function Key 3 F3 Left Left Function Key 4 F4 Right Right Function Key 5 F5 Cycle Cycle Function Key 6 F6 Punch Punch Function Key 7 F7 Previous Prev Function Key 8 F8 Add Add Fader Group 1 FadGp1 Next Next Fader Group 2 FadGp2 Forward Forwrd Fader Group 3 FadGp3 Rewind Rewind Fader Group 4 FadGp4 Stop Stop Fader Group 5 FadGp5 Play Play ...

Page 55: ...ULT 35 Default Soft Keys 25 DHCP 12 14 DYN switch 37 e ENTER 37 EQ switch 37 ESC 37 EXT switch 40 EXTERNAL Connections 15 F F1 and F2 37 Flip Mode 35 Foot Switches 26 FOOTSWITCH connector 15 G Glossary 2 H Headphones 39 HEADPHONES connector 15 Hi Z 39 HP LEVEL 39 HUI 2 21 I iJack 40 iJack connector 15 INS 39 INSTRUMENT 35 IP address 12 ipMIDI 2 ipMIDI Installation 9 10 ipMIDI Configuration 15 16 J...

Page 56: ...l Pro Tools 36 PRE Connections 15 Profiles 21 Protocols 21 R REC switch 34 Record Ready 34 Recording Sources 39 Remote Installation 11 S S PDIF 5 11 SAVE 37 Scrolling channels 34 SEL key 34 SEND RETURN Connections 15 SHIFT 37 Show Auto Mode 24 Show Sub Keys 29 Soft Key Configuration 25 Soft Keys 33 Software Versions 2 SOLO 34 Soundcards proprietary 5 6 T TALKBACK 42 TERMINAL connector 15 TRACK 35 ...

Page 57: ...Nucleus2 User Guide Page 53 Notes ...

Page 58: ...ged No part of this publication may be reproduced in any form or by any means whether mechanical or electronic without the written permission of Solid State Logic Oxford OX5 1RU England As research and development is a continual process Solid State Logic reserves the right to change the features and specifications described herein without notice or obligation Solid State Logic cannot be held respo...

Reviews: