background image

11

 Available  immediately   

 1– 5  years  guarantee   

 Cash  &  carry  discount  of  5%   

 Free  shipping (Germany) 

CHECKLIST FOR MAINTENANCE/INSPECTION

Monthly intervals

1

2

6

12

1

Check the hydraulic oil cylinder, the piston is quiet and no fluid is leaking

2

Check the hydraulic connections and hoses for damage and leaks

3

Check the hydraulic oil level and top up oil if necessary

4

Replace hydraulic oil after 12 months or 1500 operating hours

5

Check and adjust the pressure valve function (1000 kg +0/ +10%)

Mechanics

6

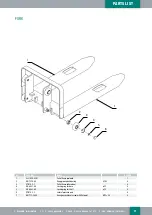
Check the fork for deformation or cracks

7

Check the chassis for deformation or cracks

8

Check that all screws are tightened properly

9

Check the chassis and chain for corrosion, deformation or damage, replace the chain if necessary

10

Check the gearbox for noise and leakage

11

Check the wheels / rollers for deformation and/or damage, replace defective wheels if necessary

12

Lubricating the steering

13

Control and lubrication centre

14

Check grease nipple

15

Replace protection and/or protection board, if damaged

Electrics

16

Check if wires are damaged

17

Check electrical connections and the terminal

18

Testing the emergency stop switch function

19

Check the electric motor for noises

20

Check display/indicators for function

21

Check fuses and replace if necessary

22

Test of the acoustic signal

23

Check the contacts

24

Check that the frame is tight (insulation test)

25

Check the function and wear of the accelerator

26

Check the drive motor of the electrical system

Brake system

27

Check the brake performance; if necessary replace the brake discs or adjust the distance between 
the brakes

Battery

28

Check the battery voltage

29

Clean and check for corrosion or damage

30

Check whether the battery housing is damaged

Battery charger

31

Check if the power cable is damaged

32

Start protection program check during charging

Functions

33

Test of the signal tone

34

Checking the Electromagnetic Brake with Air Gap

35

Testing the emergency brake function

36

Test of reverse braking and regenerative braking function

37

Testing the large red emergency stop switch on the drawbar (belly switch)

38

Check the steering function

39

Check the lifting and lowering function

40

Check the functions of the drawbar

41

Check the key switch for damage

42

The limit switch for the detection speed (the lifting height is >~300mm)

Miscellaneous

43

Check that all labels are legible and complete

44

Check whether the protective grille is damaged

45

Check the drawbar if it is worn for height adjustment or replacement

46

Perform a test run

GENERAL

Summary of Contents for HE1200/3

Page 1: ...ASSEMBLY OPERATING INSTRUCTIONS Electric Forklift HE1200 3 Before using please read this manual and please do not use the Forklift before the installation is complete...

Page 2: ...te 6 Maintenance 6 Operating instructions 7 8 Charging and replacing the battery 9 Regular inspections 10 Checklist for maintenance inspection 11 Troubleshooting 12 PARTS LIST Wheel System 13 Mounting...

Page 3: ...so Do not use the truck unless you have checked that it is in perfect condition Pay particular attention to the chain wheels drawbar chassis control unit mast battery etc Do not use on very dirty floo...

Page 4: ...0 transverse mm 2068 Aisle width for pallets 800 1200 in longitudinal direction mm 2034 Turning radius Wa mm 1336 Wheel size front number mm 80 70 4 Wheel size rear wheel number mm 210 70 1 Additional...

Page 5: ...pressing this function Insert the key 16 and turn it clockwise For safety and to prevent unauthorised use the key must be turned anticlockwise and pulled out Follow the instructions on the safety lab...

Page 6: ...driving straight ahead Check the chain and roller for damage or corrosion Check that the wheel moves smoothly Press the emergency stop button to check the emergency brake function Check brake functio...

Page 7: ...fe area Turn the key counterclockwise to the off position and remove the key LOAD CURVE The load curve shows a given load centre C mm and the horizontal load capacity of the largest load Q kg and the...

Page 8: ...ng this lever Or by moving the direction lever in the opposite direction until it begins to move in the other direction When the tiller is moved up or down into the braking zone B the vehicle braking...

Page 9: ...use of the sealed lead acid battery is permitted the additional battery weight has an influence on the behaviour of the vehicle Note Please observe the maximum operating temperature of the battery REP...

Page 10: ...failure and possibly to an accident Have only one technician trained for work on the pressure regulating valve carry out the work If you need to replace a wheel please follow the above instructions Th...

Page 11: ...tric motor for noises 20 Check display indicators for function 21 Check fuses and replace if necessary 22 Test of the acoustic signal 23 Check the contacts 24 Check that the frame is tight insulation...

Page 12: ...e battery is not connected Connect the battery correctly to the charger The fuse is out Check the fuse and replace it where appropriate Low battery Charging the battery The emergency stop switch is ac...

Page 13: ...pin 5 35 8 3 DFL25 1 14D Connection plate 4 4 CL10 4H Front axle 2 4 5 SL20 1 9 Washer 8 6 GB T 276 94 Deep groove ball bearing 6204 8 7 CL10 5 Small wheel 4 8 GB T 70 1 2000 Hexagon socket head cap s...

Page 14: ...Name Quantity 1 GB T 818 2000 Phillips screw M6 16 6 2 SPN10 0 6 Protective cover clip 6 3 SPN1016 0 4 Protective cover 1 4 CLJ1030 06 2 Large flat head Phillips screw 1 5 CLJ1030 06 4 Cover 1 6 CLJ1...

Page 15: ...traight hydraulic grease nipples M6 2 5 GB T 301 1995 Pressure ball bearing 51111 2 6 GB T 276 94 Deep groove ball bearing 6205 2Z 2 7 CL10 5 5 3 Seal 2 8 M20 1 5 Slotted nut 2 9 CL10 5 5 4G Frame 2 1...

Page 16: ...44 0 20 78 94 15 16 info topregal com www topregal com PARTS LIST 32 27 28 29 DRIVE INSTALLATION 14 33 15 17 18 19 20 21 22 16 23 24 25 26 30 31 34 35 36 37 38 39 40 41 42 1 2 3 4 5 6 7 8 9 10 12 13...

Page 17: ...1 2000 hexagon socket head screw M6 20 8 18 GB T93 1987 Spring washer 6 8 19 GB T70 1 2000 hexagon socket head screw M8 35 5 20 GB T93 1987 Spring washer 8 5 21 GB T70 1 2000 hexagon socket head screw...

Page 18: ...2 02 Spring Washer Assembly 1 10 GB T 6177 1 2000 Hexagon nuts with flange M8 1 11 GB T 70 1 2000 Hexagon socket screws M10 20 1 12 GB T 70 3 2000 Countersunk flat head screw with hexagon socket M8 20...

Page 19: ...Free shipping Germany PARTS LIST No Code No Name Quantity 1 CLJ1030 05 Oil cylinder module 1 2 GB982 77 Seal 18 1 3 CLJ1030 04 1 Rubber hose 1 4 SPN10 8 6 Oil connection 1 5 CLJ1030 01 03 03 Aggregate...

Page 20: ...y 1 8 GB T 70 1 2000 Hexagon socket head cap screws M4 40 1 9 GB T 70 1 2000 Hexagon socket head cap screws M4 35 1 10 TY 02 32 Fuse holder 1 11 GB T 95 2002 Flat washer 4 2 12 GB T 93 1987 Spring was...

Page 21: ...1 CLJ1030 03 01 Pallet frame welded 1 2 GB T 276 94 Deep groove ball bearing 6205 4 3 SPN10 3 1 Pallet frame roller wheel 4 4 GB 893 1 86 Locking ring for bore 52 4 5 GB 894 1 86 Locking ring for sha...

Page 22: ...22 44 0 20 78 94 15 16 info topregal com www topregal com PARTS LIST LIFTING SYSTEM 21 17 1 5 6 16 14 7 9 8 10 26 4 3 2 13 20 22 23 25 24 15 14 13 18 17 18 19 15 14 13 15 14 13 1 2 3 11 12...

Page 23: ...ng ring for shaft 25 2 10 SPN10 3 3 Lateral pressure pad 2 11 SPN10 7 1 3 Guide wheel 2 12 SPN10 7 1 Centre distance of the guide wheels 2 13 GB T 95 2002 Flat washer 8 18 14 GB T 93 1987 Spring washe...

Page 24: ...V 26 05 20 TOPREGAL GmbH Industriestrasse 3 70794 Filderstadt Germany Telephone 49 0 7158 9181500 Email info topregal com Website www topregal com...

Reviews: