background image

16

Before using

Please read the following instructions carefully. They 
contain important information about operating and 
caring for your appliance, as well as about safety. 
We recommend you retain these notes for future 
use.

1. General information

–   Before connecting the appliance, check that the 

voltage indicated on the appliance information 
plate matches your mains voltage.

–   Always clean the appliance with a dry or at most 

a slightly damp cloth.

–   All repairs must be carried out by approved 

service centres (e.g. SOLIS Customer Service). 
Non approved repairs pose a risk for the user.

–   No liability for any damage or injury can be 

accepted if the appliance is used or operated 
in any way that does not conform with these 
instructions, or if an unapproved repair is carried 
out. All warranty claims will also be invalid.

–   Protect the appliance from frost; do not leave 

overnight in the car in winter as this may dam-
age your machine.

Safety advice 

–   Never operate the appliance with a defect 

power cord.

–   Never operate the appliance without the coffee 

wast container, without water or without the 
drip tray and cup grille.

–   Only use original SOLIS-1,2,3 SPRESSO coffee 

portions. Normal coffee portions may damage 
the appliance, in which case no liability can be 
accepted. All warranty claims will also be invalid.

–   Never unplug the appliance by pulling on the 

cord; never handle the plug with wet hands.

–   Never immerse the appliance in water.
–   Children do not realise the risks associated with 

electrical equipment – never leave children 
unsupervised with electrical appliances.

2.  Installation / 

Before first use 

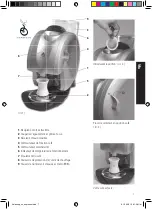
2.1  Open water tank cover (9), remove water tank 

(3), fill with cold water and replace. 

      Replace  water tank cover.
2.2 Set coffee selector (4) to position 0.
2.3  Set the ON/OFF switch (5) to position I. Wait 

until the operating temperature indicator  
(6) shows green.

2.4  Insert an original SOLIS-1,2,3 SPRESSO coffee 

portion in the opening provided and place a 
coffee cup under the coffee outlet.

2.5  Turn the coffee selector (4) from position 0 to 

position I and allow cup to fill. When full, turn 
the coffee selector back to position 0. The used 
coffee portion will automatically fall into the 
coffee waste container when switch is returned 
to position 0. The first coffee you make when 
using your appliance for the first time will  
«clean»  your factory-new machine and should 
not be drunk.

3. Making coffe  

Note: This appliance will only function with original 
SOLIS-1,2,3 SPRESSO coffee portions.

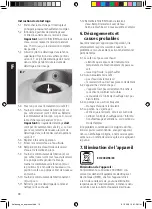
3.1  Open water tank cover (9), remove water tank 

(3), fill with cold water and replace. 

      Replace water tank cover.
3.2  Check that the ON/OFF switch (5) is in position 

I and the operating temperature indicator  

      ( 6) shows green.
3.3  Place an original SOLIS-1,2,3 SPRESSO coffee 

portion in the opening provided for this       
purpose. Position a coffee cup under the coffee 
outlet.

3.4  Turn the coffee selector (4) from position 0 to 

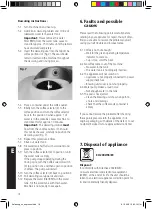
position I (Fig.3) and allow cup to fill. When 


 full, turn the coffee selector (4) back to  
position 0. The used coffee portion will auto-
matically fall into the waste coffee container 
when coffee selector (4) is returned to  
position 0.  

E

Anleitung_oh_espresso.indd   16

9.1.2008   10:02:10 Uhr

Summary of Contents for 1,2,3 SPRESSO Oh EXPRESSO

Page 1: ...loi Istruzioni per l uso Instructions for use ESPRESSO PORTIONEN AUTOMAT AUTOMATE PORTIONS ESPRESSO MACCHINA PER ESPRESSO IN PORZIONI COFFEE MACHINE FOR PORTIONS Typ Type Tipo 112 Anleitung_oh_espresso indd 1 9 1 2008 10 01 47 Uhr ...

Page 2: ...trage Page 9 10 Dérangements et causes probables Page 10 Elimination Page 10 Sommario Didascalia Pagina 11 Avvertenze generali Pagina 12 Messa in funzione Pagina 12 Preparazione del caffè Pagina 12 Manutenzione e pulizia Pagina 13 Decalcificazione Pagina 13 14 Guasti e possibili cause Pagina 14 Smaltimento Pagina 14 Table of contents Picture legend Side 15 General information Side 16 Installation S...

Page 3: ...sschalter Kaffee 5 Betriebsschalter EIN AUS 6 Betriebstemperatur Anzeige 7 Kaffeeauslauf 8 Brüheinheit Schutzdeckel 9 Wassertankdeckel mit BRITA Memo Portion einführen Abb 2 den Funktionswählschalter auf Kaffee stellen Abb 3 Ihr Kaffee ist fertig Abb 1 Anleitung_oh_espresso indd 3 9 1 2008 10 01 52 Uhr ...

Page 4: ...erlischt Den Stecker nie am Kabel oder mit nassen Händen aus der Steckdose ziehen Gerät nicht ins Wasser tauchen Kinder erkennen die Gefahren nicht die im Umgang mit Elektrogeräten entstehen können deshalb Kinder nie unbeaufsichtigt mit Elektro geräten alleine lassen 2 Inbetriebnahme Vor dem ersten Gebrauch 2 1 Wassertankdeckel 9 abnehmen Wassertank 3 entfernen mit Kaltwasser füllen und wieder ein...

Page 5: ...kalkungsanleitung zurückzuführen sind fallen nicht unter Garantie Insbesondere darf für die Entkalkung in keinem Fall Essig oder andere gebräuchliche Entkalkungsmittel mit Amidosulfonsäure verwendet werden da diese den Kunststoff zerstören würden 3 4 Funktionsschalter Kaffee 4 von Stellung 0 auf Stellung Kaffee drehen Abb 3 und Tasse auffüllen Wenn Tasse aufgefüllt Funktions schalter Kaffee 4 zurü...

Page 6: ...lt zu einer Sammelstelle für Elektrogeräte Entkalkungsanleitung 5 1 Maschine einschalten und aufheizen 5 2 2 Solis Entkalkungstabletten und l lauwar mes Wasser zusammen in Wassertank geben Achtung vorher BRITA Filterpatrone aus Wassertank entfernen Wassertank ca 15 Min stehen lassen bis Tabletten vollstän dig aufgelöst sind 5 3 Die mit den Entkalkungstabletten mitge lieferte Entkalkungsdichtung ob...

Page 7: ...n café 5 Commutateur marche arrêt 6 Indicateur de température de fonctionnement 7 Ecoulement du café 8 Couvercle de protection de l unité de chauffage 9 Couvercle du réservoir d eau avec memo BRITA Introduisez la portion ill 2 Placer le selécteur en position café ill 3 Votre café est servi ill 1 Anleitung_oh_espresso indd 7 9 1 2008 10 01 58 Uhr ...

Page 8: ...ponsabilité de SOLIS Il n y a également plus droit à la garantie Ne jamais tirer sur le cordon ou retirer la fiche en avant les mains humides Ne jamais plonger l appareil dans l eau Les enfants n ont pas conscience des dangers inhérents à l utilisation d un appareil électrique aussi ne pas les laisser sans surveillance à proximité de tels appareils 2 Mise en service Avant la première utilisation 2...

Page 9: ...e chauffage vers l avant et horizontalement ill 5 et 6 Pour le nettoyage n utiliser que de l eau chaude Sécher l unité de chauffage 4 5 Replacer l unité de chauffage nettoyée dans son logement toujours avec précaution Remettre le dispositif d arrêt en position 4 6 Refermer le couvercle de protection de l unité de chauffage 5 Détartrage La machine est à détartrer régulièrement selon la dureté de l ...

Page 10: ...de la fente et nettoyer à l eau chaude 5 12 Remettre le filtre BRITA dans le réservoir d eau Remplir le réservoir avec de l eau fraîche la machine est à nouveau prête à l emploi 6 Dérangements et causes probables Avant de renvoyer l appareil pour réparation lire attentivement les poins suivants Souvent le problème se résout aisément évitant énervement et perte de temps 6 1 Le café n est pas assez ...

Page 11: ...a 4 Selettore caffè 5 Interruttore I 0 6 Indicatore temperatura d esercizio 7 Becco caffè 8 Coperchio gruppo caffè 9 Coperchio serbatoio acqua con memo BRITA Introducete la cialda fig 2 Portare il selettore in posizione caffè fig 3 il vostro caffè è servito fig 1 Anleitung_oh_espresso indd 11 9 1 2008 10 02 04 Uhr ...

Page 12: ...acchina può subire dei danni nel qual caso si declina qualsiasi respon sabilità In un caso del genere la garanzia si estingue Non staccate mai la spina dalla presa tirandola per il cavo o prendendola con le mani bagnate Non immergete mai la macchina in acqua I bambini non conoscono il pericolo inerente all uso di apparecchi elettrici perciò non lasciate mai un bambino da solo con un appa recchio e...

Page 13: ...tra il gruppo di caffè Sfilate con cautela il gruppo caffè tirandolo oriz zontalmente in avanti fig 5 e 6 Per pulirlo utilizzate esclusivamente acqua calda quindi asciugatelo bene 4 5 Rimettete con cautela il gruppo di caffè 4 6 Chiudete il copercchio del gruppo 8 5 Decalcificazione La macchina va decalcificata periodicamente in base al tenore di calcare dell acqua anche se si usa il filtro per l a...

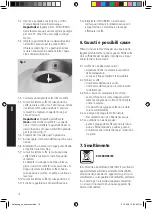
Page 14: ... selettore caffè 4 sulla posizione 0 5 11 Estrarre la guarnizione di decalcificazione 5 12 Rimettere il filtro BRITA nel serbatoio dell acqua riempire il serbatoio acqua con acqua fredda La macchina é pronta per effettuare il caffè 6 Guasti e possibili cause Prima di inviare la macchina per una riparazione leggete attentamente i punti seguenti Molte volte ciò è sufficiente per risolvere il problem...

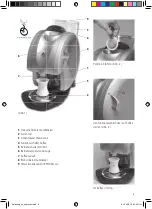
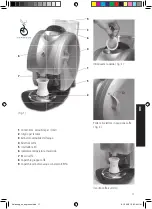
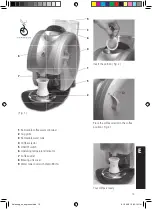
Page 15: ...4 Coffee selector 5 ON OFF switch 6 Operating temperature indicator 7 Coffee outlet 8 Brewing unit cover 9 Water tank cover with memo BRITA Insert the portion Fig 2 Place the coffee selector in the coffee position Fig 3 Your coffee is ready Fig 1 Anleitung_oh_espresso indd 15 9 1 2008 10 02 10 Uhr ...

Page 16: ...ctrical equipment never leave children unsupervised with electrical appliances 2 Installation Before first use 2 1 Open water tank cover 9 remove water tank 3 fill with cold water and replace Replace water tank cover 2 2 Set coffee selector 4 to position 0 2 3 Set the ON OFF switch 5 to position I Wait until the operating temperature indicator 6 shows green 2 4 Insert an original SOLIS 1 2 3 SPRESS...

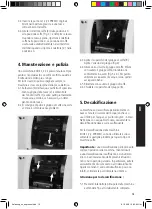
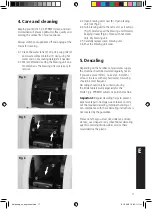
Page 17: ...unit 4 5 Carefully replace clean brewing unit 4 6 Shut the brewing unit cover 5 Descaling Depending on the hardness of your water supply the machine should be descaled regularly even if you use a water filter i e every 4 6 months at least In areas with very hard water descaling should be more frequent Descaling should only be carried out using the SOLIS tablets made especially for the SOLIS 1 2 3 ...

Page 18: ...11 Pull descaling seal upwards and clean 5 12 Replace the water filter BRITA in the water tank Fill the water tank with fresh water Machine is now ready to use again 6 Faults and possible causes Please read the following points carefully before sending in your appliance for repair You will often find you are able to resolve the problem yourself saving yourself trouble and inconvenience 6 1 Coffee ...

Page 19: ...Anleitung_oh_espresso indd 19 9 1 2008 10 02 12 Uhr ...

Page 20: ...SOLIS AG Solis Haus CH 8152 Glattbrugg Zürich Telefon 41 44 874 64 54 Fax 41 44 874 64 99 info solis ch www solis ch 002 43 Anleitung_oh_espresso indd 20 9 1 2008 10 02 12 Uhr ...

Reviews: