61
7.
Replace the steam duct (
I
) into the water tank above the heater unit, tighten
it counter clock wisely and place cover as well as aroma tray on the appliance.
8.
Clean the outside of the appliance with a soft, moist cloth and, if necessary,
some mild detergent. Never dip the appliance into liquid and do not spray the
appliance with water or other liquids.
CAUTION:
Never use aggressive, abrasive or caustic detergents or a scratching
sponge. The plastic casing might be damaged.
2. STORAGE
•
Pour all water out of the tank and the heater unit. Dry the entire appliance
with a soft cloth. Leave the appliance open – with the cover removed – until it
is completely dry.
•
Store the appliance protected from dust in a dry and dark place with good air
circulation.
Summary of Contents for 7215
Page 6: ...6 GERÄTEBESCHREIBUNG Abb 1 A B C D E F G H I J K ...
Page 9: ...9 Abb 2 Abb 3 MAX Linie für max Wassermenge 2 8 l Abb 4 ...
Page 11: ...11 Abb 5 EIN Taste innen AUS Taste herausstehend Abb 6 Abb 7 ...
Page 17: ...17 ...
Page 22: ...22 DESCRIPTION DE L APPAREIL Fig 1 A B C D E F G H I J K ...
Page 25: ...25 Fig 2 Fig 3 MAX ligne indiquant le niveau maximum d eau 2 8 l Fig 4 ...
Page 27: ...27 Fig 5 MARCHE touche enfoncée ARRET touche sortie Fig 6 Fig 7 ...
Page 33: ...33 ...
Page 38: ...38 DESCRIZIONE DEL DISPOSITIVO Fig 1 A B C D E F G H I J K ...
Page 41: ...41 Fig 2 Fig 3 MAX Indicatore della quantità massima di acqua 2 8 l Fig 4 ...
Page 43: ...43 Fig 5 ON Tasto dentro OFF Tasto fuori Fig 6 Fig 7 ...
Page 49: ...49 ...
Page 54: ...54 APPLIANCE DESCRIPTION Fig 1 A B C D E F G H I J K ...
Page 57: ...57 Fig 2 Fig 3 MAX Line for max water amount 2 8 l Fig 4 ...
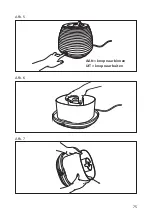
Page 59: ...59 Fig 5 ON button pressed in OFF button standing out Fig 6 Fig 7 ...
Page 65: ...65 ...
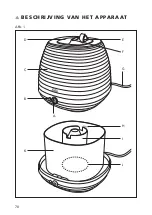
Page 70: ...70 BESCHRIJVING VAN HET APPARAAT Afb 1 A B C D E F G H I J K ...
Page 73: ...73 Afb 2 Afb 3 MAX De lijn die de maximale hoeveelheid water aangeeft 2 8 l Afb 4 ...
Page 75: ...75 Afb 5 AAN knop naar binnen UIT knop naar buiten Afb 6 Afb 7 ...


