background image

20

UTILIZZO DEL COMPACT MIXER

Attenzione: estraete la spina di rete dell’apparecchio prima di inserire o estrarre la frusta o il gancio  
per impastare.

Inserimento della frusta/del gancio per impastare

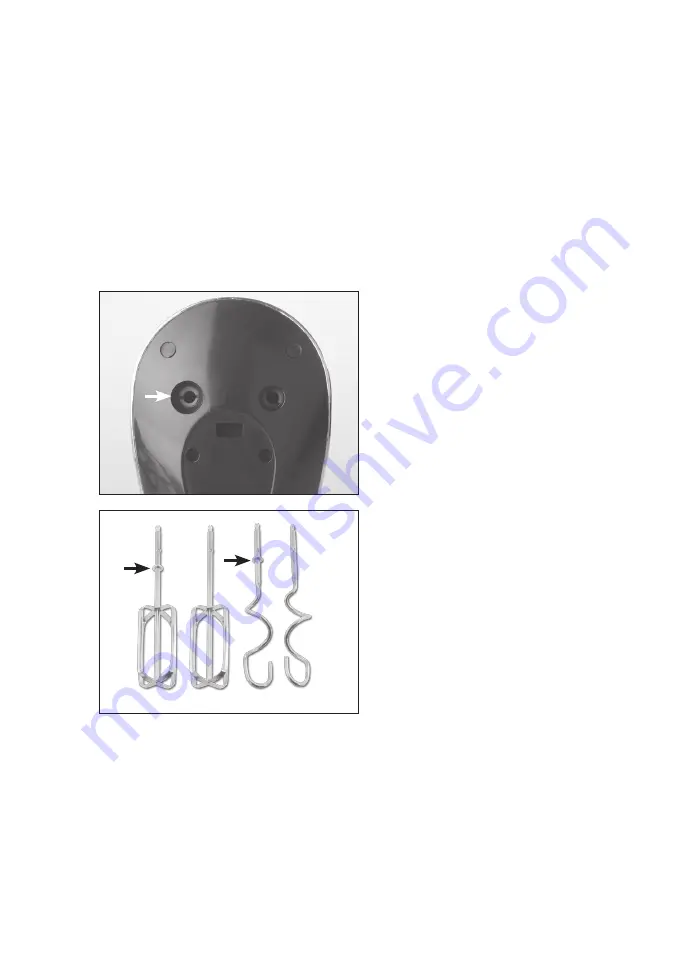
Una delle due fruste ovvero dei due ganci per impastare è marcata con un anello (Illustrazione 2).

1.  Inserite la frusta o il gancio con l’anello nell’apertura più grande dell‘apparecchio. Se lo si inserisce  


nell’altra apertura la frusta o il gancio non si blocca a scatto. (Illustrazione 1).

2.  Inserite la frusta o il gancio senza marchio anello nell’apertura più piccola.

Rimozione della frusta/del gancio per impastare

1.  Estraete la spina di rete dopo l’utilizzo dell‘apparecchio.
2.  Premete il tasto EJECT, per rimuovere la frusta o il gancio per impastare.  
 

Non premete tale tasto durante il funzionamento.

Illustrazione 1

Illustrazione 2

Summary of Contents for 829

Page 1: ...COMPACT MIXER TYP TYPE TIPO 829 Bedienungsanleitung Mode d emploi Istruzioni per l uso User Manual Gebruiksaanwijzing S I N C E 1 9 0 8 ...

Page 2: ...ters FI Sicherheitsschalter um einen zusätzlichen Schutz bei der Verwendung von elektrischen Geräten zu gewährleisten Es ist ratsam einen Sicherheitsschalter mit einem Nennfehlerbetriebsstrom von maximal 30 mA zu verwenden Fachmännischen Rat erhalten Sie bei Ihrem Elektriker Lüftungsschlitze EJECT Taste zum Auswerfen der Schneebesen bzw Knethaken Schneebesen Knethaken Aufbewahrungscontainer für Zu...

Page 3: ...r heraus bevor Sie die Schneebesen oder die Knethaken einsetzen oder entfernen nach dem Gebrauch vor dem Reinigen des Geräts falls während des Gebrauchs Störungen auftreten Verwenden Sie den COMPACT MIXER nicht wenn das Gerät oder das Netzkabel sichtbare Schäden aufweisen oder das Gerät herunter gefallen ist Nehmen Sie keine Änderungen am Gerät selbst oder am Netzkabel des Geräts vor Das Netzkabel...

Page 4: ...ebesen Knethaken mit dem Ring in die grössere Öffnung des Geräts ein Beim Einsetzen in die andere Öffnung rastet der Schneebesen Knethaken nicht ein Abb 1 2 Setzen Sie den Schneebesen Knethaken ohne Ringmarkierung in die kleinere Öffnung ein Entfernen der Schneebesen Knethaken 1 Ziehen Sie nach Gebrauch des Geräts den Netzstecker heraus 2 Drücken Sie die Taste EJECT um die Schneebesen oder Knethak...

Page 5: ...um Geschwindigkeitsstufen zu überspringen Nach 9 Minuten und 59 Sekunden springt die Uhr auf 0 Minuten und 00 Sekunden zurück und beginnt erneut zu zählen 4 Drücken Sie die Taste um den COMPACT MIXER abzuschalten HINWEIS Um das übermässige Spritzen oder Stauben beispielsweise von Mehl zu vermeiden führen Sie die Schneebesen oder Knethaken vollständig in die Zutaten ein bevor Sie das Rührgerät eins...

Page 6: ...taten bzw wenn eine niedrige Geschwindigkeit angebracht ist Stufe 4 Zum Mischen von flüssigen Zutaten oder zum Hinzufügen von Flüssigkeiten zu trockenen Zutaten Stufe 5 6 Besonders geeignet zum Kneten von Teig Stufe 7 Für die wechselnde Zugabe von trockenen und flüssigen Zutaten Stufe 9 10 Zum Mischen von Fertig Kuchenmischungen oder wenn eine mittlere Geschwindigkeit angebracht ist Stufe 11 Beisp...

Page 7: ...mittel Die Einsätze sind spülmaschinenfest Reinigung des Handrührgeräts Wischen Sie das Gehäuse mit einem leicht feuchten Tuch ab Verwenden Sie keine aggressiven Scheuer oder Lösungsmittel Achten Sie darauf dass keinerlei Flüssigkeit in das Gerät gelangen kann Fehlersuche und behebung Keine Funktion Ist das Netzkabel eingesteckt Ist das Gerät eingeschaltet Schneebesen Knethaken Fügen Sie den Zutat...

Page 8: ...ungsgemässen Entsorgung des Geräts deutlich hervorzuheben ist es mit dem Symbol eines durchgestrichenen Abfallcontainers gekennzeichnet SOLIS behält sich das Recht vor jederzeit technische und optische Veränderungen sowie der Produktver besserung dienliche Modifikationen vorzunehmen SOLIS HELPLINE 044 874 64 14 Nur für Kundinnen und Kunden in der Schweiz Dieser Artikel zeichnet sich durch Langlebi...

Page 9: ... Watt 16 Geschwindigkeitsstufen Digitalanzeige 300 Watt Februar 2014 Solis of Switzerland AG Solis Haus CH 8152 Glattbrugg Zürich Schweiz Telefon 41 44 874 64 54 Telefax 41 44 874 64 99 info solis ch www solis ch www solis com ...

Page 10: ...commutateur de sécurité FI pour garantir une protection supplémentaire dans l emploi d appareils électriques Il est conseillé d employer un commutateur de sécurité avec un courant nominal d erreur de 30 mA au maximum Vous trouverez des conseils professionnels chez votre électricien Fentes d aération Bouton EJECT permettant de retirer les fouets batteurs et pétrisseurs Fouets batteurs Fouets pétris...

Page 11: ...z le câble d alimentation de la prise secteur avant de mettre ou de retirer les fouets batteurs et pétrisseurs après chaque utilisation avant de nettoyer l appareil si des anomalies surviennent lorsque l appareil est en fonctionnement N utilisez pas le COMPACT MIXER lorsque l appareil ou le câble d alimentation montre des dommages bien visibles ou lorsque l appareil est tombé Ne pratiquez jamais v...

Page 12: ... l ouverture la plus grande de l appareil Si vous l introduisez dans l autre ouverture le fouet ne se verrouillera pas Figure 1 2 Introduisez le fouet ne portant pas de bague dans l ouverture la plus petite Enlèvement des fouets batteurs et pétrisseurs 1 Lorsque vous avez fini d utiliser l appareil débranchez le câble d alimentation de la prise secteur 2 Pour enlever ensuite les fouets batteurs et...

Page 13: ...sur la touche ou sur la touche pour passer à une vitesse inférieure ou supérieure Après 9 minutes et 59 secondes l horloge se réinitialise et affiche 0 minute et 00 seconde et recommence à s incrémenter 4 Appuyez sur la touche pour couper le COMPACT MIXER REMARQUE Pour éviter des éclaboussures ou la formation de poussière par exemple par la farine vous devez placer le fouet batteur ou pétrisseur a...

Page 14: ...ger des aliments secs ou pour incorporer des ingrédients ou plus exactement lorsqu une vitesse basse est nécessaire Niveau 4 Pour mélanger des ingrédients liquides ou pour ajouter des liquides à des ingrédients secs Niveaux 5 6 Particulièrement recommandés pour malaxer des pâtes Niveau 7 Pour l ajout en alternance d ingrédients secs et liquides Niveaux 9 10 Pour mélanger des préparations de gâteau...

Page 15: ...u de produit vaisselle Les fouets résistent au lave vaisselle Nettoyage du mixer Essuyez le boîtier avec un chiffon légèrement humide N utilisez surtout pas de produits agressifs abra sifs et du dissolvant Faites très attention à ce qu aucun liquide ne pénètre dans l appareil Recherche et élimination des pannes Pas de fonctionnement Le câble d alimentation est il bien branché L appareil est il bie...

Page 16: ... centre local de collecte des déchets ou chez un revendeur qui l éliminera de façon ap propriée Contrairement à une élimination inappropriée l élimination séparée des appareils électriques et électroniques permet d éviter les éventuelles conséquences négatives sur l environnement et la santé et autorise la réutilisation et le recyclage des composants ainsi que des économies d énergie et de matière...

Page 17: ...ps d emploi 300 watts 16 niveaux de vitesse Affichage digital Solis of Switzerland SA Solis Haus CH 8152 Glattbrugg Zurich Suisse Téléphone 41 44 874 64 54 Téléfax 41 44 874 64 99 info solis ch www solis ch www solis com Février 2014 ...

Page 18: ...rodomestici vi consigliamo di usare un interruttore di sicurezza per correnti di guasto È consigliabile utilizzare un interruttore di sicurezza con una corrente di guasto di esercizio nominale di max 30 mA Per una consulenza specializzata rivolgetevi al vostro elettricista di fiducia Fessure di ventilazione Tasto EJECT per l espulsione della frusta e del gancio per impastare Fruste Gancio per impa...

Page 19: ...di pulire l apparecchio nel caso in cui durante l utilizzo si verifichino guasti Non utilizzate il COMPACT MIXER quando l apparecchio o il cavo di alimentazione presentano danni visibili oppure quando l apparecchio è caduto per terra Non effettuate modifiche sull apparecchio stesso o sul cavo di alimentazione Il cavo di alimentazione dell apparecchio non deve essere sostituito o modificato dall ut...

Page 20: ...sta o il gancio con l anello nell apertura più grande dell apparecchio Se lo si inserisce nell altra apertura la frusta o il gancio non si blocca a scatto Illustrazione 1 2 Inserite la frusta o il gancio senza marchio anello nell apertura più piccola Rimozione della frusta del gancio per impastare 1 Estraete la spina di rete dopo l utilizzo dell apparecchio 2 Premete il tasto EJECT per rimuovere l...

Page 21: ...r saltare ad altri livelli di velocità Dopo 9 minuti e 59 secondi l orologio ritorna a 0 minuti e 00 secondi e ricomincia il conteggio da zero 4 Premete il tasto per spegnere il COMPACT MIXER NOTA Per evitare di spruzzare o sollevare in maniera eccessiva sostanze in polvere ad esempio farina inserite completamente le fruste o i ganci per impastare negli ingredienti prima di attivare l apparecchio ...

Page 22: ... o per incorporare ingredienti ovvero quando è indicata una velocità bassa Velocità 4 per miscelare ingredienti liquidi o per aggiungere liquidi a ingredienti asciutti Velocità 5 6 particolarmente idonea per impasti Velocità 7 per l aggiunta alternata di ingredienti asciutti e liquidi Velocità 9 10 per miscelare ingredienti pronti per torte o quando è indicata una velocità media Velocità 11 ad ese...

Page 23: ...uesti elementi possono essere lavati in lavastoviglie Pulizia dell apparecchio Strofinate il corpo dell apparecchio con un panno leggermente umido Non utilizzate solventi o panni aggressivi Prestate attenzione a evitare che nessun liquido penetri nell apparecchio Ricerca e soluzione guasti Mancato funzionamento È inserito il cavo di alimentazione L apparecchio è acceso Fruste Ganci per impastare A...

Page 24: ...ma notevole Per richiamare l attenzione sull obbligo di smaltimento regolare dell apparecchio lo stesso è contrassegnato con un simbolo di un contenitore di rifiuti barrato SOLIS si riserva il diritto di apportare in qualsiasi momento modifiche tecniche ed estetiche nonché modifiche atte a migliorare il prodotto SOLIS HELPLINE 044 874 64 14 Solo per i clienti in Svizzera Questo articolo si contrad...

Page 25: ...a digitale 300 Watt 16 livelli di velocità Display digitale Febbraio 2014 Solis of Switzerland SA Solis Haus CH 8152 Glattbrugg Zurigo Svizzera Telefono 41 44 874 64 54 Fax 41 44 874 64 99 info solis ch www solis ch www solis com ...

Page 26: ...stallation of a residual current circuit breaker to provide additional protection when using electrical appliances It is advisable to use a circuit breaker with a nominal fault current of maximum 30 mA Your local electrician can advise you Ventilation slots EJECT key to eject the beater dough hook Wire beaters Dough hook Storage case for accessories and cable ON OFF button Display button to set th...

Page 27: ... the wire beaters or the dough hooks after you finish using the appliance before cleaning the appliance if any faults occur while you are using the appliance Do not use the COMPACT MIXER if there is any visible damage to the appliance or the cable or if the appliance has fallen over Do not carry out any modifications to the appliance or to the mains power cable yourself The mains cable must not be...

Page 28: ...ter dough hook with the ring into the larger opening on the appliance The wire beater dough hook will not latch in if you insert it into the other opening Figure 1 2 Insert the wire beater dough hook without the ring marker into the smaller opening Removing the wire beater dough hook 1 Unplug the appliance from the mains after use 2 Press the EJECT key to remove the wire beater or dough hook Do no...

Page 29: ...ttings Keep the or button pressed to scroll through the speed settings After 9 minutes 59 seconds the clock will jump back to 0 minutes 00 seconds and re start the count 4 Press the button to switch the COMPACT MIXER off TIP To prevent excessive splashing or dusting e g with flour place the wire beater or dough hook fully into the ingredients before switching the mixer on and switch the appliance ...

Page 30: ... or to fold ingredients in or when a low speed is required Setting 4 To mix liquid ingredients or to add liquids to dry ingredients Setting 5 6 Particularly suitable for kneading dough Setting 7 For adding dry and liquid ingredients alternately Setting 9 10 To mix ready prepared cake mixes or when a medium speed is required Setting 11 To beat ingredients such as butter or sugar glazes Setting 12 1...

Page 31: ...with water and detergent The inserts are dishwasher proof Troubleshooting Wipe the cover with a slightly damp cloth Do not use any aggressive abrasives or solvents Make sure that no liquid can enter into the appliance Fehlersuche und behebung Appliance does not work IIs the mains cable plugged in Is the appliance switched on Wire beaters dough hooks Add a little liquid to the ingredients are block...

Page 32: ...his equipment must not be disposed of as an household waste It must be taken to special local community waste collection centres or to a dealer providing this service Disposing of electrical and electronic equipment separately avoids possible negative effects on the environment and human health deriving from an inappropriate disposal and enables its components to be recovered and recycled to obtai...

Page 33: ...perating time 300 watt 16 speed settings Digital display February 2014 Solis of Switzerland Ltd Solis House CH 8152 Glattbrugg Zurich Switzerland Phone 41 44 874 64 54 Fax 41 44 874 64 99 info solis ch www solis ch www solis com ...

Page 34: ... elektrische apparaten beter beschermd te zijn adviseren wij een aardlekschakelaar te gebruiken Het verdient aanbeveling een aardlekschakelaar te kiezen met een nominale lekstroom van maximaal 30 mA Voor deskundig advies kunt u terecht bij uw elektricien ventilatieope ningen EJECT knop voor het uitwerpen van de kloppers resp kneedhaken kloppers kneedhaken opbergtas voor de accessoires en het netsn...

Page 35: ... nabijheid van de gootsteen Haal de netstekker uit het stopcontact voordat u de kloppers of kneedhaken inzet of verwijdert na gebruik van het apparaat voordat u het apparaat gaat reinigen wanneer zich tijdens het gebruik storingen voordoen Gebruik de COMPACT MIXER niet wanneer het apparaat of het netsnoer zichtbaar beschadigd is of het apparaat is gevallen Verander zelf nooit iets aan het apparaat...

Page 36: ...edhaken met de ring in de grootste opening van het apparaat Wanneer u deze klopper kneedhaken in de andere opening steekt klikt hij niet vast Afbeelding 1 2 Steek de klopper kneedhaken zonder markeringsring in de kleinste opening Kloppers kneedhaken verwijderen 1 Haal na gebruik van het apparaat de netstekker uit het stopcontact 2 Druk de EJECT knop in om de kloppers of kneedhaken te verwijderen D...

Page 37: ...drukt om snelheidsstanden over te slaan Na 9 minuten en 59 seconden springt de klok terug op 0 minuten en 00 seconden en begint deze opnieuw te lopen 4 Druk de knop in om de COMPACT MIXER uit te schakelen AANWIJZING Om veel spetteren of stuiven bijv van meel te voorkomen kunt u de kloppers of kneedhaken het beste zo ver mogelijk in de ingrediënten steken voordat u de mixer inschakelt en het appara...

Page 38: ...eer een lage snelheid het meest geschikt is Stand 4 voor het mengen van vloeibare ingrediënten en het toevoegen van vloeistoffen aan drogen ingrediënten Stand 5 6 bij uitstek geschikt voor het kneden van deeg Stand 7 voor het afwisselend toevoegen van droge en vloeibare ingrediënten Stand 9 10 voor het mengen van kant en klare cake en taartmixen en wanneer een matige snelheid het meest geschikt is...

Page 39: ...r en afwasmiddel De kloppers en kneedhaken zijn afwasmachinebestendig Handmixer reinigen Neem de behuizing af met een licht bevochtigde doek Gebruik geen agressieve schuur of oplosmiddelen Let op dat er geen vloeistof in het apparaat terecht kan komen Problemen opsporen en oplossen Apparaat werkt niet Is het netsnoer aangesloten Is het apparaat ingeschakeld Kloppers kneedhaken Voeg wat vloeistof a...

Page 40: ...n worden bespaard Om de verplichting om het toestel volgens de voorschriften te verwijderen duidelijk onder de aandacht te brengen is hiernaast het symbool van een doorgekruiste afvalbak afgebeeld SOLIS behoudt zich te allen tijde het recht voor van technische en optische wijzigingen en modificaties ter verbetering van haar producten SOLIS HELPLINE 044 874 64 14 Alleen voor klanten in Zwitserland ...

Page 41: ...nduiding 300 watt 16 snelheidsstanden Digitaal display Februari 2014 Solis of Switzerland AG Solis House CH 8152 Glattbrugg Zurich Zwitserland Telefoon 41 44 874 64 54 Fax 41 44 874 64 99 info solis ch www solis ch www solis com ...

Page 42: ......

Reviews: