155
154
GB
GB
▲
PROBLEMS AND POSSIBLE CAUSES
▲
■
THE APPLIANCE DOESN’T WORK
1. Check that the plug is plugged into the correct socket.
2. Check whether the power cable is damaged. If this is the case, bring the appli-
ance to Solis or a Solis approved service centre to get the cable replaced.
3. Check whether the socket is working by connecting another electrical device.
4. Check if the bag end is evenly inserted in the vacuum bay resp. vacuum chamber
all the way to the end stop.
5. Check, if you have pushed the start lever after making adjustments to activate
the functions.
6. Wait for at least 1 minute before using the appliance again.
7. If you perform too many welding processes in a row, you might trigger the
thermo safety feature of the sealing bar. In that case, the appliance has to cool
down before you can continue using it.
▲
■
THE APPLIANCE IS NOT SEALING AN EMPTY BAG
Make sure that the end of the bag is correctly placed in the vacuum bay, pushed all
the way in and also that the
Manual Seal
button has been touched and the start
lever has been pushed.
▲
■
THE AIR IS NOT COMPLETELY SUCKED OUT OF THE BAG
1. To ensure that the bag is firmly sealed, the open end of the bag has to be
completely inserted into the vacuum bay resp. vacuum chamber to the end stop
without wrinkles.
2. Check whether the bag has a hole in it. To do this, seal the bag with some air in
it and submerge it in water. If bubbles rise from it, it is leaking, use another bag.
3. Use bags and films from Solis exclusively!
4. Perhaps the bag is not completely sealed, because of crumbs, fat or liquid in the
seal or the bag was not flat and has wrinkles or creases. Open the bag, clean
the inside of the bag end and make sure to insert the bag end absolutely evenly
and all the way to the end stop into the vacuum bay.
▲
■
CLEANING VACUUM CONTAINERS
1. The containers without the lids can be hand washed in warm, soapy water.
Attention: Do not immerse the lids of the containers into water and don’t
put them into a dishwasher. The inner cap underside of the container
lid can be removed and washed. Clean the lids themselves only with a
damp cloth. Allow them to dry thoroughly and re-insert the cap on the
underside of the lid.
2. Allow all accessories to dry completely, before storage or use.
3. We recommend, to keep the rubber seals elastic, to rub them from time to time
with a few drops of cooking oil.
▲
▲
STORING THE APPLIANCE
▲
●
Note: Always store the appliance with the release mechanism unlocked
after using it. This means that the appliance must always complete the
programs it is running and the bag has to be removed from the unlocked
vacuum bay.
If the power plug is pulled before the appliance is unlocked resp. a pro-
gram is deactivated, the seals remain locked and might warp, impairing
the functionality of the appliance.
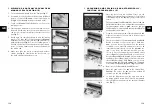
Store the appliance in a flat dark place, out of reach of children, at best in it’s origi-
nal packaging. The vacuum sealer can be stored standing on the appliance base or,
to save space, on the side (upright or lengthways)
(see
Fig. 21+22
)
.
The latching mechanism must not be locked so that no pressure is put onto the
seals. The seals are consumable material and are not covered by warranty.
Fig. 21
Fig. 22

