

R
Solmeta geotagger
Pro
9
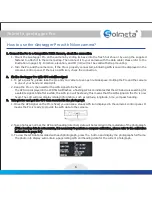
Used as a GPS track logger
The Geotagger Pro can be used as a GPS track logger which provides real time coordinate logging and easy-to
use trip guiding service. It can record about 60,000 positions, each position including longitude, latitude, time,
and altitude. Once the Pro get a GPS signal fixed (the GPS icon is steady on the LCD), the GPS data will be
recorded in the internal memory. The logging file can be downloaded to your PC by using “ Solmeta Utility”( It
can be downloaded from our website www.solmeta.com) via USB connection. You can combine these positions
with your digital camera photos to share the track histories and photo locations to mapping application
software such as Google Earth.
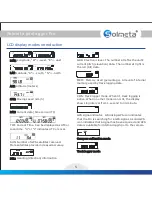
1. Interval setting
The Geotagger Pro supports time logging mode. The regular interval can be selected from 1 second to 30
minutes.
Please follow the procedure below to set the regular interval. (10-second is the factory default )
1. Turn on the Pro, short press the
button until the LCD changes to the track logger mode.
MENU
2. Then short press the
button, the CON icon and time in the LCD will be blinking. In this status,
ENTER
continue
short press the
button to get the interval changed. (The interval can be set from 1-second to
MENU
30-minute)
3. Once the interval you prefer shown on the LCD, press the
button to confirm your select.
ENTER
Note
If you want to stop the logging, in the track logger mode, continue short press the
button until the LCD
MENU
changes to , In this status, short press the
button to confirm your select.
ENTER
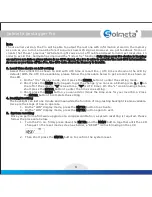
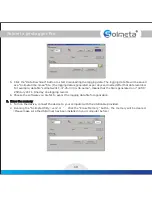
2. Download the logging data to PC
1. Install the USB driver in your PC from the CD provided in the package.
2. Connect the Pro to a computer via the UCB cable, turn on the device.
3. Running the application software “SolmetaUtility(Ver2.0)” on your computer.
4. Click the yellow button to select the directory for saving.