background image

How to use the Geotagger Pro with Nikon camera?

R

Solmeta geotagger 

Pro

6

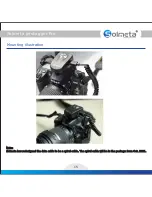
1. Connect the Pro to a Compatible DSLR Camera, check the connection
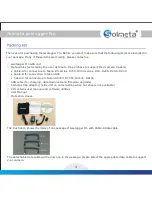
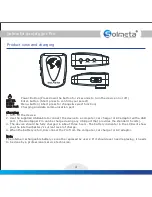
      1. Mount the Geotagger Pro on the camera by sliding its base into the flash hot shoe or by using the supplied     
          fastener to attach it to the camera strap. Then connect it to your camera with the data cable (Please refer to the 
          illustration in page 15). Direction, elevation, and tilt (roll) will not be valid with strap mounting.
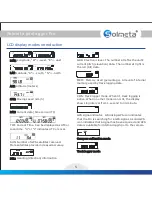
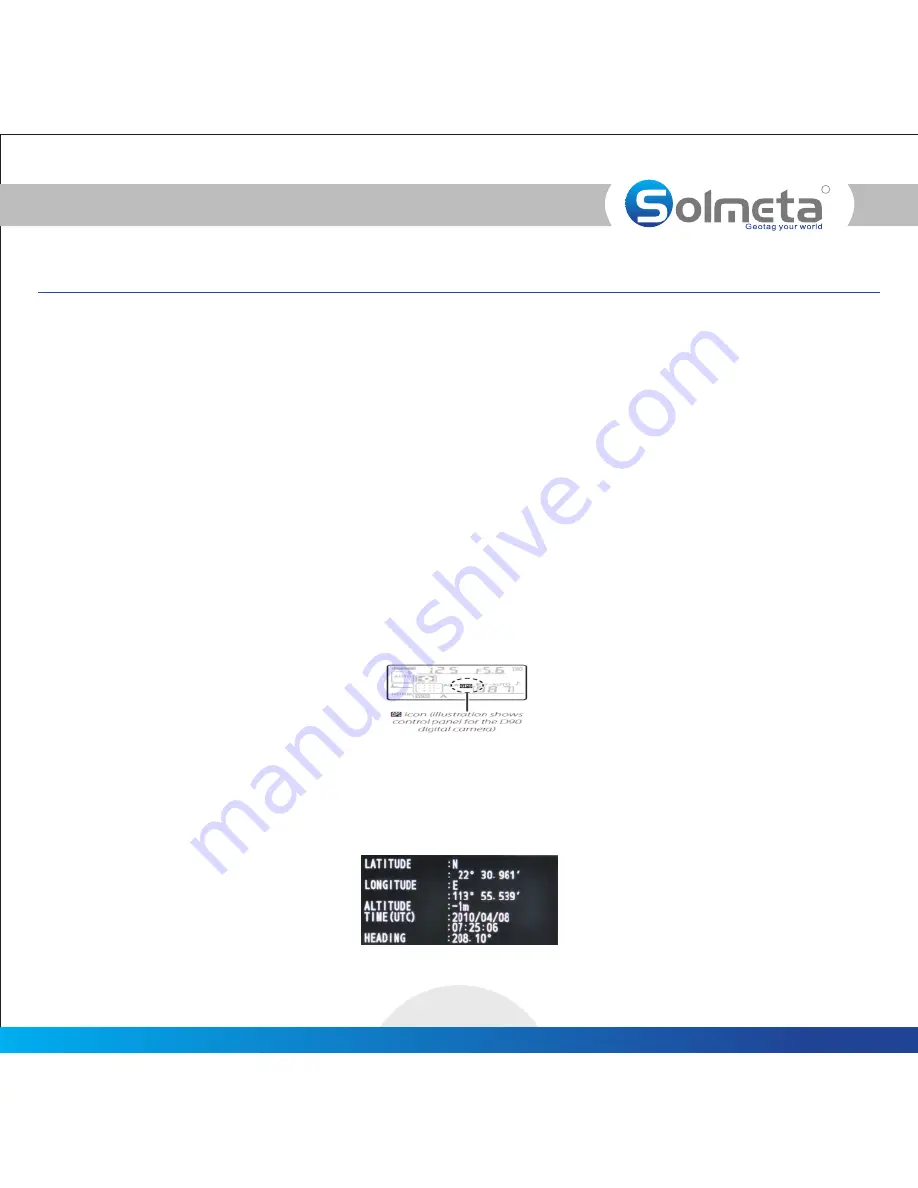
      2. Turn the Pro and the camera on, if the Pro is properly connected, a blinking GPS icon will be displayed in the 
          camera’s control panel. If there is no GPS icon, check the connection.

2.   Fix the Geotagger Pro with GPS satellites signal
      1. To get a quick fix, please take the pro and your camera to an open outside space. Holding the Pro and the camera 
          in one of your hand and stand still.
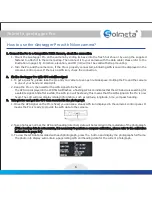
      2. Keep the Pro on, then wait for the GPS signal to be fixed. 
          The GPS icon displayed in the LCD first will flashes, a flashing GPS icon indicates that the GPS device is searching for 
          a satellite signal. And after a while, the GPS icon will be steady, this means that the GPS signal on the Pro is now 
          fixed. The LCD will now display related information, such as latitude, longitude, time, compass heading. 
3.   Take photos and get the GPS data recorded in the photograph
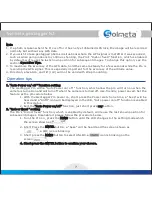
      1. Once the GPS signal on the Pro is fixed, you can see a steady GPS icon displayed in the camera’s control panel. It 
         means the Pro is ready to provide the GPS data to the camera.

      2. Take photos as normal, the GPS and heading (direction) data will be recorded in the metadata of the photograph.  
           If the heading data is not accurate, it is necessary to perform a compass calibration, please refer to the calibration 

(

          instruction in page 14 )
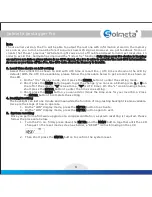
      3. To view the GPS data recorded with each photograph, press the   button and display the photographs full frame. 
          The photo info display will contain a page listing GPS and heading data for the current photograph.

Summary of Contents for Geotagger Pro

Page 1: ...R Geotagger Pro Geotagger Pro User Manual V2 0 Solmeta Technology Co Ltd Copyright 2011 Solmeta Technology Co Ltd All Rights Reserved...

Page 2: ...ty Information Introduction Packing list Product view and charging LCD display modes introduction How to use the Geotagger Pro with Nikon camera Operation tips Used as a GPS track logger Firmware upgr...

Page 3: ...unit dry Do not immerse in or expose to water or handle with wet hands Exposing the GPS unit to water could result fire or electric shock Do not subject to high temperatures The GPS unit can be damag...

Page 4: ...to about 60 000 points can be logged Software is provided to download or clear the logging data recorded in the memory Firmware can be upgrade via USB cable using the supplied software Thank you for y...

Page 5: ...D700 D300 series D2X D2XS D2HS D200 Cable B for connection to Nikon D90 Cable C for connection to Nikon D5000 D7000 D3100 D5100 USB cable for charging data download and firmware upgrade Camera strap...

Page 6: ...mputer car charger or AC adaptor with a USB port The Geotagger Pro can be charged using any USB port that provides the standard 5 volts 3 The device should be fully charged in about three hours The ba...

Page 7: ...t right is the roll tilt data Electronic level The number at left is the unit s DIR Heading direction information MEM memory used by track logging data Memory Used percentage Amount of internal CON ac...

Page 8: ...it for the GPS signal to be fixed The GPS icon displayed in the LCD first will flashes a flashing GPS icon indicates that the GPS device is searching for a satellite signal And after a while the GPS i...

Page 9: ...ower on off function which allow the pro will turn on when the camera is turned on and will turn off when the camera is turned off Use friendly power saved Set the feature as the procedure below 1 Wit...

Page 10: ...t press the button to enter the setting mode ENTER 2 Short press the button again to get the change you can see a blinking icon or on MENU L U the left of the screen is local time is UTC time On the L...

Page 11: ...1 second to 30 minutes Please follow the procedure below to set the regular interval 10 second is the factory default 1 Turn on the Pro short press the button until the LCD changes to the track logger...

Page 12: ...ta 2011 07 25 07 44 36 nema means that the file is generated on 7 44 36 25th July 2011 One day one logging record 6 Choose the software you prefer to export the logging data file for application 3 Era...

Page 13: ...wnloaded from our website 5 Click the Firmware Update button then the interface of Firmware upgrade will pop up 6 Click the Browse button to select the bin file of the latest firmware version 7 Click...

Page 14: ...tions for use Do not drop The product may malfunction if subjected to strong shocks or vibration Keep dry This product is not waterproof and may malfunction if immersed in or exposed to water Avoid su...

Page 15: ...Specification R Solmeta geotagger Pro 13...

Page 16: ...cable connected and then turn the Pro and the camera on 2 Press down the button for about 3 seconds until LCD changes to the compass calibration mode a MENU rectangle icon as is shown on the LCD then...

Page 17: ...Mounting illustration R Solmeta geotagger Pro 15 Note Solmeta has redesigned the data cable to be a spiral cable The spiral cable will be in the package from Oct 2011...

Page 18: ...Technology Company Add Room 327 Building 5 Zhong Xing Industrial Town Chuang Ye Road Nan Shan district Shenzhen 518054 China Tel 0086 755 26969187 Fax 0086 755 26969187 E Mail service solmeta com Web...

Reviews: