background image

21

SLS-ENVR Series NVR V2.1 User Manual

SECTION 2: INSTALLATION AND SETUP

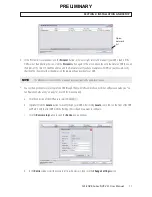
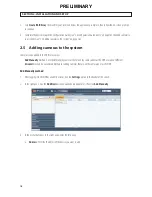
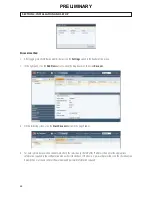
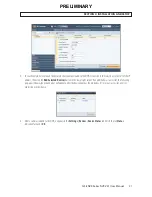
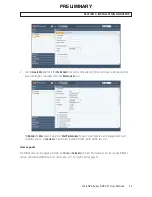
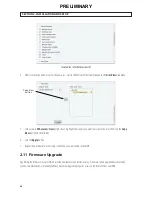
5.  For each camera discovered on the network that you want to add to the NVR system, check the select box to the left of the IP 

address, then click the 

Add Selected Devices

 button in the lower right corner. If an addition was successful, the following 

pop-up window will open and a dot will appear under the device name as shown below. If it was not successful, an error 
expression will be shown.

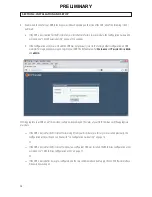
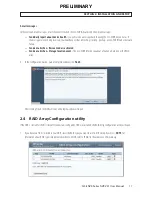
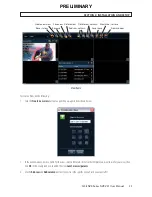
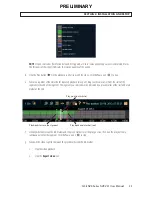
6.  After a camera is added to the NVR, it appears in the 

Settings

 | 

Devices

 | 

Device Status

 tab. Verify that all 

Status


indication for each is 

OK

PRELIMINARY

Summary of Contents for SLS-ENVR Series

Page 1: ...BEFORE USING YOUR SYSTEM and always follow the instructions for safety and proper use Save this manual for future reference SLS ENVR16 xT_RM 2012 Observint Technologies Inc All rights reserved 10 19 2...

Page 2: ...nd or audio signals of others without their knowledge and or consent We encourage you to check and comply with all applicable local state and federal laws and regulations before engaging in any form o...

Page 3: ...n damage to the internal hard drive do not move the unit while it is plugged in Protect hard disk drives from static electricity Do not stack hard disk drives or keep them upright Do not use an electr...

Page 4: ...wing options 23 2 6 1 Control ofView frames 23 2 6 2 CreateViews 24 2 6 3 Moving panels and frames 26 2 7 PTZ camera control 27 2 8 Configuring cameras for recording 28 2 9 Playback and export recordi...

Page 5: ...nfigurationWizard 52 3 5 9 Customization menu 52 3 6 System menu 52 3 6 1 Shutdown Restart menu 52 3 6 2 Firmware Upgrade menu 53 3 6 3 Factory Reset menu 55 3 6 4 System Log menu 55 3 6 5 Backup Rest...

Page 6: ...vi NOTES PRELIMINARY...
Page 7: ...ected to the NVR differs according to the specific SLS ENVR model The NVR provides a centralized repository for collection of and access to data from the devices The system administrator can define th...

Page 8: ...yback Batch export of multiple channels Multiple independent recording schedules Supported cameras video servers and other devices ONVIF protocol support Supported brands ACTi Arecont Vision AXIS D Li...

Page 9: ...11 0 or newer recommended Microsoft Internet Explorer 8 or 9 32 bit version only Google Chrome 18 or newer Safari 4 or 5 with Apple OS only with JavaScript and cookies enabled see the preferences of y...

Page 10: ...HDDs Power consumption 12 Vdc up to 48 w typical with 2 HDDs Automatic recovery after power outage Package contains NVR SLS ENVR16 with pre installed HDD s Power adaptor 100 240 Vac 50 60 Hz to 12 Vd...

Page 11: ...tivity LED Lights when the network cable is connected blinks during network activity Tray 1 Tray 2 active LEDs Blink when the HDD is accessed Power Information LEDs These LEDs function as a pair to in...

Page 12: ...press pressing the button for more than 15 seconds signals a very long press The NVR reacts differently to these presses depending on the status See the table below Power LED Information LED Status Sh...

Page 13: ...g the HDD powering on the NVR see 2 2 3 NVR installation on page 12 and logging into the device 2 3 Discover utility on page 13 you will be prompted to execute an HDD RAID Array Configuration utility...

Page 14: ...ck cover to the side Note that the back cover and the NVR are connected by wiring 4 Slide the HDD s connector end first into the trays inside the NVR enclosure Back cover Tray 1 upper Tray 2 lower 5 A...

Page 15: ...of the NVR then carefully set the NVR back cover to the side Note that the back cover and the NVR are connected by wiring 3 Gently pull back on tab of the ejector rail to unseat the HDD from the conn...

Page 16: ...erver is not available the NVR defaults to a static network configuration with the IP address 192 168 1 78 The network configuration parameters can be set using the Discover utility the Configuration...

Page 17: ...of your NVR NOTE TheMACaddressoftheSLS ENVR16isshownontheproductlabelontheundersideoftheunit 7 You can change the network settings of the NVR through the SLS ENVR web interface with the Configuration...

Page 18: ...t values for Username and Password are admin and admin After logging into your NVR one of three screens will open depending on the status of your NVR Continue with the appropriate procedure If the NVR...

Page 19: ...and can be initiated through the NVR web browser interface 1 When the Configuration Guide utility opens a login window appears Enter your administrator Username and Password then click Log In The defa...

Page 20: ...ion Guide Date and Time window select the options appropriate for location then click Apply and Continue Note that an option is provided to synchronize the NVR with your computer Time Zone First speci...

Page 21: ...r The values entered in the fields IP address network mask gateway and DNS server are ignored If Automatic Configuration DHCP is set and the DHCP server in the system is not active the SLS ENVR sets t...

Page 22: ...ide E mail configuration window enter the SMTP settings and other e mail options to automatically send e mail when events occur Click Apply and Continue SMTP Settings SMTP server Enter the SMTP addres...

Page 23: ...activated Send e mail when Storage location event The SLS ENVR informs you about a fault on a hard disk or the RAID array 9 In the Configuration Guide Guide Complete window click Finish After clicking...

Page 24: ...an be added to the NVR in two ways Add Manually method A method for adding cameras that are on the same subnet as the NVR or a subnet different Discover method An automated method for adding cameras t...

Page 25: ...n identification for the device The identification code must be composed of alpha numeric characters f HTTP and RSTP ports Change the port numbers if necessary g Device is password protected If the de...

Page 26: ...click Discover 3 On the following screen click the Start Discover button in the page header 4 For each camera discovered on the network check the select box to the left of the IP address then enter t...

Page 27: ...then click the Add Selected Devices button in the lower right corner If an addition was successful the following pop up window will open and a dot will appear under the device name as shown below If...

Page 28: ...your camera in the Camera List near the top of the window To see and expanded view of a camera drag and drop the thumbnail for the camera into a cell See above To change the size of the cell drag the...

Page 29: ...APPENDIX A Status Monitor Definitions on page 63 for more information Snapshot Duplication of video frame 2 6 1 Control of View frames To add camera video to a View frame drag the camera thumbnail at...

Page 30: ...e to the full screen of the monitor Save Snapshot Opens a menu to save the current image of the video Duplicate as Live Creates a duplicate viewing frame of the same video Duplicate as Recordings Open...

Page 31: ...To create a View do the following 1 Click the Create new view button to open the pop up window shown below 2 In the window above enter a name for the view select a template similar to the template yo...

Page 32: ...he upper right corner of the View frame then click the view you want to open 2 Click the New Window button to detach the view from the main window then drag it to another area of the desktop 3 Open an...

Page 33: ...tion zoom focus and iris The PTZ control panel normally appears in the lower left corner of the web interface Video window Directional controls Open presets list Zoom in Zoom out To manually change th...

Page 34: ...ime frame when recording can occur In the following example a time frame named My schedule was added to pre set schedules included by default in the system a Click the Create Schedule icon at the top...

Page 35: ...is shown in the list in the left frame Note you can edit the default preset schedules 4 Click Devices in the left frame then in the right pane click the Device Status button 5 Check the device select...

Page 36: ...down list to the right of Camera Stream then select the stream resolution you prefer e You can open the Advanced Recording Options and Advanced Video Options submenus by clicking the q icons Edit the...

Page 37: ...up the recording modes for other cameras in the system as needed 2 9 Playback and export recordings 1 In the Video view click the Recordings icon for the camera you want to playback or download video...

Page 38: ...once the time at which you want to start playing video The current play position is indicated by a white marker Shift left Center Payback rate Expand Contract Open Legend Open calendar Export video M...

Page 39: ...repeated playback or export drag your mouse cursor from the start of the segment to the end of the segment The segment you selected will be indicated by a green marker at the start and a red marker a...

Page 40: ...nd select the location where the video segment will be saved on your computer i Click OK to export download the video segment A window will open showing the progress of the download 2 10 Adding users...

Page 41: ...level The Admin and User options have pre set User Permissions however as an Admin you can change any permissions assigned to any user Use Custom user permissions to enable disable specific abilities...

Page 42: ...ght the view s you want to assign to the user then click the Copy View button in the middle 6 Click the Apply button 7 Repeat this procedure for other login credentials you want to add to the NVR 2 11...

Page 43: ...er com updates login 2 On the IPCorder Upgrade Website page click the listyourdevices hyperlink 3 On the My Registered Devices page click the registeranewdevice hyperlink then follow the on screen ins...

Page 44: ...ructions to complete the upgrade 2 11 3 Perform offline firmware upgrade To perform an offline firmware upgrade do the following 1 Login to your NVR as an admin user then click the Settings option at...

Page 45: ...a computer with internet access 6 Click Upgrade Firmware to open the Firmware Upgrade instruction window Notice that the version of your current firmware is shown at the top of the window Typicaloffl...

Page 46: ...provided as a reference to perform special functions Devices Device Status Add New Delete Selected Network Grid Export Authentication Grid Export Show Passwords Users Create User Delete User Schedule...

Page 47: ...sing Discover automated method and Manually For a description of adding devices to the system refer to 2 5 Adding cameras to the system on page 18 3 1 2 Delete devices Devices can also be deleted by d...

Page 48: ...ames for the devices listed You can opt to also View passwords and Export this data 3 1 6 Device trees Within the Devices list Device Trees can be formed to organize devices into logical groups These...

Page 49: ...bove The Create new tree icon was used to create a group that was then named Tuesday Tree The LG LW130W object in the Source Tree frame was selected then the Add to Edited Tree button was clicked The...

Page 50: ...ly User and Custom access can be restricted to pre set Views For instance a view that includes only cameras of the store front can be assigned to one user and another user can be assigned only to view...

Page 51: ...eated in the Views frame to any user with User or Custom access Click Apply to save your settings 3 3 Schedules menu The Schedules menu includes two preset schedules Always and Weekend and allows you...

Page 52: ...n For instance you can create an automatic action that send you an email when the free space on the HDD is less than a certain size or create a manual action that starts recording a camera video when...

Page 53: ...name the action 3 5 Configuration menu The Configuration menu provides individual system Configuration Setup menus a link to the Configuration Wizard and some additional features Use of these Configu...

Page 54: ...48 SECTION 3 SETTINGS MENU REFERENCE 3 5 2 Email menu The Email menu allows you to change your email settings from within the web interface After making changes click Apply PRELIMINARY...

Page 55: ...tings from within the web interface When using this menu identify the time zone and city first then change the Date Time section as needed 3 5 4 FTP menu FTP makes possible direct access to recordings...

Page 56: ...disks are non operational to an extent that results in array failure the data is lost Storage Settings The NVR continuously monitors the free space on the disk If space is low it automatically delete...

Page 57: ...er then replace the original disk a different disk After starting the NVR the system will open the Installation and Rescue mode through which you can configure the disk for use 3 5 6 Configure Storage...

Page 58: ...9 Customization menu The NVR Customization menu is used to change the logo on the web interface to enable a URL to open when you click the logo set the light strip band around the face of the SLS ENV...

Page 59: ...d register your NVR see 2 11 1 Registering your SLS ENVR on page 37 for more information Online Upgrade Mode To upgrade your firmware online your NVR must have access to the internet Click the Online...

Page 60: ...ccess to the internet you must 1 Generate the product key Click Get Product Key in the following window 2 Using the product key download the firmware file from a computer that has access to the intern...

Page 61: ...l other system options and settings will be restored to the original factory defaults The system will open again to the Configuration Wizard Select the options you prefer to preserve settings then cli...

Page 62: ...des a way to retain current system settings then reload them later if necessary It is recommended that you backup your system settings after configuration changes are made Backup system configuration...

Page 63: ...ode 3 Select the sections of the system you want to backup By default all sections are selected 4 Click Backup Restore system configuration 1 Click the Restore button in the screen above 2 Browse to t...

Page 64: ...nd Temperature units and Video Viewer settings These options are similar to those presented in the Configuration Wizard See 2 3 Configuration Guide utility on page 13 for more information 3 7 2 Change...

Page 65: ...option Must be enabled in router Sometimes remote is not allowed due to security risks or because the router is not capable of enabling this kind of remote access setup In general there are two types...

Page 66: ...NOTE Usuallythe SLS ENVRwillautomatically determinewhethertheclientisconnectinglocallyorremotelyandusesproperaddressing Sometimes ie withVPNaccess itmay bedifficulttodetectautomatically Usethe Forcel...

Page 67: ...isible from the external network If your router has an external address e g 194 114 132 12 the Preferred Web Port shall be set at 1024 then for access from the external network enter the address http...

Page 68: ...it is often marked Protocol Gateway port port on the external side of the router to which data from outside should be sent This is a port in a given range which is often marked on the router as the S...

Page 69: ...le 1 System status monitor variables Variable Description totalSpace Total disk space freeSpace Free disk space that can be used to store recordings swapUsed Number that expresses the saturation of th...

Page 70: ...Q Q What do I need to play videos downloaded from my SLS ENVR A A We recommend VLC Player which contains also required CODECs Q Q Is it possible to connect a monitor directly to the SLS ENVR A A No Th...

Page 71: ...Video quality resolution depends on cameras setup Control of user buttons Password protection for whole application Available on Google Play See https play google com store apps details id com koukaam...

Reviews: