3
NOTE
: If you change the network settings of the NVR, the Configuration Guide may lead you to
repeat some steps completed previously.
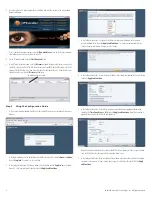
7. In the Configuration Guide - E-mail configuration window, enter the SMTP settings and other e-mail
options to automatically send e-mail when events occur. Click
Apply and Continue
.
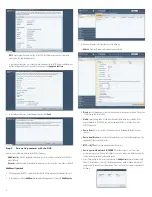
8. In the Configuration Guide - Guide Complete window, click
Finish
.
Step 4. Associating cameras with the NVR
Cameras can be added to (monitored by) the NVR in two ways:
•
Add Manually
method: A method for adding cameras that are on the same subnet as the NVR or a
subnet different.
•
Discover
method: An automated method for adding cameras that are on the same subnet as the NVR.
Add Manually method
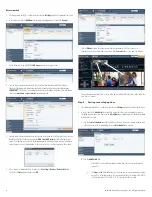
1. After logging into the NVR as an administrator, click the Settings option in the header of the screen.
2. In the right pane, click the
Add New
button to open the drop down list, then click
Add Manually
.
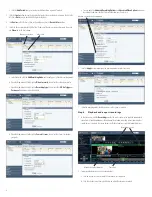
3. In the menu that opens in the right pane, enter the following:
a.
Address
. Enter the IP address of the device you want to add.
b.
Brand
. Open the drop-down list and select the brand of the device you are adding. If the device
is ONVIF compatible, select ONVIF.
c.
Model
. Open the drop-down list and select the model of the brand you are adding. In the
example above with the ONVIF brand, only one option, GENERIC, is selectable. Here, click
GENERIC to select it.
d.
Device Nam
e. Enter a device name. The device name can be composed of alpha-numeric
characters
e.
Device identification
. Enter an identification for the device. The identification code must be
composed of alpha-numeric characters
f.
HTTP
and
RSTP
ports. Change the port numbers if necessary.
g.
Device is password protected
.
IMPORTANT
: If the device requires a user name and
password to login, check this box, then include the username and password information in the
sections below to administer and view the device.
h. After all information on the screen is entered, click the
Add Devices
button in the lower right
corner. If the addition was successful, the following pop-up window will open, and a dot will
appear under the device name as shown below. If it was not successful, an error expression will
be shown.


