3
SLS-ENVR2016 NVR Quick Setup Guide
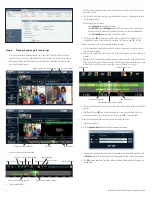
4. In the
Configuration Wizard - Change default administrator password
frame, enter your
new password in both fields, then click
Apply and Continue
. It is strongly recommended that
you change the password to one with good security strength, an uncommon expression containing
upper case, lower case
and
numerical characters. Password length should be at least 6 characters.
5. In the
Configuration Wizard - User preferences
frame, select the options appropriate for
installation, then click
Apply and Continue
.
6. In the
Configuration Wizard - Date and Time
frame, select the options appropriate for location,
including the
Time Zone
Area
and
City
, then click
Apply and Continue
.
Note that an option is provided to synchronize the NVR with your computer. If you change the clock
time, the NVR will restart, then open the next configuration screen.
NOTE
Synchronize the camera clocks the same way the NVR is synchronized. The NVR and camera clocks
must indicate the same time to ensure compatibility.
7. In the
Configuration Wizard - Network configuration
frame, enter the network and domain
options you prefer. In the Domain Settings section, you can specify a Hostname for your NVR. Click
Apply and Continue
.
NOTE
If you change the network settings of the NVR, the Configuration Wizard may lead you to repeat some
steps completed previously.
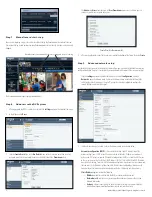
8. In the
Configuration Wizard - E-mail configuration
frame, enter the SMTP settings and other
e-mail options to automatically send e-mail when events occur (recommended). Click
Apply and
Continue
. The example below shows the setup for an account with all notifications selected.
9. In the
Configuration Wizard - Guide Completed
frame, click
Finish
.
Step 4. Associating cameras with the NVR
Cameras can be added to (monitored by) the NVR in two ways:
•
Add Manually
method: A method for adding cameras that are on the same subnet as the NVR or a
subnet different. You must enter the IP address and brand and model for each camera you add.
•
Discover
method: An automated method for discovering all NVR compatible cameras that are on the
subnet. For each camera you add, the IP address, brand and model is automatically configured.
Add Manually method
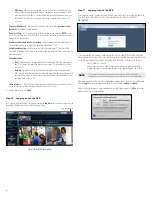
1. After logging into the NVR as an administrator, click the
Settings
option in the header of the screen.
2. In the right pane, click
Add Manually
.
Add Manually
3. In the menu that opens in the right pane, enter the following:
a.
Address
. Enter the IP address of the device you want to add into the
Address
field.
b.
Brand
. Open the drop-down list and select the brand of the device you are adding. If the brand
is not listed, but the device is ONVIF compatible, select ONVIF.


