7
© 2013 Observint Technologies. All rights reserved.
Step 7. Manual record start - stop
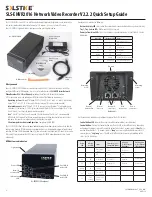
You can start recording a camera channel manually by clicking the Record icon in the header of the view
frame, then clicking it again to stop recording. Recording mode that is manually started must be manually
stopped.
Click Record icon to manually start recording and stop recording
The Record icon does not appear during video playback.
Step 8. Add users to the NVR system
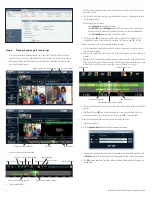
1. After logging into the NVR as an administrator, click the
Settings
option in the header of the screen.
2. In the left pane, click
Users
.
3. Click the
Create User
button. In the
Use Details
menu, enter a Username, enter then re-enter a
password (note that the password strength is calculated), then click a
Permissions
level.
The
Admin
and
User
options have pre-set
User Permissions
, however, as an Admin you can
change any permissions assigned to any user.
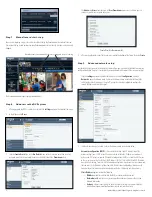
Create User - User Permissions list
4. After selecting the permissions for the new user, scroll to the bottom of the frame, then click
Create
.
Step 9. Advanced network setup
Complete this step if you want to change the network settings you selected with Solstice Discover or the
Configuration Wizard (Step 5 of 7), or enable the second network interface port. Otherwise, go to Step 9.
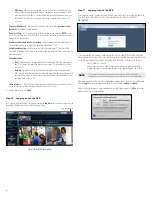
1. Click the
Settings
option in the header of the screen, then click
Configuration
, and then
Network
to open the Network menu. Entries in the Network menu are identical to those in the
initial Configuration Wizard menu (step 5 of 7), except that it includes options to configure the
second (Backup) network interface port.
2. Select network settings as needed. Fields in the Network menu are described below.
Automatic configuration (DHCP)
- If you select this setting, the NVR attempts to get the
network settings from a DHCP server. The values entered in the fields IP address, network mask,
gateway and DNS server are ignored. If Automatic Configuration (DHCP) is set and the DHCP server
in the system is not active, the NVR sets the IP address 192.168.1.78. With DHCP, the NVR IP address
may sometimes change. To ensure that the network configuration remains constant, we recommend
that you select Static IP Address setting if possible, then set the network configuration manually.
Consult with your network administrator to determine the best static network settings to use.
Static IP address
options include the following:
—
IP Address
- address, under which the NVR is visible in the local network.
—
Network mask
- in most cases, you can copy the current mask shown in the Section
Network Information.
—
Gateway
- address under which the router is visible in the local area network through
which network communication flows to outer networks and the Internet.


