background image

17

Note: The included remote control is a universal type 
which is used for several different models. This model of 
air conditioner and the included remote control differ from 
other types in the following two ways:
1.  The remote control has an “Auto” mode which the 

main unit does not have. If “Auto” is selected using 
the remote control, the main unit will be set to “Cool” 
mode but without the option of selecting the  
fan speed.

2.  The remote control has 3 settings for the fan speed: 

Low, high and “Auto”. The “Auto” fan speed setting 
does not work with this model of air conditioner. There 
are in effect only 2 fan speed settings, low and high.

REMOTE CONTROL DISPLAY


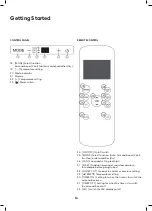
33.  Displayed functions.
34.  Shown when the remote control transmits a signal.
35.  Shown when the air conditioner is switched on.
36.  Shown when the Timer On mode is activated.
37.  Shown when the Timer Off mode is activated.
38.  Shown when the remote control batteries  

need changing.

39.  Shown when the sleep mode is activated.
40. Shows the chosen fan speed.
41.  Shows the chosen temperature or timer setting.  

In fan mode nothing is shown on the display.

INSERTING BATTERIES INTO THE REMOTE CONTROL


1.  Remove the battery cover on the back of the remote 

control by sliding it in the direction of the arrow.

2.  Insert 2 x AAA batteries (included). Note the polarity 

markings in the battery compartment to ensure 
correct insertion.

3.  Slide the battery cover back into place.

for example before going to bed. 

28. [ SHORT CUT ] Go back to current or previous 

setting. 

29. [ 

TEMP

 ] Temperature setting 

30. [ TIMER ON ] Setting for when the timer is to 

switch the air conditioner on. 

31. [ TIMER OFF ] Setting for when the timer is to 

switch the air conditioner off. 

32. [ LED ] Switch the LED display on/off 


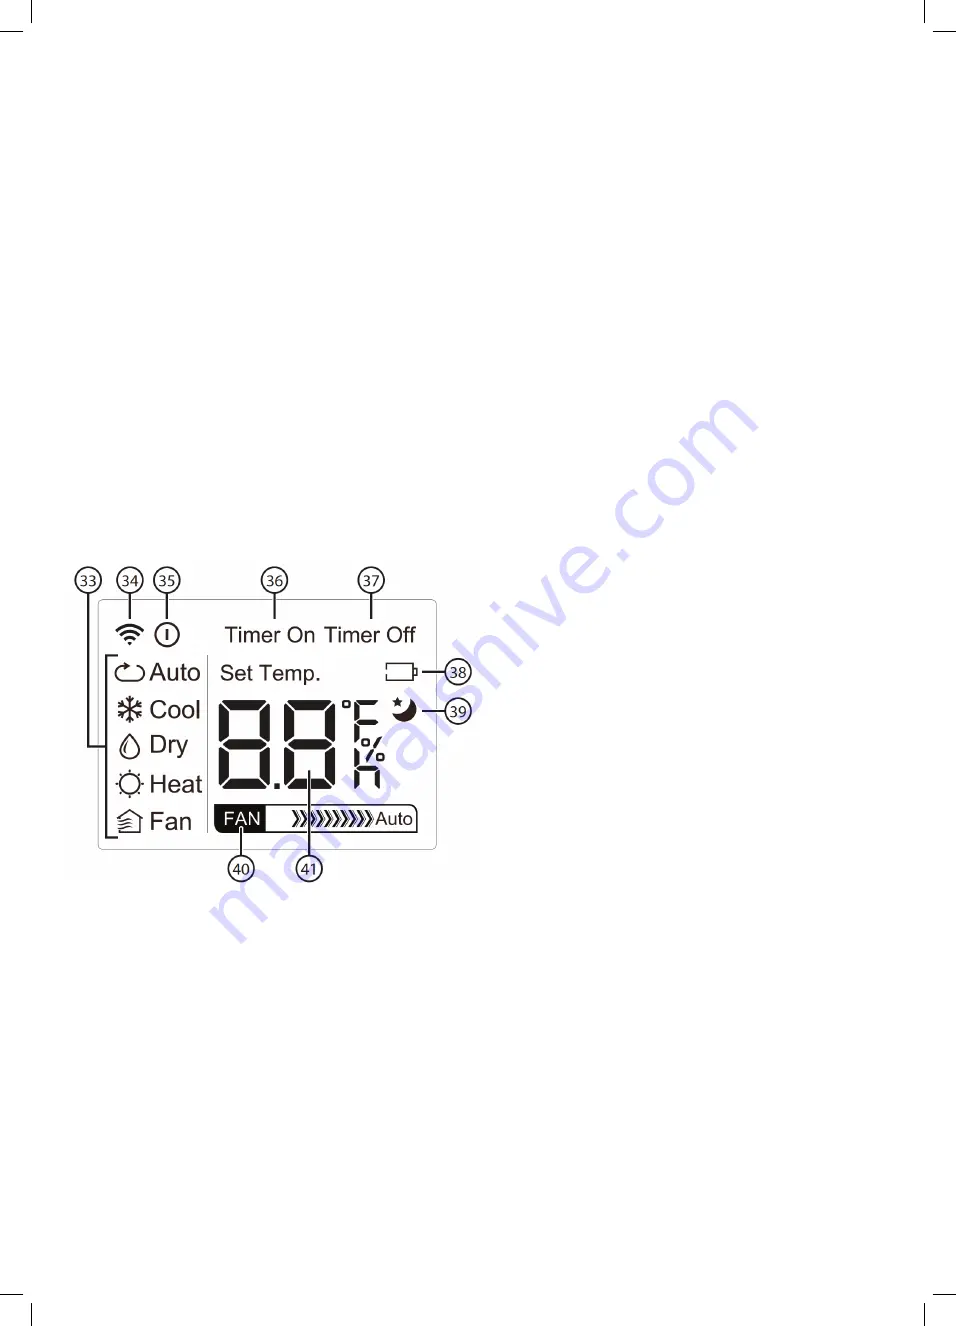
Remote control display


33. Displayed functions. 

34. Shown when the remote control transmits a signal. 

35. Shown when the air conditioner is switched on. 

36. Shown when the Timer On mode is activated. 

37. Shown when the Timer Off mode is activated. 

38. Shown when the remote control batteries need changing. 

39. Shown when the sleep mode is activated. 

40. Shows the chosen fan speed. 

41. Shows the chosen temperature or timer setting. In fan mode nothing is shown on the display. 


Inserting batteries into the remote control 

1.


Remove the battery cover on the back of the remote control by sliding it in the direction of the arrow. 

2.


Insert 2 x AAA batteries (included). Note the polarity markings in the battery compartment to ensure correct insertion. 

3.


Slide the battery cover back into place. 


Note: 

-


Changing batteries erases any programmed settings the remote might have previously had. 

-


Never mix old and new batteries. Never mix rechargeable and non-rechargeable batteries. 

-


Remove the batteries from the remote control if it is not to be used for a long time. 


Note: The included remote control is a universal type which is used for several different models. This model of air conditioner and 

the included remote control differ from other types in the following two ways: 


1.


The remote control has an “Auto” mode which the main unit does not have. If “Auto” is selected using the remote control, 

the main unit will be set to “Cool” mode but without the option of selecting the fan speed. 

2.


The remote control has 3 settings for the fan speed: Low, high and “Auto”. The “Auto” fan speed setting does not work 

with this model of air conditioner. There are in effect only 2 fan speed settings, low and high. 


Summary of Contents for GGSAP2560W

Page 1: ...E S S E N T I A L S F O R L I F E User Manual MODEL GGSAP2560W Portable Air conditioner 2 56kW...

Page 2: ...he following information which can be found on the rating plate and the date of purchase which can be found on your sales invoice STORE DETAILS STORE NAME ADDRESS TELEPHONE PURCHASE DATE PRODUCT DETAI...

Page 3: ...features and importantly taking care of your appliance when cleaning our Support Team are here to help You can use our online Support Centre at anytime by visiting http support residentiagroup com au...

Page 4: ...4 This page is intentionally left blank...

Page 5: ...2 Other Useful Information 24 Technical Specifications 25 Attach Your Receipt 26 Warranty Information S lt recommends the use of original spare parts When contacting our customer service team please e...

Page 6: ...unplugging it from the wall socket Disconnect Turn off the unit first and then unplug it when it is not in use and before maintenance or cleaning but do not unplug it when it is in operation as this c...

Page 7: ...en built in accordance with relevant safety and performance standards An electrical specialist must carry out all repairs Contact our after sales support line for advice on service Cooling efficiency...

Page 8: ...arried of the person competent in the use of flammable refrigerants The appliance shall be stored in a room without continuously operating open operating gas appliance and ignition sources for example...

Page 9: ...inguisher adjacent to the charging area 6 No ignition sources No person carrying out work in relation to a refrigeration system which involves exposing any pipe work that contains or has contained fla...

Page 10: ...d by the manufacturer Other parts may result in the ignition of refrigerant in the atmosphere from a leak 12 Cabling Check that cabling will not be subject to wear corrosion excessive pressure vibrati...

Page 11: ...volume liquid charge i Do not exceed the maximum working pressure of the cylinder even temporarily j When the cylinders have been filled correctly and the process completed make sure that the cylinder...

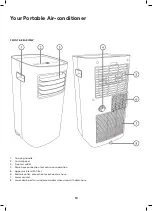
Page 12: ...ion for exhaust air hose 7 Lower air inlet 8 Lower drain port for condensed water when used with drain hose Product Overview Front Rear View 1 Carrying handle 2 Control panel 3 Front air outlet 4 Drai...

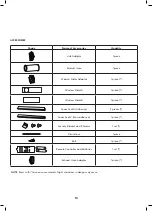
Page 13: ...e Window Slider A 1 piece Window Slider B 1 piece Foam Seal A Adhesive 2 pieces Foam Seal C Non adhesive 1 piece Security Bracket and 2 Screws 1 set Drain Hose 1 piece Bolt 1 piece Remote Controller a...

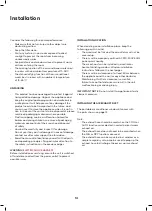
Page 14: ...vice Read the manual to familiarise yourself with all parts and operating principles Pay particular attention to the safety instructions on the previous pages WARNING ELECTRIC SHOCK HAZARD Before inst...

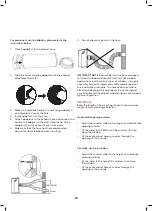
Page 15: ...he hole 5 Attach adapter 3 to the exhaust hose and connect the adapter in the wall Close the lid of the adapter when the not in use 6 Make sure that the hose has the recommended amount of when install...

Page 16: ...LED display on off Getting Started 18 MODE Select function Air conditioner Cool fan Fan or dehumidifier Dry 19 Temperature setting 20 Mode indicator 21 Display 22 Temperature setting 23 Power switch...

Page 17: ...28 SHORT CUT Go back to current or previous setting 29 TEMP Temperature setting 30 TIMER ON Setting for when the timer is to switch the air conditioner on 31 TIMER OFF Setting for when the timer is to...

Page 18: ...o set the desired temperature 17 30 C 62 86 F The display shows the set temperature Note The fan speed cannot be set using the control panel on the main unit Set the desired fan speed using the remote...

Page 19: ...ed on the remote control 3 Press TIMER ON 4 Press TIMER ON the required number of times until 10h is displayed on the remote control 5 The air conditioner is now programmed to stop in 2 hours and rest...

Page 20: ...ew seconds the remote control will revert back to showing the current set temperature 4 The stop function is now activated and the air conditioner is now programmed to stop in 10 hours Setting the air...

Page 21: ...steady even and level surface A gurgling sound is heard This can often be explained by the movement of the coolant in the air conditioner This is completely normal Error code E1 The temperature contro...

Page 22: ...atteries in the compartment at the back of the remote control Open the cover to the battery compartment at the back of the remote control Take out the depleted batteries if applicable and replace them...

Page 23: ...ntains batteries If batteries are swallowed seek immediate medical assistance Also ensure the remote control packaging is disposed of safely Only dispose of batteries when they are fully discharged Di...

Page 24: ...rubbish Electrical and electronic products contain substances that can have a detrimental effect on the environment and human health if disposed of inappropriately Observe any local regulations regar...

Page 25: ...25 Attach your receipt to this page...

Page 26: ...n to repair an Appliance during the Warranty Period g Warranty Period means i where the Appliance is used for personal domestic or household use i e normal single family use as set out in the instruct...

Page 27: ...nce was serviced or repaired by anyone other than Residentia Group an authorised repairer or ASR 8 This warranty the contract to which it relates and the relationship between you and Residentia Group...

Page 28: ...T 1300 11 4357 E support residentiagroup com au E S S E N T I A L S F O R L I F E An initiative by Residentia Group www solt house...

Reviews: