background image

6

7

Installation

Your Washing Machine

INSTALLATION POSITIONING

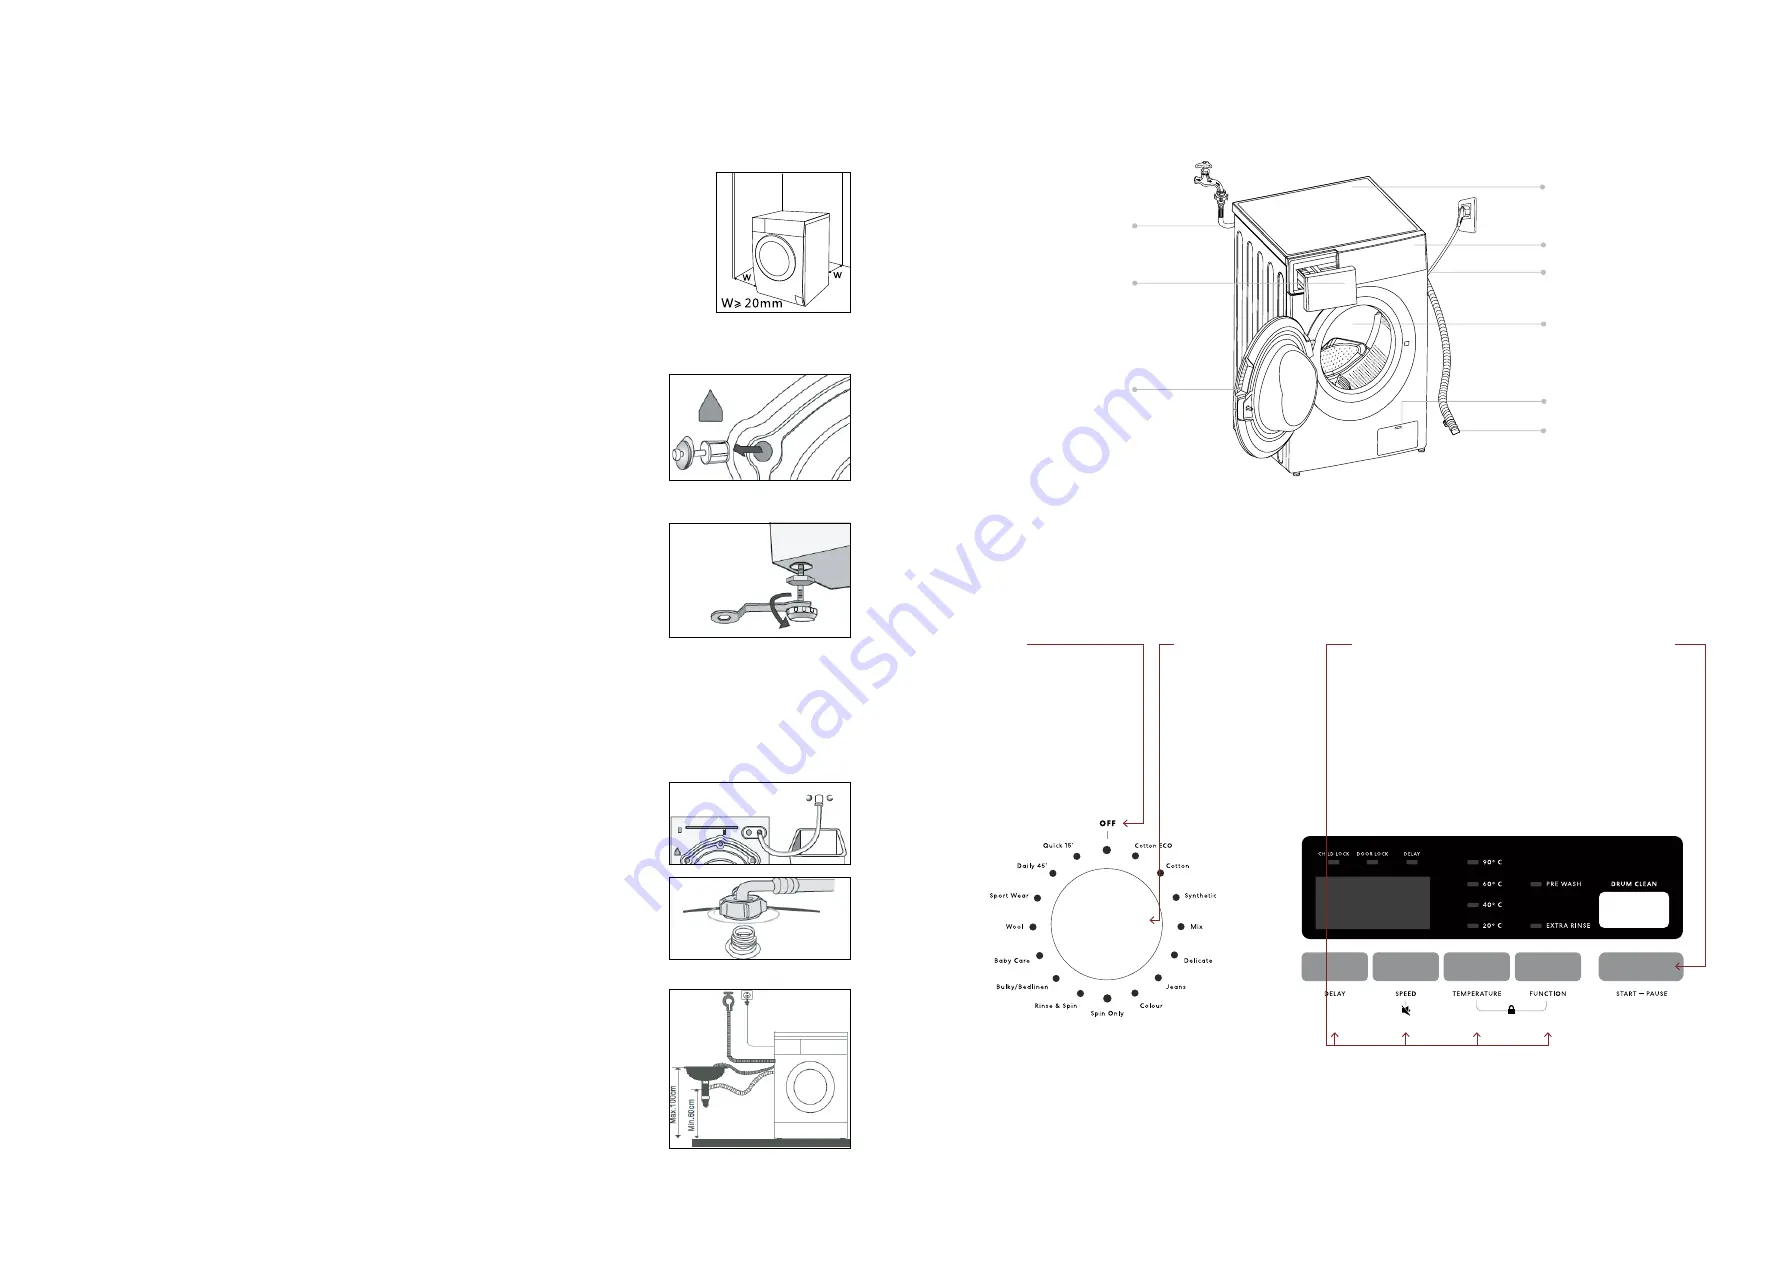
•  Ensure that your appliance is installed on solid and flat ground, in a level position.
•  Please do not place the appliance on a slope, soft carpet or wooden floor.
•  Your appliance should only be installed within an internal environment.  

Do not install the appliance outdoors.

REMOVING THE TRANSPORTATION BOLTS

Before using this washing machine, transport bolts must be removed from the  
backside of this machine. Please take the following steps to remove the bolts:
•  Loosen all bolts with a spanner and then remove them.
•  Use the plugs (supplied) to plug the holes.
•  Keep the transport bolts for future use.

LEVEL ADJUSTING

•  If the floor is obviously uneven, your appliance feet need to be adjusted. If your 

appliance isn’t level, it will cause your appliance to vibrate, and potentially move 
from its position.

•  Once you’ve positioned your washing machine, press down from the top in all four 

corners to ensure that it’s completely stable (i.e. not rocking in any direction). Also 
use a spirit level to ensure that it is completely level in all directions.

•  Should you need to make adjustments, use a spanner to turn the appliance legs 

until it makes contact with the floor. Turn the leg using one hand and then fasten 
the nut up against the appliance cabinet, to lock the leg  
in place.

•  After making any adjustments to the appliance legs,  

re-check to ensure it is level and no rocking occurring.

CONNECT THE INLET PIPE

•  Connect the hose elbow to the cold water outlet, screwing in a clockwise 

direction.

•  Connect the other end of the inlet hose to the water inlet valve on the rear of the 

washing machine.

•  After installation, if there are any leaks detected, remove the hose and re-install 

using the steps above. The hose is designed to be used on a standard washing 
machine cock outlet.

POSITION THE OUTLET HOSE

•  The outlet hose (used to drain the discharged water) is to be ideally connected 

to the relevant waste pipe, although it can also be positioned to drain into a sink/
trough. Note that the outlet hose has a minimum outlet position of 60cm and a 
maximum position of 100cm  
(as illustrated below). 
 
Note: If you are positioning the outlet hose to drain into a sink or trough, please 
ensure that it is fixed in place and that the sink remains unblocked at all times.

THE APPLIANCE

Water supply hose

Top cover

Cover panel

Servie filter

Power supply cord

Drain hose

Drum

Detergent dispenser

Door

CONTROL PANEL

Off

When the 
Program dial is in
the 'Off' position 
no power is
supplied
to the unit.

Program dial

Turn the 
Program dial 
to your desired
wash cycle

Start/Pause

Press this button 
to start or pause 
your wash cycle

Additional options

You may select
additional functions
to your desired
wash cycle.

Summary of Contents for GGSFLW606

Page 1: ...E S S E N T I A L S F O R L I F E User Manual MODEL S GGSFLW60 6kg Front Load Washing Machine ...

Page 2: ...re at anytime by visiting http support residentiagroup com au or you can contact us via calling us on 1300 11 HELP 4357 It is important that you read through the following use and care manual thoroughly to familiarise yourself with the installation and operation requirements of your appliance to ensure optimum performance Again thank you for choosing an Sôlt appliance and we look forward to being ...

Page 3: ...e a correctly installed shockproof socket Do not use multi plug adapters and extension cables Make sure not to cause damage to the mains plug and to the mains cable Should the appliance power supply cable need to be replaced this must be carried out by our Service Centre Connect the mains plug to the mains socket only at the end of the installation Make sure that there is access to the mains plug ...

Page 4: ...t up against the appliance cabinet to lock the leg in place After making any adjustments to the appliance legs re check to ensure it is level and no rocking occurring CONNECT THE INLET PIPE Connect the hose elbow to the cold water outlet screwing in a clockwise direction Connect the other end of the inlet hose to the water inlet valve on the rear of the washing machine After installation if there ...

Page 5: ...0 600 Jeans 800 800 800 Colour 800 800 800 Spin Only 800 800 800 Program Default Speed RPM 1000 1200 1400 Rinse Spin 800 800 800 Bulky Bedlinen 800 800 800 Baby Care 800 800 800 Wool 600 600 600 Sportswear 800 800 800 Daily 45 800 800 800 Quick 15 800 800 800 Required Optional Your Washing Machine Continued Quick Start Guide QUICK START Follow the procedure below to operate your washing machine 1 ...

Page 6: ...lts Fiber type Maximum Load Capacity Cotton 6 0kg Synthetics 3 0kg Wool 2 0kg Delicates 2 5kg WASHING CLOTHES FOR THE FIRST TIME Before washing any clothes please perform one cycle without clothes inside as follows Connect the power source and water Insert a small amount of detergent into Compartment II of the detergent drawer and close it Select the desired program Press the Start Pause button on...

Page 7: ... always ensure the appliance is switched off the power plug is removed from the power outlet and the water supply has been closed CLEANING THE WASHING MACHINE Proper maintenance of your washing machine will keep it looking as new and extend its working life The exterior surface can be cleaned with household cleaners and a soft damp cleaning cloth If there is any residual water at the completion of...

Page 8: ...ntenance Continued Troubleshooting WARNING Only authorised technicians can carry out repairs Before contacting our customer service team please refer to the table below to see if your fault can be fixed by yourself Should a service technician visit be arranged and its found there are no faults with the appliance a call out charge will apply PROBLEM SOLUTION Washing Machine won t start up Check tha...

Page 9: ...ifications for your Washing Machine Washing Capacity 6 0kg Dimensions W D H mm 595 495 850 mm Net Weight 60kg Rated Power 2050W Power Supply 220 240V 50Hz 10Amp Standard Water Pressure 0 05MPa 1 0MPa Max Noise Level Washing Spinning 60dbA 79dbA NOTE This product is subject to continuous improvement specification are subject to change without prior notice This product was tested in accordance with ...

Page 10: ...vel of an authorised representative b transportation and delivery of the Appliance to and from Residentia Group or its ASR in all instances unless the Appliance is transported by Residentia Group or its ASR the Appliance is transported at the owner s cost and risk while in transit to and from Residentia Group or its ASR 6 Proof of purchase is required before you can make a claim under this warrant...

Page 11: ...T 1300 11 4357 E support residentiagroup com au E S S E N T I A L S F O R L I F E An initiative by Residentia Group www solt house ...

Reviews: