background image

12

IGNITION AND OPERATION OF THE BURNERS 

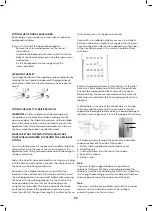
To light the burner, press the control knob fully down and 
hold the knob down before rotating anti-clockwise to 
the High Flame position. The ignition device is integrated 
into the control knob and is automatically activated by 
pushing down on the control knob. 

After lighting the flame, keep the knob pressed for 
about 10 seconds: this time is necessary to heat up the 
thermocouple and activate the safety valve, which would 
otherwise cut off the gas flow. This step only applies 
where flame failure device is fitted. 

In the instance of a power failure, place a lit match near 
the burner and proceed as described above. If the flame 
does not light after the first attempt, wait 5 minutes for 
the gas to dissipate before attempting to re-light the 
burner. 

Once lit, check that the flame is even and turn the control 
knob to adjust the flame as required. If the flame is 
uneven, check that the 'burner head/skirt' and 'burner 
cap' are correctly positioned. To turn off the flame, turn 
the control knob clockwise to the off position. Before 
removing pots or pans from the burners, always turn off 
the flame. 

For correct use of the cooktop


For lower gas consumption and better efficiency, use 
only flat bottomed pans of dimensions suitable for the 
burners, as shown in the table below. Also, as soon as a 
liquid comes to the boil take care to turn the flame down 
to a level that will just keep it boiling. 

Burner

φ

min Saucepan

φ

max Sauce-

pan

Auxilliary

90mm

160mm

Semi-rapid

130mm

180mm

Fish pan

310mm × 140mm

380mm × 

230mm

Rapid

150mm

260mm

Triple ring

210mm

260mm

Operating Instructions (Continued)

Summary of Contents for GGSUC907S

Page 1: ...E S S E N T I A L S F O R L I F E User Manual MODEL GGSUC907S V 1 0 1020 90cm Dual Fuel Freestanding Cooker ...

Page 2: ...tures and importantly taking care of your appliance when cleaning our Support Team are here to help You can use our online Support Centre at anytime by visiting http support residentiagroup com au or you can contact us via calling us on 1300 11 HELP 4357 It is important that you read through the following use and care manual thoroughly to familiarise yourself with the installation and operation re...

Page 3: ...al Connection 30 Gas Connection 36 Attach Your Receipt 37 Purchase Details 38 Warranty Information Sôlt recommends the use of original spare parts When contacting our customer service team please ensure that you have the following information at hand which can be found on your appliances rating plate Model Number Serial Number T 1300 11 4357 E support residentiagroup com au Customer Care ...

Page 4: ...as on the appliance that gets hot Curtains Do not install the oven next to curtains or soft furnishings Damaged cord If the power cord is damaged it must be replaced by the manufacturer or a qualified service engineer in order to avoid a hazard Packaging Ensure that all packaging elements are kept away from children and disposed of correctly Most packaging elements can be recycled GENERAL USAGE CO...

Page 5: ...ge the door hinges Grill Keep the oven door closed when using the grill function Oven cavity During cooking never place pans trays or other cookware directly onto the bottom of your oven including any dishes with water or ice Always place them on the shelves provided Oven accessories When removing the baking drip tray or oven rack from the hot oven always use an oven mitt Aluminium foil Do not use...

Page 6: ...4 108 CE Electromagnetic compatibility Low voltage 73 23 Safety standards AS NZS 60335 2 6 2014 A1 with AS NZS 60335 1 2011 A1 A2 A3 A4 2009 142 EC Gas Appliance Directive The manufacturer declares that the oven is built using certified materials and requires the appliance to be installed in accordance with the standards currently in force This oven should only be used by a trained person and for ...

Page 7: ...nual is for reference only Your Freestanding Cooker may appear differently Oven Temperature Knob Oven Function Selector Knob Gas Burner Knobs Digital Timer Minus Button DIGITAL TIMER PANEL LED Display Plus Button Function Button Your Freestanding Cooker ...

Page 8: ...r finishing off many meals i e browning the top of a roast frittata or potato gratin Note For best results allow 5 minutes of pre heating before placing any food into the oven Ensure your dish is centered under the grill element Roast Fan Grill Fan combined with the upper element and grill element This function uses the intense heat from the two upper elements for top browning and the fan to ensur...

Page 9: ...king symbol Then press the or buttons to set the time for the oven to switch off Use the Function Selector Knob and Temperature Control Knob to select your desired Oven mode and Temperature The indicator bars above the Cooking and Stop Cooking symbols will flash indicating that the automatic cooking feature of the oven is activated When it is time to start cooking the oven will automatically switc...

Page 10: ...ble ties and protective wraps inserts from the oven 2 Ensure that all shelves and baking trays have been re installed into the oven 3 Make sure that all oven control dials are switched the Off position 4 Use the Function selector knob to select the Bake function Then use the Oven Temperature knob and set it to 200ºC 5 After 30 minutes use the Function selector knob to select the Fan Grill function...

Page 11: ...rts of the gas cooktop DESCRIPTION OF SYMBOLS Description of the burner areas of the gas cooktop Flame Spreader Flame Safety Device Burner Head Burner Caps Cast Iron Trivets Front Left Burner Front Right Burner Middle Wok Burner Rear Left Burner Rear Right Burner ...

Page 12: ...pt wait 5 minutes for the gas to dissipate before attempting to re light the burner Once lit check that the flame is even and turn the control knob to adjust the flame as required If the flame is uneven check that the burner head skirt and burner cap are correctly positioned To turn off the flame turn the control knob clockwise to the off position Before removing pots or pans from the burners alwa...

Page 13: ...ase the temperature by 20 C Cook larger cuts of meat at a lower temperature for a longer time The meat will cook more evenly Always roast meat fat side up That way basting may not be required Always rest the meat for at least 10 minutes after roasting to allow the juices to settle Remember the meat will continue to cook for a few minutes after removing it from the oven Shelf Position Guide Place t...

Page 14: ... for cleaning Failure to do this may result in the oven tipping and adults and children may be killed To prevent soiling from becoming baked on and stubborn we recommend removing any easy to reach spills food or grease stains from the oven cavity enamel after each use Cleaning Don ts Do not use aerosol cleaners until the cooker has completely cooled The propellant substance in these cleaners could...

Page 15: ... use a damp cloth with detergent Do not use any oven cleaners harsh or abrasive cleaners scouring pads steel wool or sharp metal scrapers on the glass These may scratch and damage the surface Oven door glass exterior Clean using a soft cloth and a mixture of warm water and dishwashing liquid or glass cleaner Oven Interior Parts Enamel oven interior light soiling 1 Wipe with a damp cloth using a so...

Page 16: ...to the oven Only a trained and supported service technician can take apart the door Do not attempt to take the door apart for cleaning If the inner panes of glass in the door become dirty please contact our After Sales Service team on 1300 11 HELP 4357 Oven door gasket Avoid cleaning this part If you need to remove large food particles off it proceed as follows 1 Dampen a sponge with clean hot wat...

Page 17: ... positioned correctly Incorrect assembly can cause dangerous irregular flames and ignition problems Do not put any burner parts in the dishwasher as they will become discoloured Ignitors 1 Check that the burner is turned OFF 2 Clean the ignitor with a small brush e g old toothbrush or cotton swab that has been dipped into rubbing alcohol The ignitors must be kept clean and dry to work correctly Di...

Page 18: ...g 1 Fig 2 Fig 3 Fig 4 A B Reassemble the door by following the above procedures backwards 18 page how to remove the door Unhooking the doors For a more thorough clean you have to remove the oven door Choose the removal and assemble method according to different structure of oven door purchased Proceed as follows Open the door to the full extent Fig 1 Open the lever A completely on the left and rig...

Page 19: ...ree sparking It must be cleaned very carefully using a toothbrush and methylated spirits Note To avoid damage to the electronic ignition do not try to light a burner without all burner parts in place Replacing the burner parts Carefully replace the burner parts as per the following illustrations Fit the flame spreader to the housing as shown below Make sure the burner is not able to rotate Check t...

Page 20: ...lame spreader and burner cap are Clean and dry Positioned correctly as shown below Replacing an oven bulb Important Use a 25W 220 240V 50Hz E14 halogen bulb for replacement Do not use a standard light bulb in any oven the heat will break it 1 Allow the oven including the lamp cover and the bulb to cool completely 2 Remove any shelves that may get in the way 3 Remove the door if the lamp will be ha...

Page 21: ... is not responsible for any shipping damage Do not discard any packaging materials until the freestanding oven has been inspected and found to be free of damage Remove the outer carboard box and any packing materials from the freestanding oven Note Some models are supplied with a protective film on the stainless steel parts which must be removed before installing and using the appliance Product Di...

Page 22: ... freestanding oven is secure and provide safety measures to keep it in place Cabinetry dimensions can be adjusted to suit the plinth height see product dimensions for chassis height FREESTANDING OVEN CLEARANCES Product Dimensions MM A Minimum vertical distance between benchtop and cabinet extending above the counter 450 B Minimum clearance from left and right hand edge of the freestanding oven to ...

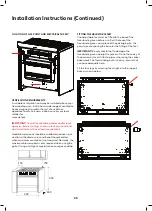
Page 23: ...ows Refer to the diagram below for the location of the pilot hole Use 3 5mm diameter drill bit to drill the pilot hole through the cupboard and both sides of the cooker Before drilling check your measurements to ensure the pilot holes are located within the range specified in the diagram A drilled hole in the side of the cooker which is outside the range specified may void the warrantee Inspect cu...

Page 24: ...t oven to tilt forward Figure 1 X X Incorrect Installation Accidental Tipping Chains are provided as a preventative measure against accidental tipping These chains must be fitted as part of the installers compliance Failure for your installer to fit chains in accordance with the relevant installation code will make the installation of your upright cooker non compliant and classed as an illegal ins...

Page 25: ...ile at time being fixed to the rear of the cabinet using a self drilling wood screw It is ave the screw fixed closer to the hole for better support The left and right ples shown have two extra screws attached to the chain which makes the Right Side Correct Chain Installation In order to prevent the oven from tipping forward as shown on the previous page we need to make sure both chains provided wi...

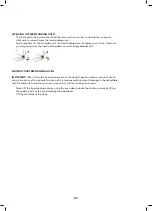
Page 26: ...lation is not required Normally the maximum blower speed is only required when using the grill or frying at a high temperature on your gas cooktop FITTING THE ADJUSTABLE FEET The adjustable feet must be fitted to the base of the freestanding oven before use Rest the rear of the freestanding oven on a piece of the packaging i e the polystyrene exposing the base for the fitting of the feet IMPORTANT...

Page 27: ... to the adjustable feet Be careful to avoid too much pressure on any two feet during this process Never lift the freestanding oven by using the oven door handle the cooktop rail or by lifting the cooktop trim as this may damage the appliances Lift the feet clear of the floor 2 1 vel of the appliance can be adjusted by rotating the feet located ppliance at each corner Rotate the feet to decrease or...

Page 28: ...28 This page is intentionally left blank ...

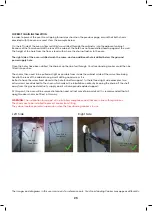
Page 29: ...on DO NOT unscrew the screws fixing the cover plate behind the terminal block Connect the feeding cable to a plug suitable for the load indicated on the rating plate of the product In case of a direct connection to the mains cable without plug it is necessary to insert a suitable omnipolar switch before the appliance with minimum opening between contacts of 3 mm the grounding wire should not be in...

Page 30: ...in this manual should be installed to restrict movement of the appliance to no more than 80 of the length of the flexible gas hose The chain should be attached securely to the product where shown and on the wall Flexible hose assemblies should be AS NZS 1869 Class B or Class D certified The thread connection shall be Rp ISO 7 1 male The hose assembly shall be as short as practicable and comply wit...

Page 31: ...appliance fails to operate correctly after all checks have been carried out please call our After Sales Service team on 1300 11 HELP 4357 ULPG Note Before connecting the appliance to the gas main mount the brass conical adaptor onto the gas inlet pipe ensuring the supplied gasket is positioned between Natural Gas Connect gas supply to the pressure regulator and adjust the regulator to obtain a tes...

Page 32: ... process outlined within this manual If the range has been disconnected and re connected to the gas supply line repeat leak testing After conversion to ULPG gas affix the supplied conversion label near the data plate on the product as well as at the beginning of this manual If the range is being converted for use ULPG before connecting to the gas Burner Natural gas 1 0 kPa Universal LPG 2 75 kPa I...

Page 33: ...33 The images and diagrams in this user manual is for reference only Your Freestanding Cooker may appear differently ...

Page 34: ...ppliance is to use 3 Adjust the minimum burner setting refer to Adjusting the minimum burner setting 4 Refit the flame spreaders the burner caps and the pan supports trivets 5 Fix the warning label supplied with the conversion kit stating that the freestanding oven has been converted for use with ULPG to the rear of the freestanding oven Ensure that it is located in close proximity to the gas inle...

Page 35: ...ngle Wok burners Lubrication of the gas valves If a gas valve becomes stiff it is necessary to dismantle it carefully and clean it with petroleum spirit Specialist high temperature resistant grease should be used to lubricate the valve before replacing This must be carried out by an authorised person or service agent Please call our After Sales Service team on 1300 11 HELP 4357 to arrange one Need...

Page 36: ...36 Attach your receipt to this page ...

Page 37: ...the following information which can be found on the rating plate and the date of purchase which can be found on your sales invoice STORE DETAILS STORE NAME ADDRESS TELEPHONE PURCHASE DATE PRODUCT DETAILS MODEL NO SERIAL NO Purchase Details ...

Page 38: ...ance during the Warranty Period g Warranty Period means i where the Appliance is used for personal domestic or household use i e normal single family use as set out in the instruction manual the Appliance is warranted against manufacturing defects for 24 months following the date of original purchase of the Appliance h you means the purchaser of the Appliance not having purchased the Appliance for...

Page 39: ... to which it relates and the relationship between you and Residentia Group are governed by the law applicable where the Appliance was purchased 9 To the extent permitted by law Residentia Group excludes all warranties and liabilities other than as contained in this document including liability for any loss or damage whether direct or indirect arising from your purchase use or non use of the Applia...

Page 40: ...T 1300 11 4357 E support residentiagroup com au E S S E N T I A L S F O R L I F E An initiative by Residentia Group www solt house ...

Reviews: