background image

P32-EN – Subject to technical changes 04.11

30

Setting the controller and start-up

8.7 Setting the impulse rate (optional)

If you have installed a volume flow measuring unit for

measuring the solar yield, be sure that the correct quantity

per impulse is set on the controller.

The volume flow measuring unit from Solvis (item no.:

09499, order separately) has a quantity of 0.5 l per

impulse (factory setting at controller).

If you are using on-site volume flow measuring units,

you have to set the quantity per impulse at input 15 of 

the SolvisControl. 

You can only make the setting in the “Technician” oper-

ating mode. To do this, proceed as follows:

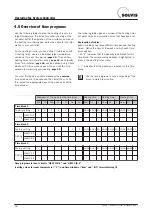
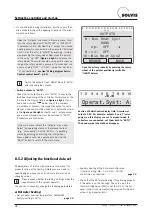
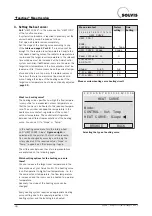
In the function overview, press the “SERVICE” button. In

the main menu, select the “Inputs” entry by turning and

pressing the rotary wheel. In the Outputs menu, position

the pointer on “PAR?” beneath the entry “15: Flow.Sol.2”

and press the rotary wheel. Turn the rotary wheel in the

menu that opens up until the pointer is on “QUOTIENT: 

0.5 l/Imp” (

figure on right

). Set the value you require by

pressing and turning the rotary wheel until the required

value appears and then pressing it again. Press the

“BACK” button several times to return to the function

overview.

1 2 3 4 5 6 7 8 9 10 11 12 13 14

BROWSE

BACK

DES: Solar Flow2

QUOTIENT:

0.5 l/Imp

MEAN(An):

1.0 sec

INPUT 15

At the pointer position 

set the quantity per

impulse 

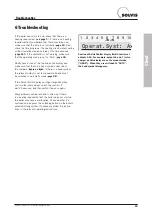
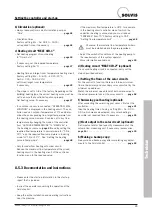
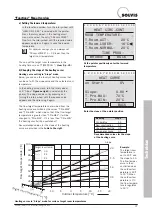
In the function overview, press the “SERVICE” button. In

the main menu, select the “Outputs” entry by turning and

pressing the rotary wheel. In the Outputs menu, position

the pointer on “AUTO/OFF” beneath the entry “7: Solar

Pump2” and press the rotary wheel. Turn the rotary wheel

until “HAND/ON” appears, and then press it. The pump 

is now in operation, and the number “7” in the top row 

is highlighted black (

figure on right

). Press the “BACK”

button several times to return to the function overview.

1 2 3 4 5 6 

8 9 10 11 12 13 14

OUTPUTS

BROWSE

BACK

6: Solar Pump1      

HAND/ON

PAR?

HAND/OFF

PAR?

RPM stage:

0

7: Solar Pump2

7

8.6 Function check of outputs (pumps) 

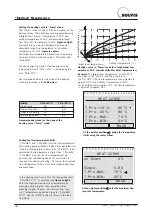
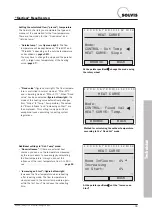
If you want to switch on a pump manually – such as for a

function check – proceed as follows (example using pump

in secondary solar circuit):

Outputs 6 and 7 (solar pumps) are set to manual

mode. Output 6 to “HAND/OFF”, output 7 to

“HAND/ON” (note that 7 is highlighted in black

in the row of numbers above)

Summary of Contents for SolvisDirekt

Page 1: ...ation for System Operators and Installers SolvisStrato with hot water station WWS xx Hot water flow rates 24 and 36 l min Operating system A2 08EN 22844 Item no 22844 P 32 EN Subject to technical chan...

Page 2: ...ecialist installing the heating system Client On pages 5 to 23 you will find all the information you need on how to use the SolvisControl system controller to operate your heating system safely If you...

Page 3: ...5 Start up and sensor installation 27 8 6 Function check of outputs pumps 30 8 7 Setting the impulse rate optional 30 8 8 Connecting the swimming pool sensor optional 31 9 Functions Menu 32 9 1 Mainte...

Page 4: ...designed with particular emphasis on safety But improper operation may result in hazards or damages Observe the following notes Read the operating instructions carefully Observe the safety notes to p...

Page 5: ...Direkt system With the SolvisStrato stratified buffer tank integrated in the fresh water system figure on right you benefit from our patented stratified charger technology Compared to stan dard buffer...

Page 6: ...ermost layer there is hot water for heating of drinking water Depending on the tank size 90 to 200 l are stored here so that enough water is heated for small and average dispensable amounts even at ti...

Page 7: ...flow encoder to control the heating of drinking water based on demand It also includes ther mometers to measure the flow and return temperature of the primary circuit of the plate heat exchanger All c...

Page 8: ...ol system controller The system controller coordinates all components SolvisControl functions Hygienic water heating with time controlled auxiliary heating of the buffer Time controlled swimming pool...

Page 9: ...y has probably been interrupted by the emergency stop switch which is usually next to the boiler or outside on the heating room door 5 Please always check whether the time and date have been set corre...

Page 10: ...top shows the status of the outputs When a number is highlighted in black it means that this output is switched ON A hand symbol indicates that this output is being operated manually Basic operating...

Page 11: ...X 70 C T Pre MIN 20 C Heating times menu 1 2 3 4 5 6 7 8 9 10 11 12 13 14 Return temp HEAT CIR 1 Mo Tu We Th Fr Sa Su 06 30 22 30 20 C 00 00 00 00 20 C 00 00 00 00 20 C Mo Tu We Th Fr Sa Su 07 30 00 0...

Page 12: ...ic mode HEAT CIR 1 2 Settings for heat circuits All functions are sensibly preset at the factory factory settings are provided in brackets OPERAT Set the operating mode to Time Auto If a room sensor i...

Page 13: ...times menu Factory setting Mo Su 24 hours page 17 set requested times if necessary page 46 WW_REQ 3 Setting the swimming pool heater T WW ACT Actual temperature swimming pool T WW NOM Nominal swimmin...

Page 14: ...ulse rate of the volume flow encoder is 0 5 l Imp and is installed on the relevant input S15 of the SolvisControl at the factory If you are using an on site volume flow encoder you will have to set th...

Page 15: ...e of the measured room tempera ture on the value of the flow temperature This works only if the valves on the radiators in the room are fully open If you set the room influence factor to the maximum v...

Page 16: ...tables give an overview of the heating times hot water times and circulation times that have been set Explanation of tables Each time block has three different time periods heating times Define the da...

Page 17: ...0 00 00 00 00 00 Own setting Valid days of the week for the time block Heating time 1 Heating time 2 Heating time 3 Mo Tu We Th Fr Sa Su from till from till from till Time block 1 Factory setting 00 1...

Page 18: ...ng a damp cloth Do not use any solvents to clean the SolvisStrato Heating systems must be maintained regularly according to the German Energy Conservation regulations EnEV We recommend that you have y...

Page 19: ...on right If there is a hand symbol the relevant output is set to manual mode and must be switched to automatic mode page 28 If the SolvisControl display no longer responds when you turn the rotary wh...

Page 20: ...le on page 21 If necessary switch the mixer to AUTO page 28 Notify the company responsible for installation if you cannot resolve the problem The reference room is always too warm or too cold The heat...

Page 21: ...oom tempera ture in the heating times program and increase Slope Reduce T Pre 10 C The room temperature is too high in winter but adequate in autumn and spring Reduce the slope Reduce T Pre 20 C First...

Page 22: ...tem perature sensor T Collector as required for the granting of incentives according to the market incentive program of the German federal government www BAFA de The WARNING dT Solar message figure on...

Page 23: ...d 1 2 3 4 5 6 7 8 9 10 11 12 13 14 HELP SERVICE MESSAGE Excess Temp since 16 07 at 11 30 Operat Syst Ax xxEN Message Excess temperature of protection function MESSAGE Excess Temp The function monitors...

Page 24: ...er requirement function WW_REQ 2 44 9 6 Hot water requirement function WW_REQ 3 swimming pool heating 45 9 7 Circulation control function CIRCU 46 9 8 Heat quantities counting functions 47 9 9 REQ HEA...

Page 25: ...ect the Client operating mode All the following settings are made in the Client operating mode unless stated otherwise Select the User menu item in the main menu by turning and pressing the rotary whe...

Page 26: ...7 8 9 10 11 12 13 14 Operat Syst A2 08EN HEAT CIR 1 F 17 OPERAT TIME AUTO Normal TIME PROG T Pre ACT 8 5 C T Pre NOM 48 5 C HEAT CURVE WW_REQ 1 F 10 REQUIREMENT Status OFF T WW NOM 48 C TIME PROG CIR...

Page 27: ...ted or there is sensor cable breakage 999 indicates a short circuit Perform a function check of the outputs pumps When the volume flow sensor is attached operate the relevant pump in HAND ON mode and...

Page 28: ...stem operator Check and if necessary change the following parameters a Hot water heating Set hot water nominal temperature T WW NOM factory setting is 48 C page 13 8 5 2 Adjusting the functional data...

Page 29: ...of the controller function menu to the required value If the maximum flow temperature is 35 C for example in the heating circuit controller menu to which the underfloor heating is connected you must r...

Page 30: ...the rotary wheel until the required value appears and then pressing it again Press the BACK button several times to return to the function overview 1 2 3 4 5 6 7 8 9 10 11 12 13 14 BROWSE BACK DES So...

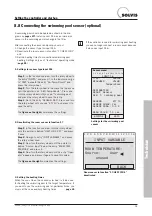
Page 31: ...e right summarizes the settings Step 1 In the function overview turn the rotary wheel until the pointer is behind HEAT CIR 1 F 17 and press it once Step 2 Now go to entry INPUT VARIABLE and press the...

Page 32: ...witched on for a few minutes Tot Runtime Total runtime of the burner The total run time can only be changed from Technician operating mode or higher Burner perf The burner performance value can be set...

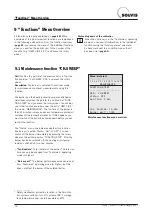
Page 33: ...ime TIME PROG Time program only active in the TIME AUTO control mode for setting time windows for heating the rooms and the associated target room temperature page 35 PRE RUN TEMPERATURE Current flow...

Page 34: ...ched off in lowering mode and the flow temperature is set to 5 C when the outdoor temperature is above 10 C factory setting For more details see section 4 Setting possibilities SWITCH OFF CONDITION b...

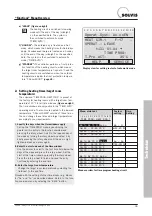
Page 35: ...ing rooms with a target room tem perature of 20 C for all time windows figure on right The time windows are only active in the TIME AUTO operating mode The rooms are heated to the lowered temperature...

Page 36: ...n the relevant time windows must be increased at the SolvisControl system controller If all heated rooms are too warm the target room temperature in the time windows must be lowered a little If some r...

Page 37: ...or tem perature is 0 C the flow tempera ture is regulated to 50 C a Setting the lowered temperature In the function overview turn the rotary wheel until HEAT CIR 1 F 16 is selected with the pointer Pr...

Page 38: ...ted see figure on right Enter the required maximum flow temperature by pressing and turning the rotary wheel and then pressing it again To enter the minimum flow pre run temperature repeat the steps f...

Page 39: ...ht The flow tempera ture is controlled in normal mode at T Pre 20 C and in lowering mode at T Pre 10 C When Fixed value has been selected figure bottom right the mode of the heating curve automaticall...

Page 40: ...of 2 K at the factory This means that the heating circuit is switched on again when the target flow pre run temperature is higher than the set minimum flow pre run temperature T Pre MIN plus 2K Examp...

Page 41: ...can control a second mixed heating circuit To do this a second heating circuit control function has been configured at the factory with the same parameters as the first one For this reason the same ex...

Page 42: ...12 13 14 HELP SERVICE WW_REQ 1 F 10 TIME PROG REQUIREMENT Status OFF T WW NOM 48 C Operat Syst Ax xxEN Setting the target hot water temperature Possible settings T WW NOM for setting the individual ta...

Page 43: ...days of the week figure on right and press the rotary wheel Set the start of the time window by turning the rotary wheel the time increases in 10 minute intervals Press the 10 button on the rotary wh...

Page 44: ...i tional hot water buffer to be available The factory setting for the time windows in the time program is zero so that the additional hot water buffer stays switched off T WW ACT The temperature at S9...

Page 45: ...tarted for heating if a variety of other conditions have been met see also Functions 20 24 in the section Overview of func tions page 62 DIFF OFF Switch off temperature difference at which the swimmin...

Page 46: ...T CR NOM 48 C At T CR ACT 48 12 36 C the circulation pump switches on and at T CR ACT 48 9 39 C it switches back off TIME PROG You can set time windows to control the circulation pump here Outside of...

Page 47: ...mperature sensors for measuring solar flow and solar return temperatures Pt 1000 which means calibration is not necessary FROST PROTECTION The amount of antifreeze in the secondary solar circuit is fi...

Page 48: ...ff and solar heat has priority It switches back on when the target flow temperature drops below the requirement threshold The course of the requirement threshold is calculated as follows dT x dt const...

Page 49: ...is operating However if the HEAT CIR 1 function is not enabled for example because the Floor Dry function is active the pump status will always be off regardless of whether it was activated by the Fl...

Page 50: ...flow when temperatures rise or fall Higher temperatures can also occur when the maximum speed has been reached Do not reduce the flow in the solar circuit the flow meter must be completely open This c...

Page 51: ...flow pre run temperature of the heating circuit plus the switch on temperature difference DIFF ON 1 K heat will be requested The boiler switches off when the temperature in the lower layer of the heat...

Page 52: ...the rotary wheel to load the factory settings Displaying the designation of a function data set The DATA ADMINISTRATION menu displays the designa tion of a set of function data It shows the file name...

Page 53: ...rol board centre right figure 2 Activate the Expert operating mode page 25 3 Open the DATA ADMINISTRATION menu If you are not already in the main menu open it with the Service button and turn the rota...

Page 54: ...nsor see system diagram in the appendix can be read at T Ref ACT and the temperature at the hot water buffer temperature sensor S1 can be read at T Lim ACT Solar control menu overview 10 3 2 Solar con...

Page 55: ...ar buffer layer S3 sensor Storage Reference input 3 reaches the set maximum tank temperature T Ref MAX page 50 under When does the safety function deploy The Puffer voll message appears We recommend t...

Page 56: ...l m h 60 min h Determining the minimum speed Switch output 6 to HAND ON figure on right Lower the speed until the calculated volume flow has set This speed is the minimum speed level Switch output 6 b...

Page 57: ...e minimum speed level as follows Press the SERVICE button in the function overview to go to the main menu In the main menu select the Functions entry by turning and pressing the rotary wheel In the fu...

Page 58: ...el Select the menu item PAR of function 8 START FUNCTION and press the rotary wheel In the start function menu turn the rotary wheel until the pointer is behind INPUT VARIABLE and press the rotary whe...

Page 59: ...e controls heating circuit 1 FNCT VAR Function variable must always be set to Temperature Cyclical If this is set to no the system will only run through the activated stages once Otherwise the cycle w...

Page 60: ...ing solar yields 7 Solar flow T Solar Pre1 S7 The sensor is located in the flow from the collector of the primary solar circuit 8 Collector temperature T Collector S8 It displays the temperature measu...

Page 61: ...the primary circuit is controlled in the AUTO setting section 10 3 2 and that speed is displayed here 7 Solar Pump2 The speed of the solar pump in the secondary circuit is controlled in the AUTO sett...

Page 62: ...tapping function control of WW pump A2 with WW tapping process 14 LOGIC FUNCTION OR 1 Evaluates the status of WW PROD and WW DRAW to enable HYG WW PR function 15 PID CONTROL HYG WW PR Speed control of...

Page 63: ...g pool pump on or off with conventional auxiliary heating 32 COMPARISON MAX FUNCT Monitors the maximum temperature of the S1 storage tank max 95 C page 23 33 ANALOG FUNCT SUM 1 Sets target temperature...

Page 64: ...1 optional S13 Temperature sensor Heating flow heating circuit 2 optional S14 Temperature sensor Return temperature hot water heat exchanger S15 Volume flow measuring unit impulse input Volume flow in...

Page 65: ...tactor 11 2 Resistance measurement values of the temperature sensors The sensor values can be checked if a defective sensor is suspected Unconnected sensors have resistance values that are shown in th...

Page 66: ...t 1 c osed opt A10 M xer heat ng c rcu t 2 open opt A11 M xer heat ng c rcu t 2 c osed opt A12 S gna heat requ rement burner f oat ng A13 Pump charg ng A14 Data transfer DL A15 Ana ogue output 0 10 V...

Page 67: ...so ar f ow sec opt S6 Sensor so ar return sec opt S7 Sensor so ar f ow pr mary opt S8 Sensor so ar co ector opt ona S9 Sensor heat ng buffer ower S10 Sensor outdoor opt ona S11 Sensor c rcu at on retu...

Page 68: ...S5 Sensor so ar f ow sec opt S6 Sensor so ar return sec opt S7 Sensor so ar f ow pr mary opt S8 Sensor so ar co ector opt ona S9 Sensor heat ng buffer ower S10 Sensor outdoor opt ona S11 Sensor c rcu...

Page 69: ...ing system The safety measures in the boiler would be by passed and there would be no switch off safety in case of a malfunction 1 Version Auxiliary heating contact on boiler requires a floating conta...

Page 70: ...atus 0 0 Off 150 15 0 6 On START 50 5 0 On 900 90 10 0 On MAX Flow temperature specifications for standard boilers Standard boiler scaling 1 2 3 4 5 6 7 8 9 10 11 12 13 14 OUTPUT 15 BROWSE BACK OUTPUT...

Page 71: ...y claims 25 LOWERED 34 Lowered temperature 28 37 Maint function 32 Manual mode 28 Maximum collector temperature 55 MemoryManager 52 MESSAGE 12 22 23 Menu overview 11 Minimum speed 56 Minimum temperatu...

Page 72: ...SOLVIS GmbH Co KG Grotrian Steinweg Str 12 38112 Braunschweig Phone 0531 28904 0 Fax 0531 28904 100 Website www solvis de E mail info solvis solar de...

Reviews: