background image


20130327 v2 

Summary of Contents for plugCAM PCQ-500C

Page 1: ...20130327 v2 ...

Page 2: ...shot 11 4 3 2 Reload Camera 11 4 4 Cameras 12 4 4 1 Delete Camera 12 4 4 2 Camera Setting 13 4 4 3 Time Date 14 4 5 Albums 15 4 5 1 View Albums 15 4 5 2 Delete Albums 15 4 5 3 View Delete Email Pictures 16 4 6 App Settings 17 4 6 1 Passcode lock 17 4 6 2 Background Skin 18 4 7 About 18 5 PC Software Instruction 19 5 1 PC Software Installation 19 5 2 Function Introduction 21 5 3 Search Camera in Lo...

Page 3: ...isclaimer 28 6 Encrypted PLC Network 29 6 1 Creating a Private Encrypted Network 29 6 2 Remove Device from an Existing Network Group 29 6 3 Create Additional Private Network 30 7 Enhance PLC Performance 31 8 Specifications 33 ...

Page 4: ...a radiator or heat register This product relies on the building s electrical installation for short circuit over current protection DO NOT allow anything to rest on the product interconnect plug DO NOT locates this product where people may walk on the cords Because this product sends data over the power line it is recommended that you plug directly into a power outlet Do not plug the device into a...

Page 5: ...ons PLC technology The advanced Plug and Play Technology automatically configures and connects the plugCAM Camera to the plugCAM App After the initial setup you can begin viewing the area selected for monitoring right from your smartphone anytime anywhere using the smartphone s 3G 4G LTE or Wi Fi connections 2 1 Package Content ...

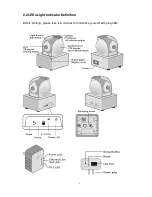
Page 6: ...3 2 2 LEDs Light Indicator Definition Before starting please take few minutes to familiarize yourself with plugCAM ...

Page 7: ...nceled OFF Power off PLC Act Link LED OFF No PLC device is detected nor connected ON PLC device is detected Blinking 1 Fast PLC UDP data transfer rate is higher than 60Mbps 2 Normal PLC UDP data transfer rate is between 10Mbps to 60Mbps 3 Slow PLC UDP data transfer rate is slower than 10Mbps Group Button Press 1 to 3 seconds to enter into Pairing Procedure creating an encrypted PLC network While i...

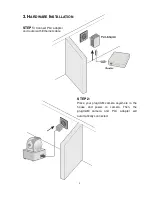
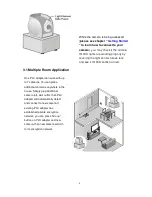
Page 8: ...INSTALLATION STEP 1 Connect PLC adapter and router with Ethernet cable STEP 2 Place your plugCAM camera anywhere in the house and power on camera Then the plugCAM camera and PLC adapter will automatically connected ...

Page 9: ... to new camera If existing PLC adapter has established private encryption network you can press Group button on PLC adapter and new camera then new camera will join to its encryption network While the camera is being accessed please see chapter Getting Started to learn how to connect to your camera you may check if the camera IR LED lights are working properly by covering the light sensor above le...

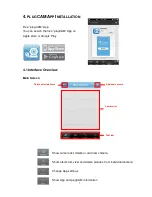
Page 10: ... on Apple store or Google Play 4 1 Interface Overview Main Screen Show camera list delete or add new camera Show album list view and delete pictures from individual camera Change App settings Show App and plugCAM information Camera list Delete selected items Add new camera Tool bar ...

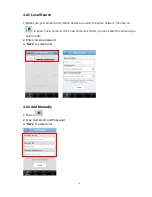
Page 11: ...here 3 options to add camera QR Code Scan Local Search and Manual P S Each plugCAM PLC adapter can support up to 7 plugCAMs 4 2 1 QR Code Scan 1 Tap on to start QR code scan 2 Scan the QR code that is located on the bottom of plugCAM 3 Save to camera list ...

Page 12: ...evice are under the same network then tap on to search new camera Once new camera is found you can select the camera you want to add 2 Enter camera password 3 Save to camera list 4 2 3 Add Manually 1 Tap on 2 Type Camera ID and Password 3 Save to camera list ...

Page 13: ... Step 2 You will need to create new password and press apply button on the screen before accessing your camera PS For the safety purpose you will be asked to create new password when you connect to camera with the default password 4 3 View Images 1 Select a camera from the camera list ...

Page 14: ...mera image 3 If the camera is offline please check if you have installed the camera properly 4 3 1 Take a Snapshot 1 While accessing the camera you can tap the icon to take a quick shot 2 The pictures will be saved to album 4 3 2 Reload Camera Tap to reload the camera image ...

Page 15: ...12 4 4 Cameras 4 4 1 Delete Camera 1 Tap to show camera list Tap to delete camera ...

Page 16: ...13 4 4 2 Camera Setting 1 Select a camera 2 Tap to enter the camera settings 3 After make changes please tap on to save each change ...

Page 17: ...14 4 4 3 Time Date 1 The default setting is Off tap On to turn on time date information 2 Tap Done to confirm then time date will show up on the viewing screen ...

Page 18: ...15 4 5 Albums 4 5 1 View Albums Tap to start 4 5 2 Delete Albums 1 Edit Delete Done to confirm ...

Page 19: ... 3 View Delete Email Pictures 1 Select an album 2 Tap on the picture you want to see for larger view 3 Tap on to Delete Email and Save picture If your don t want to do any change just press Cancel to go back ...

Page 20: ...scode again to turn off passcode lock Default setting is Off Turn on Passcode Lock can help prevent others connect to your plugCAM without your permission You must enter correct passcode every time when starting the plugCAM program after turning on this function 1 Tap on the Passcode Lock 2 Enter passcode and confirm it again ...

Page 21: ...18 4 6 2 Background Skin 4 7 About Tap to start Show Software Version Product Information 1 Tap on Background skin 2 Default is gray Choose a color for your background ...

Page 22: ...software CD to your CD R device or download from the official website to start the installation 1 Double click to start installation 2 Set up will start automatically 3 Click Next to enter PC information 4 Choose set up type and click Next to enter installation procedure ...

Page 23: ...20 5 Procedure complete automatically 6 You can see the plugCAM program and the icon after installation successfully Shortcut on desktop Program main screen ...

Page 24: ...Playback video recording Set snapshot and video recording path 9 channels default 4 channels 6 channels Edit alarm recording settings Add new camera Delete selected camera Connect to all cameras Disconnect all cameras Edit Camera Basic Information Alarm and Recording Function ...

Page 25: ...k 1 Select an empty channel 2 Click to add in a new plugCAM device 3 Click search to find plugCAM in the same network wait for plugCAM ID shows up and then type in password press Save Channel name Video frame rate Remote viewing Video recording Snapshot ...

Page 26: ... image will show on the display channel 5 4 Add Camera Manually 1 Select an empty channel 2 Click to add in a new plugCAM device 3 Type in ID and password press Save 4 Click selected channel to connect to camera 5 plugCAM image will show on the display channel ...

Page 27: ...formation Alarm and Recording Function Click for setting up basic info recording motion detection and email alert etc 5 5 1 Basic Information Change password and name of selected plugCAM 5 5 2 Alarm Setting Enable alarm choose or ...

Page 28: ...Detection Then set Alarm Methods Alarm sound Snapshot Recording Send E mail Clicking the Setting button to enter E mail address If you want to set Schedule Alert click for further settings add duration edit selected duration delete selected duration Warming Web based POP SMTP Email server such as Gmail and Hotmail are not supported ...

Page 29: ...dd duration to edit selected duration to delete selected duration Press the record button to start recording Turning red means that camera is under 1 Click the snapshot button to take snapshot from the camera 2 You can see the picture you take immediately you can also open the file folder to delete snapshots 3 Press again to take another picture ...

Page 30: ...en choose a camera to see its record 2 After you choose a camera you will see the recorded video list pick one to review 1 Click on Snapshot History then choose a camera to see its record 2 After you choose a camera you will see the recorded snapshot list pick one to review Click to choose a folder that you want to save pictures and videos Start to activate MPEG 4 recording ...

Page 31: ...ing or setup contained on distributed through or linked downloaded or accessed from any of the services or functions provided by the plugCAM product Customers hereby acknowledge that any usage or reliance upon the plugCAM product shall be at customers sole risk brite View Corporation hereby reserves the right in its sole discretion and without any prior notice or obligation to make improvements to...

Page 32: ...essing its GROUP button more than 10 seconds until all LED lights simultaneously turns off and on once At this moment its network group name has been changed to a random name It means that this device is 1 ready to be assigned another network name or 2 to be used as a seed device so other PLC devices can join to a private network group Step II Join to Other Network Group 1 Press GROUP button of de...

Page 33: ... you want to create additional private network for your powerline devices that co existence with your existing powerline private network group please repeat the Step 1 2 to generate new private network group for selected powerline devices P S Users can press the RESET button to reset the network name back to its factory default ...

Page 34: ...mmendations while placing the Powerline device AC Outlets Connection Avoid connecting PLC device to an uninterruptible power supply UPS or backup power supply device For best results connect the adaptors directly to a wall outlet is recommended Avoid connecting high power consuming appliances to the same wall outlet See the following illustration For better performance the following connection is ...

Page 35: ...ivity feature supported Electrical Wiring The PLC device delivers data over the existing electrical wiring in the house Actual PLC data transfer rate might vary including the transmission distance between two PLC adapters Special Care for Business Installation Due to several uncertainties that might degrade Powerline performance or block its operation we DO NOT recommend to install the Powerline d...

Page 36: ... Turns on under dark being accessed Video Setting Resolution Brightness Quality Environment Flip and Mirror setting Security User defined ID Password protection Public key encryption Networks Network protocols TCP IP UPnP DHCP client P2P Board band router With DHCP and UPnP enabled P2P NAT traversal technology Proprietary UDP PLC Power Line Communication Built in 500 Mbps PLC adaptor Max PLC Camer...

Reviews: