background image

12   

ES

 - Manual de instalación y uso del mando a distancia centralizado io/RTS - SOMFY

ES

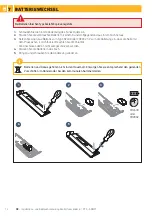
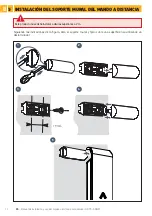
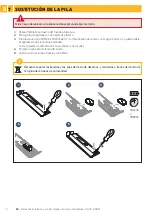
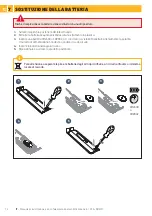
SUSTITUCIÓN DE LA PILA 

Existe riesgo de explosión si la pila se sustituye por una de tipo incorrecto.

1. 

 Desatornille la tapa trasera del mando a distancia.

2. 

 Extraiga la pila gastada con un objeto de plástico.

3. 

 Introduzca una pila CR2430 o CR2032 de 3 V, comprobando que la cara con el signo positivo (+) quede visible. 
Asegúrese de que respeta la polaridad.  
Los terminales de alimentación no se deben cortocircuitar. 

4. 

 Empuje la pila hasta el fondo del hueco. 

5. 

 Vuelva a colocar la tapa trasera y atorníllela.

Recuerde separar las baterías y las pilas del resto de desechos y reciclarlas a través del centro de 
recogida de residuos de su localidad.

1

2

CR2430 
o  
CR2032 

3

5

4

7

Summary of Contents for SITUO 5 io/RTS PURE

Page 1: ... utilisation EN io RTS centralisation remote control Installation and operating guide DE Zentralfunksender io RTS Installations und Gebrauchsanleitung ES Mando a distancia centralizado io RTS Manual de instalación y uso IT Telecomando di centralizzazione io RTS Manuale di installazione e d uso 5152226A ...

Page 2: ......

Page 3: ...5 3 1 Programmation sur une douille ou une prise télécommandée Somfy 5 3 2 Programmation sur une motorisation de volet ou volet battant radio Somfy 7 4 Effacement de votre télécommande d un équipement Somfy 8 4 1 Effacer le canal programmé sur une douille ou une prise télécommandée Somfy 8 4 2 Effacer le canal programmé sur une motorisation de volet ou volet battant radio Somfy 9 5 Installation du su...

Page 4: ...nsulter un interlocuteur Somfy ou aller sur le site www somfy com Somfy déclare que le produit décrit dans ces instructions lorsqu il est utilise conformément à ces instructions est conforme aux exigences essentielles des Directives Européennes applicables et en particulier a la Directive Radio 2014 53 EU Le texte complet de la déclaration CE de conformité est disponible à l adresse internet suiva...

Page 5: ...et io les prises télécommandées RTS et io les micro modules d éclairage RTS et io les micro modules pour volet roulant RTS et io la douille télécommandée RTS Témoins de sélection de canal et d appui sur les touches Sélecteur de canal Bouton PROG Support mural Logement du support mural Touches de commande des applications Vue de face Vue de dos Chaque canal correspond à une télécommande individuell...

Page 6: ... RTS SOMFY FR UTILISATION 2 Prise On Off 3600 W Volet roulant Volet battant Douille On Off 60 W Prise douille On Off 3600 W Appui bref Marche Ouverture Appui bref Stop si volet est en en mouvement Position favorite enregistrée si volet est ouvert ou fermé Appui bref Arrêt Fermeture ...

Page 7: ...utes les autres prises et douilles télécommandées Somfy de votre domicile 2 Appuyez autant de fois que nécessaire sur le bouton sélecteur de canal jusqu à ce que les voyants indiquent le canal à programmer 3 Appuyez sur le bouton de programmation de la douille prise télécommandée jusqu à ce que son voyant clignote 4 Faites un appui bref avec un objet fin sur le bouton PROG au dos de la télécommande...

Page 8: ...de canal jusqu à ce que les voyants indiquent le canal à ajouter 4 Appuyez avec un objet fin sur le bouton PROG au dos de cette même télécommande B Les voyants des appareils à associer s allument fixement puis s éteignent Le canal de la nouvelle télécommande B est programmé 5 Si nécessaire répétez cette procédure avec les autres canaux de la télécommande A Télécommande déjà programmée A 1 2 0 5 s No...

Page 9: ... ou le point de commande qui ne pilote que ce volet Si la commande d origine est perdue ou cassée et qu elle est la seule à piloter le volet roulant contactez l assistance Somfy Si une autre commande pilote le volet roulant utilisez la pour suivre les étapes suivantes 2 Entrouvrez le volet avec la commande d origine 3 Appuyez sur le bouton PROG de la commande d origine jusqu au va et vient du vole...

Page 10: ...es les autres prises et douilles télécommandées Somfy de votre domicile 2 Appuyez autant de fois que nécessaire sur le bouton sélecteur de canal jusqu à ce que les voyants indiquent le canal à effacer 3 Appuyez sur le bouton de programmation de la douille prise télécommandée jusqu à ce que son voyant clignote 4 Faites un appui bref avec un objet fin sur le bouton PROG au dos de la télécommande Le vo...

Page 11: ...vrez le volet avec la commande à conserver 3 Appuyez sur le bouton PROG de la commande à conserver jusqu au va et vient du volet ou un bip La fonction PROG est activée pendant 2 minutes 4 Appuyez autant de fois que nécessaire sur le bouton sélecteur de canal jusqu à ce que les voyants indiquent le canal à effacer 5 Faites un appui bref avec un objet fin sur le bouton PROG au dos de la télécommande à...

Page 12: ...ntralisation io RTS SOMFY FR INSTALLATION DU SUPPORT MURAL DE LA TÉLÉCOMMANDE Ce produit ne doit pas être installé à une hauteur supérieure à 2 m En suivant la figure ouvrez le support mural et le fixer à l aide d un tournevis sur une surface plane 1 2 19 mm 3 4 5 5 ...

Page 13: ...pot arrière de la télécommande 2 Sélectionnez le canal déjà associé ou à associer au moteur solaire partenaire 3 Pour consultez le mode en cours faire un contact bref entre les 2 parties de la zone dédiée à l activation 2 demi cercles à côté du bouton Prog Voyant du canal sélectionné est allumé fixe mode standard Voyant du canal sélectionné clignotant mode compatible autres moteurs solaires partena...

Page 14: ...le usagée hors de son logement avec un objet en plastique 3 Insérez une pile CR2430 ou CR2032 3 V la face marquée du plus visible Bien respecter la polarité Les bornes d alimentation ne doivent pas être court circuitées 4 Poussez la pile au fond de son logement 5 Remettez et vissez le capot arrière Veillez à séparer les piles et batteries des autres types de déchets et à les recycler via le systèm...

Page 15: ...ontrol 433 42MHz RTS Bande de fréquence et puissance maximale utilisée 868 700MHz 869 200MHz p a r 25 mW 433 050MHz 434 790MHz p a r 10 mW Portée radio 150 m en champ libre Utilisation garantie dans la plupart des étages en fonction de l environnement accès point à point Température d utilisation 0 C à 48 C Alimentation 1 pile type CR2430 ou CR2032 3 V 8 ...

Page 16: ......

Page 17: ... 3 1 Programming on a Somfy remote controlled lamp holder or socket 5 3 2 Programming on a Somfy radio shutter or hinged shutter drive 7 4 Deleting your remote control from Somfy equipment 8 4 1 Deleting the programmed channel from a Somfy remote controlled lamp holder or socket 8 4 2 Deleting the programmed channel from a Somfy radio shutter or hinged shutter drive 9 5 Installing the remote contr...

Page 18: ...onal information contact a Somfy representative or visit the website www somfy com Somfy declares that the product described in these instructions when used in accordance with these instructions complies with the essential requirements of the applicable European directives and in particular with Radio Directive 2014 53 EU The full text of the EC declaration of conformity is available at the follow...

Page 19: ...io remote controlled sockets RTS and io lighting micro modules RTS and io roller shutter micro modules RTS remote controlled lamp holder Channel selection and button activation indicator lights Channel selector switch PROG button Wall mounting Wall mounting recess Application control buttons Front view Rear view Each channel corresponds to an individual remote control and can be used to control on...

Page 20: ...e control SOMFY EN USE 2 On Off socket 3600 W Roller shutter Hinged shutter On Off lamp holder 60 W On Off socket lamp holder 3600 W Short press On Open Short press Stop if the shutter is moving Favourite position saved if the shutter is open or closed Short press Off Close ...

Page 21: ...s for Somfy remote controlled devices in your home 2 Press the channel selection button as many times as necessary until the indicator lights show the channel to be programmed 3 Press the programming button on the remote controlled lamp holder socket until the indicator light flashes 4 Use a fine tipped object to make a short press on the PROG button on the back of the remote control The indicator l...

Page 22: ...the indicator lights show the channel to be added 4 Use a fine tipped object to press the PROG button on the back of this same remote control B The indicator lights on the devices to be linked come on permanently then go out The channel is programmed on the new remote control B 5 If necessary repeat this procedure with the other channels on remote control A Remote control already programmed A 1 2 0...

Page 23: ... the original control is lost or broken and it is the only one that controls the roller shutter contact Somfy assistance If another control operates the roller shutter use that to follow the steps below 2 Partially open the shutter using the original control 3 Press the PROG button on the original control until the shutter makes an up and down movement The programming function is activated for 2 m...

Page 24: ... sockets for Somfy remote controlled devices in your home 2 Press the channel selection button as many times as necessary until the indicator lights show the channel to be deleted 3 Press the programming button on the remote controlled lamp holder socket until the indicator light flashes 4 Use a fine tipped object to make a short press on the PROG button on the back of the remote control The indicat...

Page 25: ...be retained 3 Press the PROG button on the control to be retained until the shutter makes an up and down movement or emits an audible signal The programming function is activated for 2 minutes 4 Press the channel selection button as many times as necessary until the indicator lights show the channel to be deleted 5 Use a fine tipped object to make a short press on the PROG button on the back of the...

Page 26: ...ntralisation remote control SOMFY EN INSTALLING THE REMOTE CONTROL WALL MOUNTING This product must not be installed at a height greater than 2 m Open the wall mounting and fix to a flat surface using a screwdriver as shown in the diagram 1 2 19 mm 3 4 5 5 ...

Page 27: ... of the remote control 2 Select the channel already paired or to be paired with a partner solar motor 3 To consult the current mode create a brief contact between the 2 parts of the dedicated activation zone 2 semi circles beside the Prog button Indicator light of the channel selected constantly on standard mode Indicator light of the channel selected mode compatible with other io partner solar mo...

Page 28: ...2 Push the battery out of its housing using a plastic object 3 Insert a 3V CR2430 or CR2032 battery with the plus side visible Make sure the polarity is correct The power supply terminals must not be short circuited 4 Push the battery fully into its housing 5 Screw the rear cover back into place Please separate batteries from other types of waste and recycle them via the local collection system 1 ...

Page 29: ...io homecontrol 433 42 MHz RTS Frequency band and maximum power used 868 700 MHz 869 200 MHz e r p 25 mW 433 050 MHz 434 790 MHz e r p 10 mW Radio range 150 m in free field Use guaranteed on most floors according to the environment point to point access Operating temperature 0 C to 48 C Power supply 1 x 3 V CR2430 or CR2032 battery 8 ...

Page 30: ......

Page 31: ...grammierung einer fernbedienten Somfy Fassung oder Steckdose 5 3 2 Programmierung eines funkgesteuerten Somfy Roll oder Klappladenantriebs 7 4 Löschung des Funksenders von Somfy Geräten 8 4 1 Löschung des programmierten Kanals von einer fernbedienten Somfy Fassung oder Steckdose 8 4 2 Löschung des programmierten Kanals von einem funkgesteuerten Somfy Roll oder Klappladenantrieb 9 5 Installation de...

Page 32: ... Ansprechpartner oder besuchen Sie unsere Website www somfy com Somfy erklärt dass das in diesen Anleitungen beschriebene Produkt bei Anwendung gemäß dieser Anweisungen mit den wesentlichen Anforderungen der anwendbaren Europäischen Richtlinien konform ist insbesondere mit der Funkanlagenrichtlinie 2014 53 EU Der vollständige Text der CE Konformitätserklärung ist unter der Internet Adresse www som...

Page 33: ...lappladenantriebe ferngesteuerte RTS und io Steckdosen RTS und io Beleuchtungs Mikromodule RTS und io Rollladen Mikromodule ferngesteuerte RTS Fassungen LEDs Statusanzeige der Kanalauswahl und der Tastenbetätigung Kanalwahltaste PROG Taste Wandhalterung Aufnahme der Wandhalterung Bedientasten Ansicht von vorne Ansicht von hinten Jeder Kanal entspricht einem einzelnen Funksender und kann ein oder m...

Page 34: ...ente Steckdose On Off 3600 W Rollladen Klappladen Fernbediente Fassung On Off 60 W Fernbediente Steckdose Fassung On Off 3600 W Kurzer Druck Ein Öffnen Kurzer Druck Stopp wenn der Laden in Bewegung ist Programmierte Lieblingsposition wenn der Laden offen oder geschlossen ist Kurzer Druck Aus Schließen ...

Page 35: ...ang alle anderen fernbedienten Somfy Steckdosen oder Fassungen in Ihrer Wohnung von der Stromversorgung 2 Drücken Sie so o auf die Kanalwahltaste bis der zu programmierende Kanal anzeigt wird 3 Drücken Sie die Programmiertaste der fernbedienten Fassung Steckdose bis die LED blinkt 4 Drücken Sie mit einem spitzen Gegenstand kurz die PROG Taste hinten am Funksender Die LED der fernbedienten Fassung ...

Page 36: ...LEDs den einzulernenden Kanal angeben 4 Drücken Sie kurz mit einem spitzen Gegenstand die PROG Taste hinten an demselben Funksender B Die LEDs der zu verbindenden Geräte leuchten durchgehend und erlöschen dann Der Kanal des neuen Funk senders B ist programmiert 5 Wiederholen Sie das Verfahren bei Bedarf mit den anderen Kanälen des Funksenders A Bereits programmierter Funksender A 1 2 0 5 s Neuer F...

Page 37: ...ie Originalbedieneinheit verloren gegangen ist oder beschädigt wurde und die einzige Bedieneinheit ist mit der der Rollladen angesteuert werden kann wenden Sie sich an den Support von Somfy Wenn der Laden mit einer anderen Bedieneinheit angesteuert werden kann verwenden Sie diese für die folgenden Schritte 2 Öffnen Sie den Laden mit dem Originalbediengerät halb 3 Drücken Sie die PROG Taste des jewe...

Page 38: ...e bei diesem Vorgang alle anderen fernbedienten Somfy Steckdosen oder Fassungen in Ihrer Wohnung von der Stromversorgung 2 Drücken Sie so o auf die Kanalwahltaste bis der zu löschende Kanal anzeigt wird 3 Drücken Sie die Programmiertaste der fernbedienten Fassung Steckdose bis die LED blinkt 4 Drücken Sie mit einem spitzen Gegenstand kurz die PROG Taste hinten am Funksender Die LED der fernbedient...

Page 39: ...rn sollen 2 Öffnen Sie den Laden mit der beizubehaltenden Bedieneinheit halb 3 Drücken Sie kurz auf die PROG Taste der beizubehaltenden Bedieneinheit bis der Laden sich bewegt oder piept Die PROG Funktion wird nun für 2 Minuten aktiviert 4 Drücken Sie so o auf die Kanalwahltaste bis der zu löschende Kanal anzeigt wird 5 Drücken Sie kurz die PROG Taste hinten am zu löschenden Funksender Der Laden be...

Page 40: ...OMFY DE INSTALLATION DER WANDHALTERUNG FÜR DEN FUNKSENDER Dieses Produkt darf maximal in einer Höhe von 2 m installiert werden Öffnen Sie die Wandhalterung gemäß Abbildung und befestigen Sie sie mithilfe eines Schraubendrehers auf einer glatten Oberfläche 1 2 19 mm 3 4 5 5 ...

Page 41: ...bdeckung des Funksenders ab 2 Wählen Sie den Kanal der dem Solarantrieb des Partners bereits zugeordnet ist oder zugeordnet werden soll 3 Überprüfen Sie den aktuellen Modus Stellen Sie kurz einen Kontakt zwischen den 2 Kontaktflächen 2 Halb kreise neben der Taste Prog her Die LED des ausgewählten Kanals leuchtet durchgehend Standardmodus Die LED des ausgewählten Kanals blinkt kompatibler Modus mit ...

Page 42: ...us 3 Setzen Sie eine neue Batterie vom Typ CR2430 oder CR2032 3 V so in die Halterung ein dass die Seite mit dem Pluszeichen sichtbar ist Beachten Sie die Polarität Die Anschlüsse dürfen nicht kurzgeschlossen werden 4 Drücken Sie die Batterie in das Fach 5 Bringen und schrauben Sie die Abdeckung wieder an Batterien und Akkus gehören nicht in den Hausmüll Entsorgen Sie sie entsprechend den geltende...

Page 43: ... 42 MHz RTS Frequenzband und maximale Leistung 868 700 MHz 869 200 MHz ERP 25 mW 433 050 MHz 434 790 MHz ERP 10 mW Funkreichweite 150 m im Freifeld Garantierter Einsatz in Etagenreichweite je nach Umgebung von Zugangspunkt zu Zugangspunkt Betriebstemperaturbereich 0 C bis 48 C Betriebsspannung 1 Batterie vom Typ CR2430 oder CR2032 3 V 8 ...

Page 44: ......

Page 45: ...talámparas o en una toma con control a distancia Somfy 5 3 2 Programación en un motor de persiana o contraventana con radiocontrol Somfy 7 4 Eliminación de un mando a distancia de un equipo Somfy 8 4 1 Borrar el canal programado en un portalámparas o una toma con control a distancia Somfy 8 4 2 Borrar el canal programado en un motor de persiana o contraventana con radiocontrol Somfy 9 5 Instalació...

Page 46: ...a web www somfy com Somfy declara que el producto descrito en las presentes instrucciones siempre que se utilice de conformidad con las mismas cumple los requisitos esenciales de las directivas europeas aplicables y en particular de la directiva 2014 53 EU sobre equipos radioeléctricos El texto completo de la declaración CE de conformidad se encuentra disponible en la siguiente página web www somf...

Page 47: ...distancia RTS e io los micromódulos de iluminación RTS e io los micromódulos para persianas enrollables RTS e io el portalámparas con control a distancia RTS Testigos de selección de canal y pulsación de los botones Selector de canal Botón PROG Soporte mural Enganche para soporte mural Botones de control de las aplicaciones Vista frontal Vista trasera Cada canal corresponde a un mando a distancia ...

Page 48: ...n Off 3600 W Persiana enrollable Contraventana Portalámparas On Off 60 W Toma portalámparas On Off 3600 W Pulsación breve Funcionamiento Apertura Pulsación breve Parada si la persiana está en movimiento Posición preferida registrada si la persiana está abierta o cerrada Pulsación breve Parada Cierre ...

Page 49: ...nciaSomfydesudomicilio 2 Pulse tantas veces como sea preciso el botón de selección de canal hasta que los indicadores luminosos indiquen el canal que desea programar 3 Pulse el botón de programación del portalámparas la toma con control a distancia hasta que su indicador luminoso parpadee 4 Pulse brevemente con un objeto fino el botón PROG de la parte posterior del mando a distancia El indicador lu...

Page 50: ...res indiquen el canal que desea añadir 4 Pulse el botón PROG situado en la parte posterior del mando a distancia B con un objeto fino Los indicadores luminosos de los equipos que van a asociarse se encenderán de forma fija y luego se apagarán El canal del nuevo mando a distancia B está programado 5 En caso necesario repita este procedimiento con los otros canales del mando a distancia A Mando a dist...

Page 51: ... Si el mando original se ha perdido o dañado y es el único que controla la persiana enrollable póngase en contacto con el servicio de asistencia de Somfy Si hay otro mando que controla la persiana enrollable utilícelo para realizar las fases siguientes 2 Entreabra la persiana con el mando original 3 Pulse el botón PROG del mando original hasta que la persiana realice un movimiento de subida y baja...

Page 52: ...mparasconcontroladistanciaSomfydesudomicilio 2 Pulse tantas veces como sea preciso el botón de selección de canal hasta que los indicadores luminosos indiquen el canal que desea eliminar 3 Pulse el botón de programación del portalámparas la toma con control a distancia hasta que su indicador luminoso parpadee 4 Pulse brevemente con un objeto fino el botón PROG de la parte posterior del mando a dist...

Page 53: ...del mando que desea mantener hasta que la persiana realice un movimiento de subida y bajada o emita un pitido La función PROG se activa durante dos minutos 4 Pulse tantas veces como sea preciso el botón de selección de canal hasta que los indicadores luminosos indiquen el canal que desea eliminar 5 Pulse brevemente con un objeto fino el botón PROG de la parte posterior del mando a distancia que des...

Page 54: ...io RTS SOMFY ES INSTALACIÓN DEL SOPORTE MURAL DEL MANDO A DISTANCIA Este producto no se debe instalar a alturas superiores a 2 m Siguiendo las indicaciones de la figura abra el soporte mural y fíjelo sobre una superficie lisa utilizando un destornillador 1 2 19 mm 3 4 5 5 ...

Page 55: ...a 2 Seleccione el canal ya vinculado o que desea vincular con el motor solar asociado 3 Para consultar el modo en curso establezca un breve contacto entre las 2 partes de la zona dedicada a la activación 2 semicírculos junto al botón Prog El indicador luminoso del canal seleccionado se enciende fijo modo estándar El indicador luminoso del canal seleccionado parpadea modo compatible con otros motore...

Page 56: ...bjeto de plástico 3 Introduzca una pila CR2430 o CR2032 de 3 V comprobando que la cara con el signo positivo quede visible Asegúrese de que respeta la polaridad Los terminales de alimentación no se deben cortocircuitar 4 Empuje la pila hasta el fondo del hueco 5 Vuelva a colocar la tapa trasera y atorníllela Recuerde separar las baterías y las pilas del resto de desechos y reciclarlas a través del...

Page 57: ...33 42 MHz RTS Banda de frecuencia y potencia máxima utilizada 868 700 MHz 869 200 MHz p r a 25 mW 433 050 MHz 434 790 MHz p r a 10 mW Alcance del radiocontrol 150 m en campo libre Uso garantizado en la mayoría de las plantas en función del entorno acceso punto a punto Temperatura de uso De 0 C a 48 C Alimentación 1 pila de tipo CR2430 o CR2032 de 3 V 8 ...

Page 58: ......

Page 59: ...ada o su una presa telecomandata Somfy 5 3 2 Programmazione su una motorizzazione per tapparelle o per persiane radio Somfy 7 4 Cancellazione del telecomando da un dispositivo Somfy 8 4 1 Cancellare il canale programmato su un portalampada o su una presa telecoman data Somfy 8 4 2 Cancellare il canale programmato su una motorizzazione per tapparelle o per persiane radio Somfy RTS 9 5 Installazione...

Page 60: ...ni consultare un interlocutore Somfy o visitare il sito www somfy com Somfy dichiara che il prodotto descritto nelle presenti istruzioni se utilizzato come indicato è conforme ai requisiti essenziali delle Direttive Europee applicabili e in particolare alla Direttiva Radio 2014 53 UE Il testo completo della dichiarazione di conformità CE è disponibile al seguente indirizzo Internet www somfy com c...

Page 61: ...o le prese telecomandate RTS e io i micro moduli di illuminazione RTS e io i micro moduli per tapparelle RTS e io la presa telecomandata RTS Spie di selezione del canale e di attivazione dei tasti Selettore di canale Pulsante PROG Supporto a muro Installazione del supporto a muro Tasti di comando dei prodotti portanti Vista frontale Vista posteriore Ogni canale corrisponde a un telecomando individ...

Page 62: ...TILIZZO 2 Presa On Off 3600 W Tapparella Persiana Portalampada On Off 60 W Presa portalampada On Off 3600 W Pressione breve Avvio Apertura Pressione breve Stop se la tapparella è in movimento Posizione preferita memorizzata se la tapparella è aperta o chiusa Pressione breve Arresto Chiusura ...

Page 63: ...re tutte le altre prese e portalampade telecomandate Somfy dell abitazione 2 Premere il pulsante di selezione canale tutte le volte che sarà necessario finché le spie non indicheranno il canale da programmare 3 Premere il pulsante di programmazione del portalampada presa telecomandata finché la spia non lampeggi 4 Premere brevemente con un oggetto sottile il tasto PROG sul retro del telecomando La s...

Page 64: ...é le spie non indicheranno il canale da aggiungere 4 Premere con un oggetto sottile il tasto PROG sul retro dello stesso telecomando B Le spie degli apparecchi da associare si accendono fisse e poi si spengono Il canale del nuovo telecomando B è programmato 5 Se necessario ripetere questa procedura con gli altri canali del telecomando A Telecomando già programmato A 1 2 0 5 s Nuovo telecomando B 3 ...

Page 65: ...he comanda no questa e soltanto questa tapparella Se il comando originale è stato perso o rotto e non c è altro modo per controllare la tapparella contattare il servizio assistenza Somfy Se la tapparella viene controllata con un altro comando utilizzare quest ultimo per effettuare i passaggi seguenti 2 Socchiudere la tapparella mediante il comando originale 3 PremereilpulsantePROGdelcomandooriginal...

Page 66: ...accare tutte le altre prese e portalampade telecomandate Somfy dell abitazione 2 Premere il pulsante di selezione canale tutte le volte che sarà necessario finché le spie non indicheranno il canale da cancellare 3 Premere il pulsante di programmazione del portalampada presa telecomandata finché la spia non lampeggi 4 Premere brevemente con un oggetto sottile il tasto PROG sul retro del telecomando L...

Page 67: ... con il comando da registrare 3 Premere il pulsante PROG del comando da registrare fino a ottenere un breve movimento di salita discesa della tapparella o un BIP La funzione PROG è attivata per 2 minuti 4 Premere il pulsante di selezione canale tutte le volte che sarà necessario finché le spie non indicheranno il canale da cancellare 5 Premere brevemente con un oggetto sottile il tasto PROG sul retr...

Page 68: ...zazione io RTS SOMFY IT INSTALLAZIONE DEL SUPPORTO A MURO DEL TELECOMANDO Non installare questo prodotto ad un altezza superiore a 2 m Come indicato in figura aprire il supporto a muro e fissarlo servendosi di un cacciavite su di una superficie piana 1 2 19 mm 3 4 5 5 ...

Page 69: ... telecomando 2 Selezionare il canale già abbinato o da abbinare al motore solare prodotto da un partner 3 Per consultare la modalità corrente effettuare un breve contatto tra le due parti della zona dedicata all attiva zione i 2 semicerchi di fianco al pulsante Prog La spia del canale selezionato è accesa fissa modalità standard Spia del canale selezionato lampeggiante modalità compatibile con altri ...

Page 70: ... esaurita servendosi di uno strumento in plastica 3 Inserire una batteria CR2430 o CR2032 3 V con il lato visibile Rispettare attentamente la polarità I morsetti di alimentazione non devono andare in cortocircuito 4 Inserire la batteria nell apposito vano 5 Riposizionare e avvitare lo sportello posteriore Fare attenzione a separare le pile e le batterie dagli altri tipi di rifiuti e a riciclarli at...

Page 71: ...l 433 42MHz RTS Banda di frequenza e potenza massima utilizzata 868 700 MHz 869 200 MHz e r p 25 mW 433 050 MHz 434 790 MHz e r p 10 mW Range radio 150 m in campo libero Utilizzo garantito nella maggior parte degli stadi in base all ambiente accesso punto a punto Temperatura di utilizzo da 0 C a 48 C Alimentazione 1 batteria tipo CR2430 o CR2032 3 V 8 ...

Page 72: ...ute Forum d entraide forum somfy fr Somfy Gmbh 07472 930 495 www somfy de Somfy Nederland B V 023 56 23 752 www somfy nl Somfy Belux NV 02 712 07 70 www somfy be Somfy Ltd 44 0113 391 3030 www somfy co uk Somfy Sp z o o 810377199 www somfy pl Somfy España SA 900 20 68 68 www somfy es Somfy Portugal 808100153 www somfy pt Somfy Hellas SA 211 6000 222 www somfy gr Somfy Italia SRL 800827151 www somf...

Reviews: