background image

Guia de instalação

N &

Copyright © 2010 - 2011 Somfy SAS. All rights reserved.

Sunis indoor WireFree™ RTS

PT

44)-X$*€ƒ$!J"%*€*:-|;-*

VH]H:MBJH]KHXBG8H]@]K[J˜
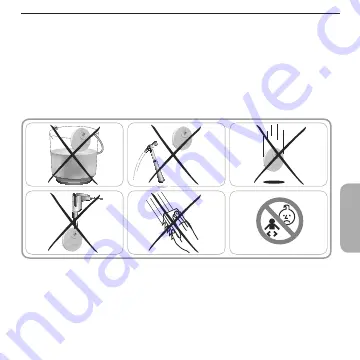
1) Nunca o mergulhe em líquido!
2) Evite embates ou impactos violentos!
N‡¶K:B›:8HB]‰
4) Nunca o perfure!
5)  ¶[JBB¥:@]K[J7Hƒ]H7BM7[7M:XJ:7@H]HB@H]H@H]:Z-
z‡HXJ:XZH]HKH8HX8:KH78]BHXµH7-

1

4

2

5

N

z

Summary of Contents for WireFree RTS

Page 1: ...Ref 5066683A EN Installer Guide ES Manual para instalador PT Guia do Instalador EL www somfy com Sunis indoor WireFree RTS ...

Page 2: ...os y demás disposiciones de la Directiva 1999 5 CE Podrá consultar una declaración de conformidad en la página web www somfy com ce Las imágenes no son contractualmente vinculantes Guía de instalación página 15 ES Pelo presente documento a Somfy declara que o aparelho está em conformidade com as exigências fundamentais e outras disposições pertinentes da directiva 1999 5 CE Está disponível uma Dec...

Page 3: ...iability 2 8BG8 7H J HKMB8 N 5 Commissioning 5 5 1 OFF selector switch 5 5 2 Adding Deleting a Sunis Indoor WireFree RTS 5 N V 7BJB XBXY JZ XB7 XK B _ jk z 5 4 Sunlight simulation 7 5 5 Mode button 8 z JJBXY JZ 7 X BYZJ JZ 7Z K 6 Use 10 7 Tips and recommendations 12 7 1 Questions about the Sunis Indoor WireFree RTS 12 j H8BXY JZ HJJ N CONTENTS ...

Page 4: ...ty 2 1 Safety and liability Before installing and using this product please read this guide carefully This Somfy product must be installed by a professional motorisation and home automation installer for whom this guide is intended Moreover the installer must comply with the current standards and legislation in the country in which the product is being installed and inform the customer of the oper...

Page 5: ...ts reserved Sunis indoor WireFree RTS EN 4 4 To avoid damage to the product 1 Never immerse it in a liquid 2 Avoid sharp bumps or blows N X J J BJ H 4 Never pierce it 5 Do no use abrasive products or solvents to clean the product z J JZ H8Z 8ZB K X 1 4 2 5 N z ...

Page 6: ... EN 3 Contents 1 Sunis indoor WireFree RTS 1 Suction cup a Protective front cover b Sun sensor c Battery d Rear cover e Sunlight detection area f Suction cup g Potentiometer for setting the sunlight threshold h Sun LED i OFF selector switch j Programming button PROG Mode button b g d c j a h i f e ...

Page 7: ...e Mode button inactive Sun LED inactive No energy consumption J sun LED glows for 5 seconds PROG button active Mode button active Sun LED active 4 K JDQ J V The procedure for adding or deleting a sensor is the same To add or delete a Sunis Indoor WireFree RTS use the RTS control point already programmed to the end product 1 Slide the OFF selector to 2 Press on the sides of the front protective cov...

Page 8: ...nis Indoor WireFree RTS The XK K 8J M 7 H8 HXK JZ JZ Sunis Indoor WireFree RTS is programmed j HJ HJB X7 N HXK H8Z JZ XK K 8J7 J assigned to this sensor W J V Clean the surface on which the sensor is to be mounted Z 8 JZHJ JZ B7 X JZBXY JZHJ 8HX 8H7J H 7ZHK 6 X JZ 7 X7 5 3 1 On an inside window sill 1 Screw the suction cup to the bottom of the sensor A 2 Moisten the suction cup N Position the sens...

Page 9: ...tion the sensor below the area to be protected by the end product D and press on the sensor J X If you turn the potentiometer to the position the sensor simulates continuous sunlight the LED glows green and the end product is lowered stops level with the sensor and is then raised slightly above the level of the sensor Do not leave the sunlight threshold setting at this level C D ...

Page 10: ... is in operating mode If the LED is red the level of sunlight intensity is lower than the set sunlight threshold If the LED is green the level of sunlight intensity is greater than the set sunlight threshold 4 Q X X kZ M 7Z J 7 X7 JB 7 BX K X7J HJB X K H BJ 77B J 8Z 8 JZ BX7JH HJB X Do not change the sunlight threshold setting in demonstration mode The same procedure is used to activate or deactiv...

Page 11: ...reshold turn the potentiometer setting toward the To decrease the sunlight threshold turn the potentiometer setting toward the To adjust the threshold according to the sunlight intensity of the moment follow the steps below 1 Slide the OFF selector switch to 2 B 77 JZ K JJ X JZ glows green or red N Turn the potentiometer up to the position the LED glows red 4 Slowly turn the potentiometer towards ...

Page 12: ...5 min 5 sec in demonstration mode the end product is lowered stops at the level of the sensor and is then raised to slightly above the level of the sensor If the sunlight intensity falls below the set sunlight threshold for more JZHX N BX N 7 8 BX K X7J HJB X K JZ X JZ XK K 8J is fully raised If the sunlight intensity rises above sunlight threshold during this operation then the end product stops ...

Page 13: ...12 00 Upper end limit position Time If the end product is lowered manually e g using a remote control or automatically e g using a timer and the sensor is no longer exposed then the sunlight detection function is deactivated until the end product is opened again manually or automatically kZ Y 67 HXY 6Z X JZ HJJ B7 6 H ...

Page 14: ...ection Adding Deleting a Sunis Indoor WireFree RTS The sunlight threshold is not set correctly Set the sensitivity level again The battery is 6 H Replace it The sensor is dirty Clean the sensor The sensor is poorly positioned Reposition the sensor The end product reacts too often The sensor is in Demonstration mode or Simulation mode Deactivate the Demonstration mode or sun Simulation mode The end...

Page 15: ...s indoor WireFree RTS EN 4 J 1 Unclip the front protective cover 2 Open the sensor N Push the used battery out of its housing using a plastic object 4 X7 J H HJJ 6BJZ BK XJB8H 7 8BG8HJB X7 X7 BXY JZHJ JZ H8 H K 6BJZ H 7 sign is visible 5 Push the battery fully into its housing ...

Page 16: ...r 7 B JZ XJ J 8JBM 8 M H8 X Radio frequency NN Power supply N HJJ J j N Safety level Class III Operating temperature z N _ _ Protection class V N Adjustable sunlight threshold min max N Batteries or accumulators have to be separated from other type of waste and must be recycled through your local treatment and recycling system ...

Page 17: ...ad 16 Y BKHK 7 X7H B BKHK z X7 ª 7 7 8 G8 7 K 7 Y BKHK 3 Contenido 18 V W X h 5 1 Selector OFF 19 5 2 Añadir Eliminar un Sunis Indoor WireFree RTS 19 N 8H XB7 XK B _ jk B H8B X K 7 H 5 5 Botón Mode 22 z V Y H H H K 7 H N Y j k q 4 7 Consejos y recomendaciones 26 V Y XJH7 7 XB7 XK B _ jk z 7 2 Sustituir la batería 27 Q x 4 Bz zVQB ...

Page 18: ...dad 2 1 Seguridad y responsabilidad XJ 7 K BX7JH H JB B H 7J K 8J H K J XBKH XJ 7JH Y H Este producto Somfy debe ser instalado por un profesional de la J B H8B X H H J HJB H8B X K Z YH H B X MH KB BYBKH 7JH Y H Asimismo el instalador debe cumplir la normativa y legislación vigentes en el país donde se va a instalar el producto e informar a su cliente de las condiciones de uso y mantenimiento del p...

Page 19: ...indoor WireFree RTS ES 4 4 J Para evitar posibles daños del producto 1 Nunca lo sumerja en un líquido 2 Evite golpes y sacudidas fuertes N K ª 8H 4 No lo perfore 5 No utilice productos abrasivos ni disolventes para limpiar el producto z HXJ XYH H ªHK K H 8HX8 K 7 XB 7 1 4 2 5 N z ...

Page 20: ... WireFree RTS ES 3 Contenido 1 Sunis Indoor Wirefree RTS 1 XJ 7H V a Tapa delantera protectora b Sensor solar c Pilas d Tapa trasera e H K K J 88B X K 7 H f XJ 7H g V J X8B J H H Y H H H K 7 H h LED indicador sol i Selector OFF j Botón de programación Prog Botón Mode b g d c j a h i f e ...

Page 21: ...activo 7BX 8 X7 X Y JB8 q k el LED indicador de sol se ilumina durante 5 segundos Botón Prog activo Botón Mode activo LED indicador de sol activo 4 K D X V El procedimiento para añadir o eliminar un sensor es el mismo Para añadir o eliminar un Sunis Indoor WireFree RTS utilice el punto de mando RTS programado en el producto portador 1 Deslice el selector OFF hasta 2 Presione en los laterales de la...

Page 22: ...nutos 4 Pulse brevemente el botón Prog del Sunis Indoor WireFree RTS El producto portador hace un movimiento de subida bajada el Sunis Indoor WireFree RTS está programado j BJH H7 H8B X 7 N H H 8HKH XH K H7 H B8H8B X 7 va a asignar a este sensor V B B H 7 G8B 7 H 7 MH H 8 8H 7 X7 Compruebe que ningún objeto proyecta sombra sobre el sensor x k 1 Rosque la ventosa a la parte inferior del sensor A 2 ...

Page 23: ...erior del sensor C 2 K 8H H M XJ 7H N 7 X7 K Hª K H XH va a proteger el producto portador D y presione el sensor X q k Si gira el potenciómetro hasta la posición 7 X7 7B H 7 H 8 XJBX H BJ XH M K K 8J JHK baja se detiene a la altura del sensor y a continuación sube ligeramente por encima del nivel del sensor K ª Hª 7J K H K 7 H X 7J XBM C D ...

Page 24: ...e se ilumina de manera permanente el sensor está en modo de funcionamiento B 7 B BXH X ª XBM K BXJ X7BKHK K H 7 H 7 más bajo que el umbral programado B 7 B BXH X M K XBM K BXJ X7BKHK K H 7 H 7 más alto que el umbral programado 5 5 2 Modo de demostración Los breves tiempos de reacción del modo de demostración permiten revisar la instalación KBG H Y H H8B X K H K 7 H X K de demostración B7 8 KB B XJ...

Page 25: ... al modo de funcionamiento 5 6 Programar el umbral de luz solar VH H H XJH H K 7 H YB J X8B J ZH8BH VH H KB7 BX B H K 7 H YB J X8B J hasta Para ajustar el umbral en función de la BXJ X7BKHK K 7 H H8J H 7BYH 7 siguientes pasos 1 Deslice el selector OFF hasta 2 Pulse brevemente el botón Mode el LED BJ XH M K ªH N Gire el potenciómetro hasta la posición BJ XH ªH 4 Gire lentamente el potenciómetro hac...

Page 26: ... en el modo de demostración el producto portador baja se detiene al nivel del sensor y a continuación sube ligeramente por encima del nivel del sensor B H BXJ X7BKHK K H 7 H 7 X H Y H HK K HXJ 7 K N BX J 7 N 7 Y XK 7 X K K demostración el producto portador vuelve a subir completamente B H BXJ X7BKHK K H 7 H H XJH X8B H K H programado durante esta operación el producto portador se detiene B H BXJ X...

Page 27: ...2 00 12 00 Posición GXH K límite superior H Si el producto portador se baja manualmente por ejemplo JB B HXK HXK H KB7JHX8BH H J JB8H XJ ª JB B HXK X J B HK 7 X7 H X 7J 7J H X8B X K K J 88B X K 7 H 7 K 7H8JBMH ZH7JH el producto portador se vuelva a abrir manualmente o automáticamente BJ XH XH HXªH 8 HXK KH 8H HJ H ...

Page 28: ...o Añadir Eliminar un Sunis Indoor WireFree RTS H K solar no está programado correctamente MH H Y H H nivel de sensibilidad Queda poca batería Sustitúyala El sensor está sucio Limpie el sensor El sensor está colocado incorrectamente MH H 8 8H sensor El producto portador reacciona con una frecuencia excesiva El sensor está en modo Demostración o en modo Simulación Desactive el modo Demostración o el...

Page 29: ...Free RTS ES 7 2 Sustituir la batería 1 Suelte la tapa delantera protectora 2 Abra el sensor N Retire la batería agotada de su alojamiento JB B HXK X ª J K 7JB8 4 XJ K 8H XH HJ H 8 X BK XJB8H7 7 8BG8H8B X 7 8 HXK H cara con el signo positivo es visible 5 XJ K 8H 8 JH XJ H HJ H X 7 alojamiento ...

Page 30: ...protectora Q x Frecuencia de radio NN Fuente de alimentación HJ H N JB j N Nivel de seguridad Clase III Temperatura de funcionamiento K H z Tipo de protección V N H K 7 H Y H mín máx N Las baterías o acumuladores deben estar separados de otro tipo de residuos y deben reciclarse mediante el tratamiento de residuos y sistema de reciclaje de su localidad ...

Page 31: ... Segurança 30 Y HXµH 7 X7H B BKHK N j 8 XKHµ K Y HXµH 7 8 G8H N 3 Índice 32 B X X 4 X 5 1 Botão selector OFF NN KB8B XH B BXH XB7 XK B _ jk NN N 8Hµ K XB7 XK B _ jk N B Hµ KH K 7 N J K Nz z GXB B BJ KH K 7 N 6 Utilização 38 Q X 7 1 Dúvidas sobre o Sunis Indoor WireFree RTS 40 7 2 Substituição da pilha 41 Q x 4 SUMÁRIO ...

Page 32: ...nergia apenas X 2 Segurança 2 1 Segurança e responsabilidade XJ 7 K BX7JH H JB B H 7J K J B H HM 7J Y BH cuidadosamente 7J K J K M 7 BX7JH HK J 8XB8 K BX7JH Hµ de aparelhos de automação do lar a quem se destina este guia O instalador deverá sobretudo cumprir as normas e leis em vigor no país em que o aparelho vai ser instalado e informar os clientes H8 8H KH7 8 XKBµ 7 K JB B Hµ K HX J Xµ K 7 H JB ...

Page 33: ...ghts reserved Sunis indoor WireFree RTS PT 4 4 X J VH H MBJH KHXBG8H K J 1 Nunca o mergulhe em líquido 2 Evite embates ou impactos violentos N K B 8HB 4 Nunca o perfure 5 JB B K J 7 H H7BM 7 7 M XJ 7 H H B H H H Z z HXJ XZH H K H 8HX8 KH7 8 BHXµH7 1 4 2 5 N z ...

Page 34: ...Free RTS PT 3 Índice 1 Sunis Indoor WireFree RTS 1 XJ 7H B X X a Tampa dianteira de protecção b Sensor solar c Pilha d Tampa posterior e H K K J 8µ KH K 7 f XJ 7H g V J X8B J H H K GXB B BJ KH K 7 h LED do sol i Botão selector OFF j Botão de programação PROG Botão Modo b g d c j a h i f e ...

Page 35: ... inactivo LED do sol inactivo não há consumo de energia k K 7 G8H H8 7 K HXJ 5 segundos Botão PROG activo Botão Modo activo LED do sol activo 4 K D X X V Os procedimentos para adicionar ou eliminar um sensor são os mesmos Para adicionar ou eliminar um Sunis Indoor B _ jk JB B XJ K 8 HXK RTS já programado para a aplicação 1 7 B 7 8J __ para 2 Prima lateralmente a tampa dianteira de protecção e puxe...

Page 36: ...otão PROG no Sunis Indoor WireFree RTS A aplicação movimenta se para cima e para baixo o Sunis Indoor WireFree RTS está programado j BJH H7 Hµ 7 N H H 8HKH H KH7 H B8Hµ 7 H HJ B B para este sensor V Limpe a superfície sobre a qual o sensor irá ser montado JBG 7 K X XZ ª 8J H 7 H 7 7 X7 5 3 1 Num parapeito interior de uma janela 1 Aparafuse a ventosa à parte inferior do sensor A 2 BKBG H M XJ 7H N ...

Page 37: ...a à parte posterior do sensor C 2 BKBG H M XJ 7H N Posicione o sensor abaixo da área que a aplicação deve proteger D e prima o sensor X k Se regular o potenciómetro para a posição 7 X7 7B H H K 7 HX XJ o LED acende a verde a aplicação desce alinha se ao nível do sensor e depois sobe ligeiramente para um nível acima do sensor K B H Y Hµ K B BJ KH K 7 X 7J X M C D ...

Page 38: ...onstração M Z M K G8H H8 7 HX XJ XJ 7 X7 está no modo de funcionamento 7JBM M Z X M K BXJ X7BKHK KH K 7 BX B H B BJ KH K 7 K GXBK 7JBM M K X M K BXJ X7BKHK KH K 7 7 B H B BJ KH K 7 K GXBK 5 5 2 Modo de demonstração Os tempos de resposta muito curtos no modo de demonstração 77B B BJH H M BG8Hµ KH BX7JH Hµ H J H Y Hµ K B BJ KH K 7 X K K demonstração 7 8 KB XJ JB B HK H H H8JBMH K 7H8JBMH modo de dem...

Page 39: ...mento Y Q X k VH H H XJH B BJ K 7 H K H K GXBµ K J X8B J KB 8µ H VH H K B B BJ K 7 H K H K GXBµ K J X8B J KB 8µ H Para ajustar o limite de acordo com a BXJ X7BKHK KH K 7 X XJ 7BYH 7 passos abaixo 1 7 B J 7 8J OFF para 2 Prima brevemente o botão Modo o LED acende a verde ou a vermelho N Regule o potenciómetro para a posição o LED acende a vermelho 4 Regule lentamente o potenciómetro para a 7Bµ HJ H...

Page 40: ... KH K 7 K GXBK K HXJ HB7 K BX J 7 7 Y XK 7 X K K demonstração a aplicação desce alinha se ao nível do sensor e depois sobe ligeiramente para um nível acima do sensor H BXJ X7BKHK KH K 7 G8H H HB K B BJ KH K 7 K GXBK K HXJ HB7 K N BX J 7 N 7 Y XK 7 X K K K X7J Hµ H H B8Hµ 7 HJ H X M B H BXJ X7BKHK KH K 7 G8H H8B H K B BJ KH K 7 durante esta operação a aplicação pára H BXJ X7BKHK KH K 7 G8H X MH XJ ...

Page 41: ...9 00 N N 12 00 12 00 Posição do limite da extremidade superior H HB H H H B8Hµ HX H XJ JB B HXK 8 XJ J H J HJB8H XJ JB B HXK J B HK 7 X7 K B H K 7JH 7J H Xµ K K J 8µ KH K 7 G8H K 7H8JBMHKH HJ H H B8Hµ M J a ser aberta manualmente ou automaticamente Se a pilha estiver fraca o LED acende a cor de laranja ...

Page 42: ... Indoor WireFree RTS O limite da K 7 X 7J K GXBK correctamente GXH X MH XJ X M K sensibilidade A pilha está fraca Substituir a pilha O sensor está sujo Limpe o sensor O sensor está mal posicionado Reposicione o sensor A aplicação reage com demasiada frequência O sensor está em Modo de demonstração ou em Modo de simulação Desactive o Modo de demonstração ou o Modo K 7B Hµ KH K 7 A aplicação reage d...

Page 43: ...Free RTS PT 4 1 Desencaixe a tampa dianteira de protecção 2 Abra o sensor N Retire a pilha usada do respectivo compartimento com a ajuda de um objecto de plástico 4 XJ K H H B ZH 8 H7 7 H7 7 8BG8Hµ 7 8 JBG8HXK 7 K H H8 H 8HKH 8 7BXH K HB7 G8H para cima 5 Encaixe bem a pilha no compartimento ...

Page 44: ... a tampa dianteira de protecção Q x Frequência de rádio NN Alimentação B ZH K N K JB j N Nível de segurança Classe III k HJ H K JB B Hµ z N _ _ Classe de protecção V N B BJ KH K 7 Y M mín máx N As baterias ou os acumuladores têm de ser separados de J 7 JB 7 K 7 K 7 J K 7 8B8 HK 7 HJ HM 7 K outros sistemas de tratamento e reciclagem locais ...

Page 45: ... N Copyright 2010 2011 Somfy SAS All rights reserved Sunis indoor WireFree RTS 4 34 Y Y __ 47 5 2 3 XB7 XK B _ jk N À 3 XB7 XK B _ jk 2 4 2 K z Á43 4 2 Y 4  2 XB7 XK B _ jk à Y ...

Page 46: ... 44 Copyright 2010 2011 Somfy SAS All rights reserved Sunis indoor WireFree RTS EL À XK B _ jk 4 3 4 2 jHKB k 8ZX Y jk 4 2 3 4Æ2 jk 2 4 2 3 4 4 4 2 0 3 2 4 Å 4 3 Ç 3 4 4 3 2 3 Å 3 2 2 Å 3 4 3 34 2 ...

Page 47: ... 45 Copyright 2010 2011 Somfy SAS All rights reserved Sunis indoor WireFree RTS 4 4 Ä 3 Å 4 4 N 2 4 3 z 1 4 2 5 N z ...

Page 48: ... z Copyright 2010 2011 Somfy SAS All rights reserved Sunis indoor WireFree RTS EL 1 Sunis indoor WireFree RTS 1 È 4Å a 3 b 0 3 c d 3 e 4 4 2 f È 4Å g 43 4 2 h É i __ j 4 Vj K b g d c j a h i f e ...

Page 49: ... 47 Copyright 2010 2011 Somfy SAS All rights reserved Sunis indoor WireFree RTS B D Ê4 __ 3 4 4 3 B Vj K É Vj K É 5 2 D V 0 3 3 Ä 3 XB7 XK B _ jk jk 1 Ê4 __ 2 3 4 4 ...

Page 50: ...opyright 2010 2011 Somfy SAS All rights reserved Sunis indoor WireFree RTS EL N Vj 2 jk 2 4 2 2 jk 4 4 Vj XB7 XK B _ jk 0 4 2 2 XB7 XK B _ jk 3 N 3 3 V 3 3 3 3 3 1 È 4Å 2 3 2 Ë 4Å N À 3 3 4 4 2 È 2 23 3 A B ...

Page 51: ... 49 Copyright 2010 2011 Somfy SAS All rights reserved Sunis indoor WireFree RTS 4 1 È 4Å 2 3 2 Ë 4Å N À 3 3 2 3 3 2 3 2 3 43 4 2 C D ...

Page 52: ... 50 Copyright 2010 2011 Somfy SAS All rights reserved Sunis indoor WireFree RTS EL F K K K 3 3 3 4 2 3 4 2 4 2 Æ 3 4 2 4 4 3 4 Å 43 4 2 0 Ì K N Ì ...

Page 53: ... 51 Copyright 2010 2011 Somfy SAS All rights reserved Sunis indoor WireFree RTS 3 N 3 Y Ä 4 4 2 43 3 Ä 2 4 2 43 3 Ä 4 2 3 3 2 1 Ê4 OFF 2 K N Ä 3 4 Ä 3 2 4 2 3 ...

Page 54: ... 52 Copyright 2010 2011 Somfy SAS All rights reserved Sunis indoor WireFree RTS EL 0 2 2 0 2 2 Y Ê4 __ È 23 È 23 2 4 2 4 2 Æ 3 4 2 3 2 3 4 2 2 3 4 2 N N 3 2 4 2 2 4 2 4 2 2 3 4 2 2 4 2 2 3 4Æ2 0 3 3 2 4 ...

Page 55: ... N Copyright 2010 2011 Somfy SAS All rights reserved Sunis indoor WireFree RTS 09 00 N N 12 00 12 00 3 Í 3 4 4 2 2 0 4 3 ...

Page 56: ... 54 Copyright 2010 2011 Somfy SAS All rights reserved Sunis indoor WireFree RTS EL V 0 2 3 Ê4 __ 3 3 Sunis Indoor WireFree RTS À 4 2 3 2 Á 3 3 0 4 3 3 3 3 3 2 3 À 3 3 0 3 2 2 0 4 2 3 2 ...

Page 57: ... 55 Copyright 2010 2011 Somfy SAS All rights reserved Sunis indoor WireFree RTS 4 1 3 2 3 N 3 4 À 3 Å 3 4 5 3 2 3 ...

Page 58: ... z Copyright 2010 2011 Somfy SAS All rights reserved Sunis indoor WireFree RTS EL z 4 3 7 À 3 3 Á NN 4 N 4 j N Î z N _ _ V N 4 2 N 2 2 4 4 2 4 4 2 4 2 ...

Page 59: ...s r o k z N z X H KB8 HX H k z N N Export Somfy Export k NN z z k NN z N Finland Somfy Nordic AB Finland k N N N France Somfy France k NN N N Germany k N Greece H7 k N z z z XY XY Somfy Co Ltd k N zNN XYH J k Nz India XKBH V k JK k z z Indonesia ÑH H JH j 7 XJHJBM G8 k z Nz Iran Somfy Iran k Nz Israel B7H J HJB X JK k N Italy Somfy Italia s r l k N Japan k z Jordan Somfy Jordan k z z z BXYK H KB H...

Page 60: ...vo k N Singapore Somfy PTE Ltd k z zN N N MH B8 Somfy spol s r o k NN zN Tel 421 905 455 259 JZ H Somfy JOO k NN Spain Somfy Espana SA k N N Sweden Somfy Nordic AB k z z 6BJ HXK Somfy A G k N N Syria Somfy Syria k zN Taïwan Somfy Development and Taiwan Branch k z N Thailand HXY j YB XH G8 k zz N Tunisia Somfy Tunisia k z N Nz N k k HZ k z z N United Arab Emirates Somfy Gulf k N XBJ K BXYK Somfy Li...

Reviews: