Design and Features
Your new Sonance Cabinet Subwoofer delivers powerful, low-
distortion bass, and easily fits into your room’s décor.
• Textured Black Finish with Black Cloth Grille
for Elegant and Minimalistic Aesthetic
• Made for Music and Movies
• Ultra Long Throw, Polypropylene Cone
Subwoofer Placement
Since your ears do not hear directional sound at deep bass
frequencies, your subwoofer’s placement is not as critical to its
overall performance as is the placement of your system’s other
speakers. The following guidelines — plus some experimentation
- will help you get the best performance possible from your
subwoofer in your listening environment. We suggest starting with
the subwoofer in line with your left and right speakers, somewhere
between either speaker and the side wall (see Figure 1).
Installing the Subwoofer Flush to a Wall
or Cabinet
To allow for proper ventilation when installing the cabinet subwoofer
this way, leave at least 1” of clearance around the top and sides of
the subwoofer and 1” of clearance behind it. If it is not possible to
provide the necessary clearance, install a fan that will bring cooling
air into the rear of the compartment containing the subwoofer.
Your subwoofer’s location relative to walls will influence the amount
of bass it produces. Placing the subwoofer next to a wall will
increase bass output; placing it in a corner will maximize its bass
output. However, corner placement can increase standing waves
in the room (peaks and dips in bass response related to the room’s
dimensions) that can make the subwoofer’s bass performance
sound uneven at different listening locations. Experiment with
different subwoofer locations until you find one that produces
strong bass that sounds clear (without boominess) at the seating
locations while maintaining the sound’s impact.
Your local authorized Sonance dealer is an expert in audio/video
system planning and installation. We strongly recommend that you
work with your dealer to ensure that you get the best performance
possible from your subwoofer.
NOTE: SONANCE SUBWOOFERS CAN PRODUCE ENOUGH BASS ENERGY
TO CAUSE OBJECTS IN THE ROOM TO RATTLE OR BUZZ DURING
PASSAGES WITH VERY STRONG BASS. IF THIS HAPPENS, TRY
RELOCATING THE ITEMS. IF THAT FAILS TO STOP THE RATTLING YOU
MAY HAVE TO REMOVE OR SECURE THE ITEMS.
Between
Main Speaker
and Side Wall
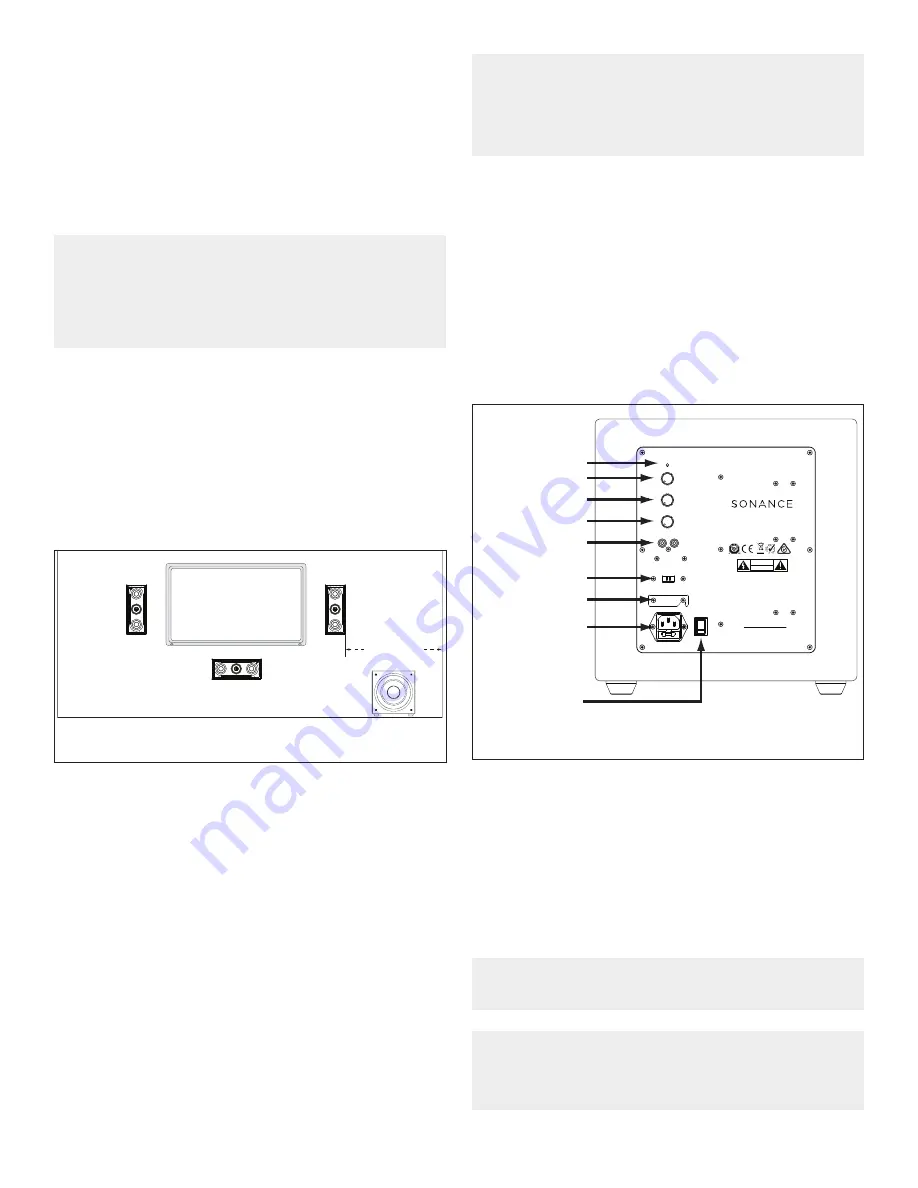
Figure 1: Start with the Subwoofer Located
Between a Main Speaker and the Side Wall.
Subwoofer Rear Panels
Figure 2 shows the controls and connections located on the
subwoofer rear panel.
Status
Volume
Crossover
Phase
Power Cord
Connection
Power Switch
Ground Lift
Line Level Input
AC Mains
STATUS
LINE LEVEL INPUT
VOLUME
MIN
MAX
CROSSOVER
50 HZ
250 HZ
150 HZ
75HZ
200 HZ
BYPASS
0 DEG
180 DEG
90 DEG
PHASE
RIGHT
LEFT / LFE
GROUND LIFT
GROUNDED
ISOLATED
100 -120V
220 – 240V
FUSE T4 AL / 250 VAC
AC 100-120V ~ 60Hz
AC 220-240V ~ 50Hz
ON
OFF
POWER
S/ N
MADE IN CHINA
This device complies with part 15 of the FCC
Rules.
Operation is subject to the following two
conditions:
(1) This device may not cause harmful
interference.
(2) This device must accept any interference
received, including interference that may cause
undesired operation.
FCC COMPLIANCE NOTICE
CAUTION
RISK OF ELECTRIC SHOCK DO NOT OPEN
RISQUE DE CHOC ELECTRONIQUE NE PAS OUVRIR
AVIS
GMA-503573-EA
MS10SUB
Figure 2: Subwoofer Rear-Panel Controls and Connections
.
Box Contents
(1) Sonance Cabinet Subwoofer
(4) Removable Rubber Feet
(1) IEC Power Cord
Subwoofer Connections
Power Connection
Your MS10SUB Cabinet Subwoofer features a removable IEC
power connector for 115V (see Figure 2). Plug the female end of
the power cord into the power cord connector on the subwoofer’s
rear panel and plug the male end into a grounded wall socket. DO
NOT plug the subwoofer’s power cord into a convenience outlet on
any other audio or video component. Power Consumption
Standby Mode 0.46W after 30 minutes without signal.
IMPORTANT: DO NOT PLUG THE POWER CORD INTO THE WALL OUTLET
UNTIL ALL SYSTEM CONNECTIONS HAVE BEEN MADE AND VERIFIED.
NOTE: IF YOU NEED TO USE AN EXTENSION CORD, USE ONLY A HEAVY-
DUTY (14-GAUGE OR LARGER) EXTENSION CORD TO AVOID STARVING
THE SUBWOOFER OF ALL THE CURRENT NECESSARY FOR FULL-
POWER OPERATION.
4


