background image

STEP 4

1

2

4

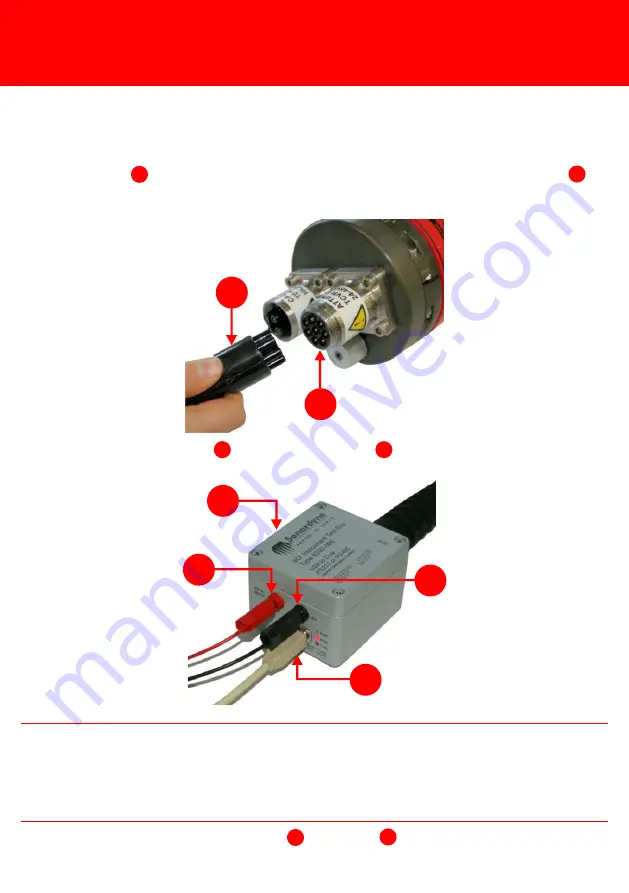
Remove the protective cover from the TCVR Comms & Power 8-Way AGP Male 

connection      on the Remote End-cap and connect the 6G Instrument Test Box     

(Type 8300-066).

1

2

As soon as the Test Box is connected to the PC, the two mode lights will 

illuminate: Red for RS232, Blue for RS485. If the mode lights are not illuminated 

when the PC is connected, refer to the ROVNav 6 manual UM-8310 for 

instructions on how to change the Test Box mode.

2

NOTE

3

4

5

6

5

Using a USB connection    , connect the Test Box      to a PC.

3

5

6

Connect a power supply to the red      and black      connections on the Test Box. 

This will supply power to the ROVNav 6 and automatically connect the battery.

4

6

PRE-INSTALLATION CHECKS

Summary of Contents for 6G ROVNAV 6

Page 1: ...QUICK START GUIDE ROVNAV 6 INSTALLATION GUIDE To access more information on the ROVNav 6 download a free QR code app on your Smartphone and then scan this code QSG IG 8310 A1 08 2013 910 0003 ...

Page 2: ...the end of the ROVNav 6 when operating the Pressure Relief Valve Sudden release of high pressure gases from the ROVNav 6 could cause injury to personnel Wear Personal Protective Equipment such as goggles when operating the Pressure Relief Vent Valve Make sure the Pressure Relief Vent Valve is manually operated in a well ventilated area to release any internal pressure before attempting to remove t...

Page 3: ...peration of the Test Box These are supplied on the 6G Utilities CD 920 2000 and require installation onto the PC before the Test Box is connected to the ROVNav 6 For any further information please refer to the ROVNav 6 User Manual UM 8310 Section 9 1 On receipt of the equipment visually inspect for any signs of damage e g corrosion dents bent electrical pins etc 2 Make sure all Warning and Caution...

Page 4: ...l pressure 1 Electric shock hazard risk if the Remote Transducer output connector contacts are touched whilst the transducer cable is disconnected the unit is powered and if instructed to transmit Never touch the connector contacts whilst the power is on WARNING 2 Remove the protective cover from the Remote Transducer 4 Way AGP connection 3 Using the Remote Transducer 4 Way AGP cable 312 8044 conn...

Page 5: ... illuminate Red for RS232 Blue for RS485 If the mode lights are not illuminated when the PC is connected refer to the ROVNav 6 manual UM 8310 for instructions on how to change the Test Box mode 2NOTE 3 4 5 6 5 Using a USB connection connect the Test Box to a PC 3 5 6 Connect a power supply to the red and black connections on the Test Box This will supply power to the ROVNav 6 and automatically con...

Page 6: ... 6G Setup tab click Set 5 An Address Selector window will appear listing all available addresses for Wideband 2 Select the address for the attached device then click OK STEP 5 ACOUSTIC CHECK USING 6G TERMINAL LITE PRE INSTALLATION CHECKS A Comms Log window will open when the ROVNav 6 is connected to the 6G Terminal Lite software The green writing is the commands sent from the software to the trans...

Page 7: ... will appear next to the Range Test button 8 If the Range Test is unsuccessful Fail will appear next to the Range Test button PRE INSTALLATION CHECKS ACOUSTIC CHECK USING 6G TERMINAL LITE 9 If Fail appears it is recommended the transceiver and attached device are moved and then the Range Test repeated If the Range Test continues to fail contact the Sonardyne Support Team for assistance ...

Page 8: ...carry out a check of the ROVNav 6 sensors proceed as follows 1 In the 6G Setup tab click Check to perform a test of all sensors installed in the transceiver 2 Acquiring will appear to indicate all sensor information is being gathered PRE INSTALLATION CHECKS ...

Page 9: ... Pass will appear 4 On completion of all tests to electrically disconnect the battery click Disconnect on the 6G Setup tab PRE INSTALLATION CHECKS SENSOR CHECK USING 6G TERMINAL LITE SOFTWARE The inclination values refer to the roll then pitch in degrees 2NOTE ...

Page 10: ...attach the Remote Transducer to an extendable ram on an ROV if the extended ram and location of the ROVNav 6 is over 4 metres When securing the Remote Transducer to an extendable ram make sure the cable does not become trapped when the ram is retracted Do not allow cables to vibrate on the outside of the hull where flow may make the cable strum and fatigue The TCVR Comms Power 8 Way Cable 312 8017...

Page 11: ...e sure the cable will not become trapped when the ram is retracted 4 Position the Remote Transducer onto the ROV and secure in place 5 Connect the Remote Transducer 4 Way AGP Cable 312 8044 to the Remote Transducer 1 1 1 2 6 Make sure the dummy plug is fitted securely to the 8 Way AGP Male connection on the Sensor End Cap Assembly 2 INSTALLING THE EQUIPMENT ...

Page 12: ...omms Power 8 Way AGP connection on the Remote Transducer End Cap Assembly 4 2 1 3 4 3 7 Position the ROVNav 6 onto the ROV so the Remote Transducer 4 Way AGP Cable 312 8044 can easily be connected to it Secure the ROVNav 6 in place 8 Connect the Remote Transducer 4 Way AGP Cable 312 8044 to the ROVNav 6 2 1 1 2 INSTALLING THE EQUIPMENT ...

Page 13: ... optional to connect the secondary port through the MUX this is only normally used for modem data received from Sonardyne logging transponders such as AMTS 2NOTE 1 2 3 4 10 Connect the other end of the TCVR Comms Power 8 Way AGP Cable 312 8017 to the ROV Mux 11 Connect the other end of the ROV umbilical connections to the ROV Mux in the control room 1 2 3 4 INSTALLING THE ROVNAV 6 AND REMOTE TRANS...

Page 14: ......

Page 15: ... Transducer and connecting cables with clean fresh water 2 Dry the ROVNav 6 Remote Transducer and connecting cables with a clean lint free cloth 3 For extended periods of storage it is recommended the battery is electronically disconnected 4 Connect to the 6G Terminal Lite software as detailed in Step 5 5 In the 6G Setup tab navigate to the Battery section Click Disconnect to electrically disconne...

Page 16: ...support sonardyne com Website www sonardyne com Twitter sonardyne Aberdeen UK T 44 0 1224 707875 F 44 0 1224 707876 sales sonardyne com Rio das Ostras Brazil T 55 22 2123 4950 F 55 22 2123 4951 brasil sales sonardyne com Singapore Asia T 65 6542 1911 F 65 6542 6937 asia sales sonardyne com QSG IG 8310 A1 08 2013 910 0003 ACOUSTIC POSITIONING INERTIAL NAVIGATION l l WIRELESS COMMUNICATION l SONAR I...

Reviews: