background image

Weekly Chronothermostat via Radio     Code: 29.085

Siesta 

- CRX  RF Emisor

Zona6RF

Zona10RF

Zona6RF

Zona10RF

Chronothermostat  for  Heating  via  Radio      Code:  29.084

Measures mm:

Net batteries: 124,5g

Installation Instructions

SONDER

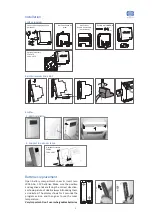
Emitter installation

Technical data

100 

80 

20 

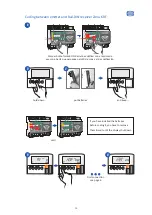
Coding between emitter and receiver

1

2

Use Instructions

SONDER

Cod.: 7766

 - ING - ENE17

Sonder Regulación, S.A.

Avda. La Llana, 93 

08191 RUBÍ

(Barcelona) Spain

www.sonder.es

Support to 

put over table

(Optional)

Location - 

Keep away the emitter of any 

                   source of heat or direct light

Wall installation

SONDER

Open the battery compartment cover and insert 
two  LR03 AAA 1.5V batteries. Make sure the (+) 
and (-) ends are facing the correct direction, as 
shown  picture  &  always  introducing  them  as 
indicated. 
The  display  shows  for  2  seconds  the  program 
version and then pass to set the internal clock.

Very Imp.: Don´t use rechargeables batteries

Batteries replacement

Put batteries

O K

ESC

MENU

ON / OFF

5 s

CLOCK

3 s

RESET

15 s

O K

ESC

MENU

ON / OFF

5 s

CLOCK

3 s

RESET

15 s

O K

ESC

MENU

ON / OFF

5 s

CLOCK

3 s

RESET

15 s

...

2

5

1

1

Until the led turns off

Open and press the ON button 

of the relay until the led flashes

Press the forced ON button of the relay to code with the 

transmitter of that zone, until flashing LEDs of zone & encoder 

First connection,
next page

Hold down

1

2

O K

ESC

MENU

ON / OFF

5 s

CLOCK

3 s

RESET

15 s

 and keep ...

If you have installed the batteries, 

before coding it, you have to remove 

them & wait until the display shut down

Zona6RF

Zona10RF

Zona6RF

Zona10RF

Siesta 

- CRXE  RF Emisor

Power supply:. 2 alkaline battery 1,5V LR03 (AAA)
Low battery indicator:............................... 
Battery duration:......................... 1,5 years, aprox
Regulation scale:........................... from 5 to 35°C
Transmission frequency:.................... 868,3 MHz
Ambient temperature:..............  from 0°C to 40°C
Storage temperature:................... maximum 50°C 
% Relativity Humidity operating:.. from 20 to 85%
Dregee of protection:.................................... IP20
Action Type According EN 60730:.................... 1.B
Homologated:................................................... CE
Approximate maximum distance between 
emitter and receiver:........ 130m in free field

Guarantee conditions

This  appliance  has  a  three-years  guarantee  limited  to 

replacement of defective parts. Transport not included.

We will not accept any responsibility for damage caused to 

the appliance by poor handling.

The guarantee does not include:

-  Appliances  with  a  damaged,  effaced  or  altered  series 

number.

-  Appliances  which  have  not  been  connected  or  used 

following the instructions that accompany it.

-  Appliances  which  have  been  altered  without  the  prior 

consent of the manufacturer.

-  Appliances  damaged  by  blows  or  liquid  spills  or  gaseous 

emissions.

For the rest of general conditions visit our web.

VERY IMPORTANT:

This  appliance  should  be  mounted  on  a 
universal embedded box.

Device designed for a clean pollution situation.

This control is not a safety device and should 
not  be  used  as  such,  is  the  responsibility to 
incorporate  appropriate  protection  for  each 
type of facility (homologated) installer.

Independent  control  device  mounting,  and 
connection via fixed pipeline.

We reserve the right of modify without prior 
notice.

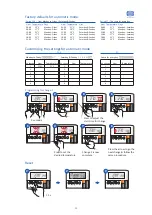
Programming the automatic mode and activation of functions

O K

ESC

MENU

O K

ESC

MENU

S E T

O K

ESC

MENU

O K

ESC

MENU

O K

ESC

MENU

O K

ESC

MENU

O K

ESC

MENU

S E T

S E T

O K

ESC

MENU

S E T

O K

ESC

MENU

O K

ESC

MENU

O K

ESC

MENU

O K

ESC

MENU

O K

ESC

MENU

O K

ESC

MENU

O K

ESC

MENU

Hour

Week Day

Month Day

Month

Year

First connection & Batteries replacement

Regulation in manual mode

O K

ESC

MENU

O K

ESC

MENU

Programmation period

S E T

S E T

Hour

06:00
08:00
12:00
15:00
18:00
22:00

Temperature

21

°

C

17

°

C

21

°

C

17

°

C

21

°

C

17

°

C

Days

Monday...Friday
Monday...Friday
Monday...Friday
Monday...Friday
Monday...Friday
Monday...Friday

O K

ESC

MENU

Setpoint 
Temperature

O K

ESC

MENU

Current time

Data shown on the display

Period P5-2  


from Monday to Friday / Saturday & Sunday

Hour

06:00
08:00
12:00
15:00
18:00
23:00

Temperature

21

°

C

19

°

C

19

°

C

19

°

C

21

°

C

15

°

C

Days

Saturday & Sunday
Saturday & Sunday
Saturday & Sunday
Saturday & Sunday
Saturday & Sunday
Saturday & Sunday

Hour

06:00
08:00
12:00
15:00
18:00
22:00

Temperature

21

°

C

17

°

C

21

°

C

17

°

C

21

°

C

15

°

C

Days

Monday...Sunday
Monday...Sunday
Monday...Sunday
Monday...Sunday
Monday...Sunday
Monday...Sunday

Period P7 


the same for every day

O K

ESC

MENU

O K

ESC

MENU

O K

ESC

MENU

O K

ESC

MENU

O K

ESC

MENU

O K

ESC

MENU

ON / OFF

5 s

CLOCK

3 s

RESET

15 s

ON / OFF

5 s

CLOCK

3 s

RESET

15 s

ON / OFF

5 s

CLOCK

3 s

RESET

15 s

ON / OFF

5 s

CLOCK

3 s

RESET

15 s

ON / OFF

5 s

CLOCK

3 s

RESET

15 s

ON / OFF

5 s

CLOCK

3 s

RESET

15 s

ON / OFF

5 s

CLOCK

3 s

RESET

15 s

ON / OFF

5 s

CLOCK

3 s

RESET

15 s

ON / OFF

5 s

CLOCK

3 s

RESET

15 s

ON / OFF

5 s

CLOCK

3 s

RESET

15 s

ON / OFF

5 s

CLOCK

3 s

RESET

15 s

ON / OFF

5 s

CLOCK

3 s

RESET

15 s

ON / OFF

5 s

CLOCK

3 s

RESET

15 s

ON / OFF

5 s

CLOCK

3 s

RESET

15 s

ON / OFF

5 s

CLOCK

3 s

RESET

15 s

ON / OFF

5 s

CLOCK

3 s

RESET

15 s

ON / OFF

5 s

CLOCK

3 s

RESET

15 s

ON / OFF

5 s

CLOCK

3 s

RESET

15 s

ON / OFF

5 s

CLOCK

3 s

RESET

15 s

ON / OFF

5 s

CLOCK

3 s

RESET

15 s

ON / OFF

5 s

CLOCK

3 s

RESET

15 s

ON / OFF

5 s

CLOCK

3 s

RESET

15 s

ON / OFF

5 s

CLOCK

3 s

RESET

15 s

ON / OFF

5 s

CLOCK

3 s

RESET

15 s

ON / OFF

5 s

CLOCK

3 s

RESET

15 s

In our technical web
step, factory settings and how to change them) at link of 

 inside product sheet 

.

 (

www.sonder-regulacion.com

), may find the complete manual with detailed instructions (programming step by 

 Installation Manual 

29.084

Summary of Contents for 29.060

Page 1: ... emissions Fortherestofgeneralconditionsvisitourweb VERYIMPORTANT This appliance should be mounted on a universalembeddedbox Devicedesignedforacleanpollutionsituation This control is not a safety device and should not be used as such is the responsibility to incorporate appropriate protection for each typeoffacility homologated installer Independent control device mounting and connectionviafixedpi...

Page 2: ...SET 15 s Hour OK ESC MENU ON OFF 5 s CLOCK 3 s RESET 15 s OK ESC MENU ON OFF 5 s CLOCK 3 s RESET 15 s OK ESC MENU ON OFF 5 s CLOCK 3 s RESET 15 s Off temperature OK ESC MENU ON OFF 5 s CLOCK 3 s RESET 15 s OK ESC MENU ON OFF 5 s CLOCK 3 s RESET 15 s Change 4 OK ESC MENU ON OFF 5 s CLOCK 3 s RESET 15 s OK ESC MENU ON OFF 5 s CLOCK 3 s RESET 15 s OK ESC MENU ON OFF 5 s CLOCK 3 s RESET 15 s OK ESC ME...

Page 3: ...New Programming New Display New Heart Energy Control Instructions Manual Model Siesta CRXE RF Chronothermostat for Heating via Radio Generation CorteX Siesta CRX Family Zona6RF Zona10RF ...

Page 4: ...st connection Configuration for Clock Temperature units Display information Data shown on the display Regulation in manual mode Programming in automatic mode Reset Coding between emitter and receiver Guarantee condition 2 4 4 5 5 6 7 8 9 10 10 11 12 14 Siesta CRXE RF Energy Control ...

Page 5: ...kend P 7 Thesixchangesaremadeequaltoeveryday MondaytoSunday Factory programming are preset you can change these settings with the time and desired temperature It canalsooperateinmanualmode settingonlythetemperaturecontrol Note Emitterandreceiverarenot encodedfromfactory seehowtodoitonpage12 Manual mode button and on off forced Down key value in setting Key to cancel and delete the user settings ba...

Page 6: ...er Coding lighted with signal Coding not lit without signal Coding flashing Sending dates or SMS received connected to power supply The contacts of the relays are powered with individual maximum load of 5A and maximum load between all connected relays of 10A OUTPUTS SPST relays The pump and boiler operate only when one of the zones has a thermostat demand Encoding that zone with the emitter Zone r...

Page 7: ...8 3 MHz Approx Maximum distance Emitter receiver 90 m in free field Ambient temperature Tmin 0 C Tmax 40 C Storage temperature maximum 50 C Relative Humidity operating from 20 to 85 Dregree of pollution 2 Software Class A Action type According EN 60730 1 B Homologated CE Both 1 2 NO C 3 NC N 5 L 4 230Vac 50Hz Power supply 230Vac 50Hz Breakage power contacts 16 8 A 250Vac 2 Maximum cable to connect...

Page 8: ...splay shows for 2 seconds the program version and then goes to see the room temperature VeryImportant Don tuserechargeablesbatteries Installation Energy Control 5 Emitter 3 7mm Flexible cable H 05V K Max 9mm S 1 5mm 2 Surface receiver 2 Support to put over table Adhesive or double sided velcro not included Wall installation by screw Connections only by qualified personnel UP click click Optional a...

Page 9: ... CLOCK 3 s ON OFF 5 s OK ESC MENU 11 OK ESC MENU 10 RESET 15 s CLOCK 3 s ON OFF 5 s OK ESC MENU 14 OK ESC MENU 13 OK ESC MENU 16 RESET 15 s CLOCK 3 s ON OFF 5 s 2 s OK ESC MENU 3 S E T OK ESC MENU 17 RESET 15 s CLOCK 3 s ON OFF 5 s RESET 15 s CLOCK 3 s ON OFF 5 s RESET 15 s CLOCK 3 s ON OFF 5 s RESET 15 s CLOCK 3 s ON OFF 5 s RESET 15 s CLOCK 3 s ON OFF 5 s RESET 15 s CLOCK 3 s ON OFF 5 s RESET 15...

Page 10: ...tion Hour format 24 12horas Temperature units C F OK ESC MENU OK ESC MENU RESET 15 s CLOCK 3 s ON OFF 5 s S E T S E T 19 18 20 OK ESC MENU OK ESC MENU 18 OK ESC MENU 19 OK ESC MENU 20 OK ESC MENU 1 OK ESC MENU 2 S E T 3 s RESET 15 s CLOCK 3 s ON OFF 5 s OK ESC MENU 17 RESET 15 s CLOCK 3 s ON OFF 5 s RESET 15 s CLOCK 3 s ON OFF 5 s RESET 15 s CLOCK 3 s ON OFF 5 s RESET 15 s CLOCK 3 s ON OFF 5 s RES...

Page 11: ...off The device no control the temperature only remains the Frost protectionfunctionandpumpprotection Regulation in heating Shown on the display with regulation in heating mode Relay switched on when the temperature is below the setpoint minus differential relayswitchedoffwhenarrivestosetpoint S E T Shownondisplaywhenyouarewithinprogramming Programmation Shownondisplaywhenboilerorpumpisactivated Ac...

Page 12: ...he water pipes from freezing It is a fixed setting and is from the factoryat5 C ESC Digits Thedisplaysshowswiththebigdigitsforthereadingforambient temperature and in smaller digits the temperature setpoint or currenttime 9 Energy Control Display information Shown on display when the control is in the process of coding between sender and receiver see page 14 and disappears whentheprocessiscomplete ...

Page 13: ...to another is to remove the battery wait 2 seconds and restart the thermostat If you switch from one mode to another change custom settings are deleted and become the factory default Programmation of periods Version OK ESC MENU 1 OK ESC MENU 5 SEG OK ESC MENU OK ESC MENU 1 2 3 OK ESC MENU 5 RESET 15 s CLOCK 3 s ON OFF 5 s OK ESC MENU 4 RESET 15 s CLOCK 3 s ON OFF 5 s OK ESC MENU 2 OK ESC MENU OK E...

Page 14: ...turday Monday Saturday Period P7 The same for every day Customizing the settings for automatic mode Press to set the desired temperature Nr change Hour Temperature Same for every day Monday to Friday Saturday Sunday 1 09 03 2 3 4 5 6 23 C Nr change Hour Temperature 1 2 3 4 5 6 Nr change Hour Temperature 1 2 3 4 5 6 P7 P5 2 Factory defualts for automatic mode Reset OK ESC MENU 2 OK ESC MENU 1 OK ES...

Page 15: ...ESET 15 s CLOCK 3 s ON OFF 5 s 6 Coding between emitter and surface receiver Until hold down put batteries until 1 2 1 4 2 5 and keep If you have installed the batteries before coding it you have to remove them wait until the display shut down OK ESC MENU RESET 15 s CLOCK 3 s ON OFF 5 s OK ESC MENU RESET 15 s CLOCK 3 s ON OFF 5 s 3 ...

Page 16: ...Zona6RF Zona10RF Zona6RF Zona10RF If you have installed the batteries before coding it you have to remove them wait until the display shut down put batteries 4 First connection see page 6 OK ESC MENU OK ESC MENU OK ESC MENU RESET 15 s CLOCK 3 s ON OFF 5 s RESET 15 s CLOCK 3 s ON OFF 5 s RESET 15 s CLOCK 3 s ON OFF 5 s 6 hold down 5 and keep OK ESC MENU RESET 15 s CLOCK 3 s ON OFF 5 s OK ESC MENU R...

Page 17: ...d to replacement of the defective part and will be delivered in the same material reception conditions packaging batteries instructions or any other accessory that includes this product will not be replaced and not be noted in the packing slip We decline any responsibility for damage caused to the appliance by bad handling failure to follow instructions contained in this manual or technical ignora...

Reviews: