background image

MMR-650 – USER MANUAL 

20 


Note:


- Update is performed automatically and may be divided into a few stages. During the update, do not 
turn off the power supply of the meter and do not remove the USB drive. The update process is continued 
until the meter displays the main MENU screen.  


Only at this point, you can 
turn off the power supply of 
the meter or start its use. 


2.4  Service 

This function is available for factory servicing and is protected by password. 
 

2.5  User interface settings  


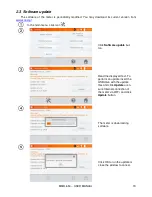
In the main menu, click icon 

.


Click 

User interface settings


button.


Uncheck 

 Screen keyboard


box to inactivate the screen 
keyboard.


Summary of Contents for MMR-650

Page 1: ......

Page 2: ......

Page 3: ...LOW RESISTANCE METER MMR 650 USER MANUAL SONEL S A Wokulskiego 11 St 58 100 widnica Poland Version 1 03 08 01 2018...

Page 4: ...sing our low resistance meter MMR 650 is a modern high quality measuring device which is easy and safe to use Please acquaint yourself with this manual in order to avoid measuring errors and prevent p...

Page 5: ...ings 23 3 Measurements 25 3 1 Testing the resistance objects 25 3 2 Testing the inductive objects 29 3 3 Measurement with automatic method selection 34 3 4 Logger 34 3 5 Core demagnetization 37 3 6 Sp...

Page 6: ...ge 60 6 2 Replacing the battery pack 60 6 3 General rules for using Li Ion rechargeable batteries 61 7 Cleaning and maintenance 62 8 Storage 62 9 Dismantling and Disposal 62 10 Annexes 63 10 1 Technic...

Page 7: ...h the device in special environments e g potentially fire risk ex plosive environment it is necessary to consult it with the person responsible for health and safety It is unacceptable to operate the...

Page 8: ...its rechargeable battery the meter automatically shuts off or blanks the screen after an adjustable inactivity period Click Energy saving button WiFi signal strength Power supply from mains Battery ch...

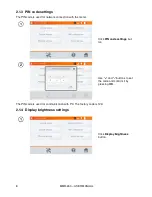
Page 9: ...MMR 650 USER MANUAL 7 Set the inactivity time for blanking the screen and turn ing off the meter 2 1 2 Sound settings Click Sound settings button Click the box to turn on or off the sound signals...

Page 10: ...or network connection with the meter Click PIN code settings but ton Use and buttons to set the code and confirm it by pressing OK The PIN code is used for communication with PC The factory code is 12...

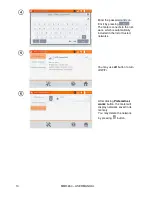
Page 11: ...ghtness and confirm it by pressing OK 2 1 5 Wi Fi configuration Click WiFi configuration but ton To see local active WiFi net works click Search network button The meter detected networks secured by p...

Page 12: ...meter connects to the net work which is automatically included in the list of trusted networks You may use off button to turn off WiFi After clicking Prefered net works button the meter will display n...

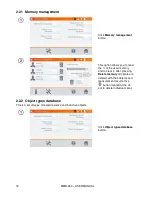
Page 13: ...settings button By clicking individual fields you may change the data of person company performing the measurements which will be printed 2 2 Memory settings In the main menu click button Note By pres...

Page 14: ...he used memory and to clear it after pressing Delete memory all clients are deleted with their objects and measurement results Use button located at the cli ent to delete individual client 2 2 2 Objec...

Page 15: ...memory Use button to add a new type of the tested object Enter a new type of the object being tested Added types may be deleted by pressing 2 2 3 Object names database It is a list of names of tested...

Page 16: ...MMR 650 USER MANUAL 14 The meter has 4 default names saved in its memory Use button to add a new name Enter the name of the object Added names may be deleted by pressing...

Page 17: ...istance limits database The specified limits may be used to automatically assess the validity of the results of resistance measurements Click Resistance limits data base button Click button to add a n...

Page 18: ...button to go to the lower limit setting Enter the lower limit Use button to go to the upper limit setting You can set only one of the limits Use button to save the limit in the memory By press ing you...

Page 19: ...may be used to automatically assess the validity of the results of temperature measurements Click Temperature limits da tabase button Click button to add a new limit Enter and save the limits using t...

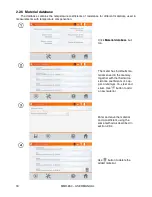
Page 20: ...ature compensation Click Material database but ton The meter has 5 defaults ma terials saved in the memory together with the thermal re sistance coefficients of cop per aluminium tin steel and silver...

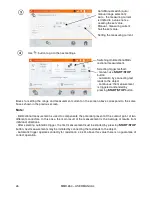
Page 21: ...sonel pl In the main menu click icon Click Software update but ton Read the displayed text To perform an update insert the USB drive with the update files and click Update or en sure Internet connecti...

Page 22: ...pdate process is continued until the meter displays the main MENU screen Only at this point you can turn off the power supply of the meter or start its use 2 4 Service This function is available for f...

Page 23: ...MMR 650 USER MANUAL 21 2 5 1 Language selection Click Language button Click the selected language 2 5 2 Selecting temperature unit Click Temperature button Click the button of selected unit...

Page 24: ...ll be au tomatically shown after turn ing on the meter This fea ture is useful for making measurements of a given type for a longer period 2 5 4 Changing the date and time Click date button Use and bu...

Page 25: ...ion about the Meter In the main menu click icon Click About the meter button The screen will display infor mation on the meter and its manufacturer 2 7 Factory default settings In the main menu click...

Page 26: ...o the menu The following elements are restored to the default settings measurement settings list of object types list of object names list of materials list of R limits list of T limit sound settings...

Page 27: ...ction of temperature compensation the declared measurement accuracy is valid for the result before the compensation 3 1 Testing the resistance objects When necessary name the measuring point Note Afte...

Page 28: ...ing START STOP button Boxes for setting the range and measurement current on the screen above correspond to the same boxes shown in the previous screen Note Bidirectional measurement is used to compen...

Page 29: ...ate the resistance at the reference temperature Turning on off the temper ature compen sation Enter the am bient tempera ture optional Enter the tempera ture of the ob ject measure it with a ther mome...

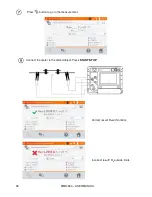
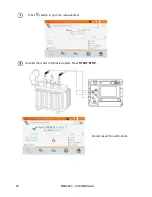
Page 30: ...MMR 650 USER MANUAL 28 Press button to go to the measurement Connect the meter to the tested object Press START STOP Correct result R0 within limits Incorrect result R0 outside limits...

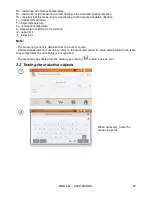
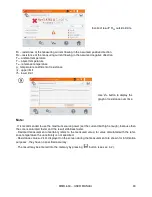
Page 31: ...temperature T0 reference temperature temperature coefficient of resistance upper limit lower limit Note The measuring current is obtained from the current source Declared measurement uncertainty refer...

Page 32: ...for amorphous cores Boxes for setting the range and measurement current on the screen above correspond to the same boxes shown in the previous screen Note Bidirectional measurement is used to compens...

Page 33: ...ance to calculate the resistance at the reference temperature Turning on off the temper ature compen sation Enter the am bient tempera ture optional Enter the tempera ture of the ob ject measure it wi...

Page 34: ...MMR 650 USER MANUAL 32 Press button to go to the measurement Connect the meter to the tested object Press START STOP Correct result RPE within limits...

Page 35: ...o display the graph of resistance over time Note It is recommended to use the maximum source power set the current limit high enough because then the core is saturated faster and the result stabilizes...

Page 36: ...and average resistance during the result stabilization the meter determines that the object is resistive it will complete the measurement faster Note For high power transformers it is recommended to u...

Page 37: ...on to go to the next settings Selecting the object type resistance inductive Selecting the time in terval 1 s 5 s 10 s 15 s 1 min 5 min 10 min 15 min Selecting logging time 1 min 5 min 10 min 15 min 3...

Page 38: ...nter the logger Connect the meter to the tested object Press START STOP Sample No number of samples Time interval Logging time Use button to display the graph of resistance over time both during the l...

Page 39: ...power transformer or measurement transformer may be magnetized The demagnetization should be carried out to elimi nate a source of potential problems Demagnetization of the magnetic core requires the...

Page 40: ...ws to calculate the temperature of windings for a heated object e g motor basing on the measured winding resistance at ambient temperature and after a period of operation taking into account the tempe...

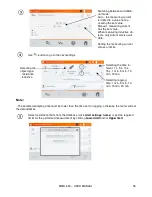
Page 41: ...lying the measuring current is non ad justable and set on Auto mode the measuring current is lim ited to a value not exceeding the set value Setting the measuring current values or limits Use button t...

Page 42: ...and or Up per limit Click button to enter the temperature settings Enter the ambient temperature op tional Enter the tempera ture of the object or measure it with a thermometer connected to the meter...

Page 43: ...MMR 650 USER MANUAL 41 Press button to go to the measurement Connect the meter to the motor windings Press START STOP Disconnect the test leads from the motor start the motor...

Page 44: ...ime turn off the engine reconnect the meter to the motor winding and press START STOP RT1 resistance of the cold winding RT2 resistance of the hot winding T1 temperature of the cold object temperature...

Page 45: ...regular basis after the measure ment 4 1 1 Entering the clients Click button to enter the memory Note Use button to enter the memory management for measurements results or to enter a higher level in t...

Page 46: ...utton to save cli ent s data in the memory 4 1 2 Entering objects subobjects measurement points and logs 4 1 2 1 Entering objects and subobjects Click of the selected cli ent To add an object measurin...

Page 47: ...Object name box to name the object mandatory Select one of the default names or enter your own You may attach an additional description by clicking De scription box By clicking Object type box you ma...

Page 48: ...ect one of the default names or enter your own Use button to save the object in the memory By clicking you can add more objects By clicking the object field and button you may enter subobjects in the...

Page 49: ...l i e at the level of client object or subobject Log is a measuring point distinguished due to performing a series of measurements in one point Click of the client and then or press button at the leve...

Page 50: ...enter your own By clicking Measurement point s type box you may select the default type of or enter your own For logging it is possible to add an additional description similarly as for the object Us...

Page 51: ...or one measuring point you can save only one result and entering the next will erase the previous one The measurement result may be entered only to the measuring point or to logger 4 2 1 Entering the...

Page 52: ...nt by clicking its name indicated by orange border Save the result by clicking button 4 2 2 Entering the results of measurements without previously organized memory Method 1 Press button after finishi...

Page 53: ...nd then click button to add the object After adding and saving the object also subobjects if nec essary click button to add the measurement point After adding and saving the measuring point click The...

Page 54: ...er the measurement or be fore click Measurement point s name and enter the name Press button after finishing the measurement Click button to add a cli ent After saving the client click its button and...

Page 55: ...e client and object subobjects and performing a series of measurements on one object after the measurement and entering the name of the measuring point click and the click again on the displayed scree...

Page 56: ...MMR 650 USER MANUAL 54 When using the logger click ing the field with results will cause the meter to display the individual samples You may scroll them using but tons Use button to dis play the graph...

Page 57: ...ry In order to facilitate searching for an object or device in the memory a function of memory search is added To start the function of searching in the memory Click button Click of the selected clien...

Page 58: ...the name or its several subsequent letters Select the type of the tested object all resistive inductive Selecting sorting by name or date After entering all the search criteria click button again Not...

Page 59: ...USB stick and vice versa In the main menu click then Memory settings and Memory management Insert the USB stick into the appropriate USB slot of the meter Click button Click to save data in the USB s...

Page 60: ...ata To delete the whole memory click Delete memory button To delete a client click on its name and then click button Click YES to confirm deleting or NO to cancel it To delete an object or the meas ur...

Page 61: ...B socket of Host type You can print meas urement results directly after the measurement or stored in memory Click icon to print it The printout includes all the results and parameters of the measureme...

Page 62: ...arger for charging it The battery pack is placed in the battery compartment Battery charger is installed inside the housing of the meter and is compatible only with the manufacturer s rechargeable bat...

Page 63: ...se the batteries in extreme temperatures Extreme temperatures reduce the lifetime of rechargeable batteries Always observe the rated operating temperature Do not dispose the battery pack into fire Li...

Page 64: ...accessories are dry during prolonged storage remove the batteries storage temperatures must be in accordance with those defined in technical specifications in order to prevent total discharge of the r...

Page 65: ...1 A 2 V 200 mV 1 0000 1 9999 0 0001 2 000 19 999 0 001 0 1 A 2 V 20 00 199 99 0 01 10 mA 2 V 200 0 1999 9 0 1 1 mA 2 V for measurements on inductive objects in fast mode 2 m v 2 digits applies to mea...

Page 66: ...FF 5 45 minutes or option not active depending on the setting w TFT graphic display 800x480 points x interface standard USB LAN y quality standard design and manufacturing are ISO 9001 compliant z the...

Page 67: ...ibutors WAPRZ010DZBKEL 10m cable with a crocodile clip WAPRZ025DZBKEL 25m cable with a crocodile clip WAZACKEL1 Kelvin clamp with a 2 6 m double wire cable LAN cable WASONT1 temperature probe ST 1 WAA...

Page 68: ...he device and provider of guarantee and post guarantee service SONEL S A ul Wokulskiego 11 58 100 widnica Poland tel 48 74 858 38 60 fax 48 74 858 38 09 E mail export sonel pl Web page www sonel pl No...

Page 69: ...MMR 650 USER MANUAL 67 NOTES...

Page 70: ...MMR 650 USER MANUAL 68 NOTES...

Page 71: ...ntry to client objects Wi Fi signal strength Entry to client edition object or measurement point with a possibility of changing data There was a limitation of the measuring current to a value lower th...

Page 72: ......

Reviews: