background image

MRU-120 

– USER MANUAL 

31 


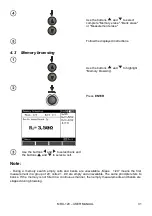
Use the buttons 

 and 

 to select 

complete "Memory erase", "Bank erase" 
or "Measurement erase" 


Follow the displayed instructions. 


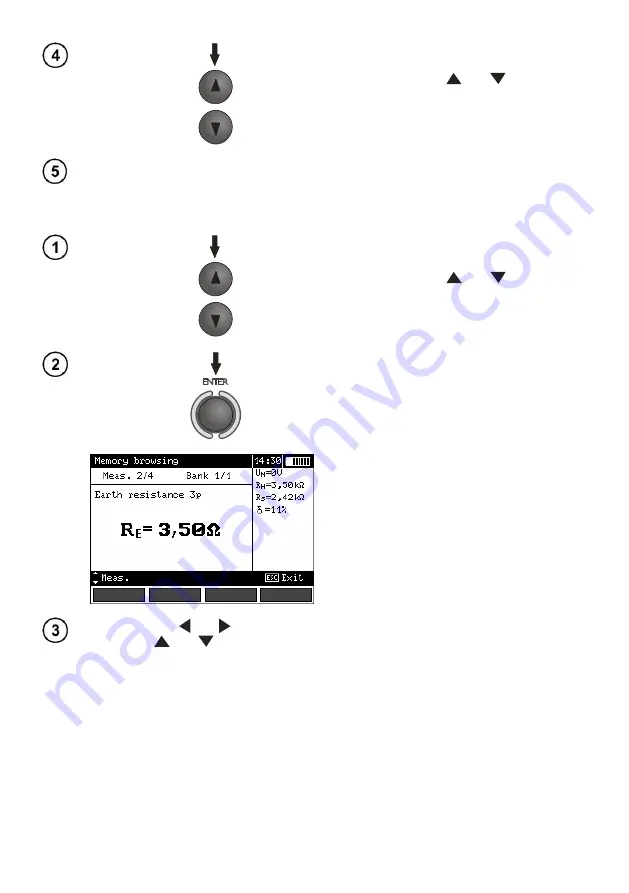
4.3  Memory browsing 


Use the buttons 

 and 

 to highlight 

“Memory browsing”. 


Press 

ENTER


Use the buttons 

 and 

 to select bank and  

the buttons 

 and 

 to select a cell. 


Note: 


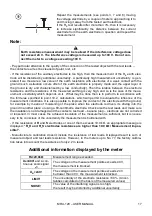
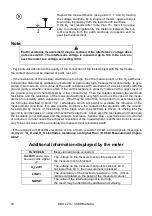
During  a  memory  search  empty  cells  and  banks  are  unavailable.  „Meas.    1/20”  means  the  first 

mea

surement in a group of 20; cells 21…99 are empty and unavailable. The same principle refers to 

banks. If the memory is not filled in a continuous manner, then empty measurements and banks are 
skipped during browsing. 


Summary of Contents for MRU-120

Page 1: ......

Page 2: ...MRU 120 USER MANUAL 2 ...

Page 3: ...USER MANUAL EARTH RESISTANCE METER MRU 120 SONEL S A Wokulskiego 11 58 100 Świdnica Version 2 8 27 07 2021 ...

Page 4: ...NUAL 2 The MRU 120 meter is a modern easy and safe measuring device Please acquaint yourself with the present manual in order to avoid measuring errors and prevent possible problems related to opera tion of the meter ...

Page 5: ...stance measurement with 3 pole method RE3P 15 3 4 Earth resistance measurement with 4 wire method RE4P 18 3 5 Earth resistance measurement with 3 pole method with additional clamp RE3P C 21 3 6 Earth resistance measurement with two clamp method 2C 24 3 7 Earth resistivity measurement ρ 26 4 Memory 29 4 1 Saving of the measurement results in the memory 29 4 2 Memory erasing 30 4 3 Memory browsing 3...

Page 6: ...s for function ρ 41 10 2 5 Influence of the interference current Il upon the result of the earth resistance measurement for method RE3P C 41 10 2 6 Influence of interference current on the result of the earth resistance measurement for two clamp method 2C 41 10 2 7 Influence of the relation of the resistance measured with clamp for the multiple earthing branch to the resultant resistance RE3P C 41...

Page 7: ...vant fire regulations required during the performance of a particular type of work Before starting the work with the device in special environments e g potentially fire risk explosive environment it is necessary to consult it with the person responsible for health and safety It is unacceptable to operate the following A damaged meter which is completely or partially out of order A meter with damag...

Page 8: ...s available at any position of the knob Press MENU Using buttons and highlight the required position Press ENTER to select the option 2 1 Measurement settings Using buttons and highlight the required position Press ENTER to select the option ...

Page 9: ...ering of interference from 50 Hz and 60 Hz networks Using buttons and select the frequency and press ENTER to select the option 2 1 2 Calibration of the measurement clamp C 3 The clamp bought apart for a meter that was purchased before must be calibrated before it is used for the first time It may be periodically calibrated in order to avoid the influence of the ageing elements upon the resolution...

Page 10: ...formation displayed by the meter Message Cause Procedure ERROR CLAMP NOT CONNECTED OR NOT PUT ON WIRE CONNECTED TO H AND E SOCKET CALIBRATION ABORTED PRESS ENTER The clamp is not connected Check whether the clamp is connected to the device or whether it is placed upon the test lead used by the meter to force the pas sage of current ERROR WIRE NOT CONNECTED TO H AND E TERMINAL CALIBRATION ABORTED P...

Page 11: ...ettings Using buttons and select the result and the distance unit and press ENTER to confirm 2 2 Meter settings Using buttons select required item Press ENTER to confirm 2 2 1 LCD contrast Using the buttons and set the contrast value and press ENTER ...

Page 12: ...F disable press ENTER 2 2 3 Display settings The setting permits to turn on off the setting bar display Use buttons and to set the dis play of the setting bar measurement parameters press ENTER Visible bar Hidden bar 2 2 4 Date and time Use buttons and to select the value to be modified Day month hour minute Use buttons and to set the value Once the date and time have been set press ENTER ...

Page 13: ...nload from the manufacturer s web page www sonel pl the meter programming software install it in the computer and connect the meter to the computer Having chosen the Program update in the MENU proceed in accordance with the instructions displayed by the programme 2 3 Language choice Use buttons and to select Language choice in the main MENU and press ENTER Use buttons and to select the language an...

Page 14: ...s specified in the standard EN 61557 4 U 24 V I 200 mA for R 10 Ω Turn the meter on Set the rotational function selector at 2P Connect the object being measured to the terminals S and E of the meter The meter is ready for measurement The auxiliary display shows the value of the interference voltage and its fre quency The setting bat shows the mains frequency set in the MENU Press START In order fo...

Page 15: ... but lower than 40 V the measurement is blocked NOISE The value of the interfering signal is too high the result may be distorted by additional uncertainty 3 2 Calibration of the test leads In order to eliminate the influence of the resistance of the test leads over the result of the meas urement it is possible to realise its compensation auto zeroing In order to do so the measurement function 2P ...

Page 16: ...lay 3 2 2 Auto zeroing off Turn the meter on Set the rotational function selector at 2P Press F1 Separate the test leads Press START S E C AT IV 300V Once the auto zeroing function has been turned off the legend AUTOZERO will be no long er displayed Note It is sufficient to realise compensation once for the given test leads It is also remembered once the meter has been turned off ...

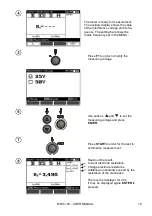
Page 17: ... Connect the current electrode driver into ground to the H socket of the meter Connect the voltage electrode driver into ground to the S socket of the meter Connect the tested earth electrode to the E socket of the meter The tested earth electrode as well as the current electrode and voltage electrode should be aligned The meter is ready for measurement The auxiliary display shows the value of the...

Page 18: ...ge and press ENTER Press START In order for the test to commence measurement Read out the result Current electrode resistance Voltage electrode resistance Additional uncertainty caused by the resistance of the electrodes Displayed when δ 30 The result is displayer for 20 s It may be displayed again ENTER is pressed ...

Page 19: ...the formulae specified in point 10 2 calculations which will permit to evaluate the influence of the measurement conditions It is also possible to improve the contact of the electrode with the ground for example by means of moistening of the place when the electrode is driven its driving into the ground in another place or using a 80 centimetre electrode Check also the test leads and make sure the...

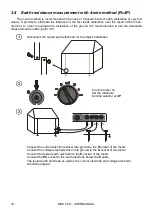
Page 20: ...d measurement function point 3 9 Disconnect the tested earth electrode for the object installation Turn the meter on Set the rotational function selector at 4P E S H E ES S H CAT IV 300V ES Connect the current electrode driver into ground to the H socket of the meter Connect the voltage electrode driver into ground to the S socket of the meter Connect the tested earth electrode to the E socket of ...

Page 21: ...e MENU Press F1 to order to modify the measuring voltage Use buttons and to set the measuring voltage and press ENTER Press START In order for the test to commence measurement Read out the result Current electrode resistance Voltage electrode resistance Additional uncertainty caused by the resistance of the electrodes The result is displayer for 20 s It may be displayed again ENTER is pressed ...

Page 22: ...h and so is the case of the meas urement uncertainty which depends on it What may be done then is to perform in accordance with the formulae specified in point 10 2 calculations which will permit to evaluate the influence of the measurement conditions It is also possible to improve the contact of the electrode with the ground for example by means of moistening of the place when the electrode is dr...

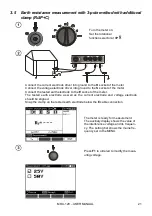
Page 23: ...ground to the S socket of the meter Connect the tested earth electrode to the E socket of the meter The tested earth electrode as well as the current electrode and voltage electrode should be aligned Snap the clamp on the tested earth electrode below the E cable connection The meter is ready for measurement The auxiliary display shows the value of the interference voltage and its frequen cy The se...

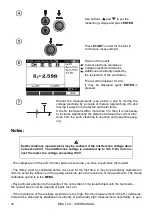
Page 24: ...nd repeat the gaug ing Notes Earth resistance measurement may be realised if the interference voltage does not exceed 24 V The interference voltage is measured up to 100 V Do not con nect the meter to a voltage exceeding 100 V The clamps are not the part of meter basic accessories you have to purchase them apart The clamp must be calibrated before it is used for the first time It may be periodical...

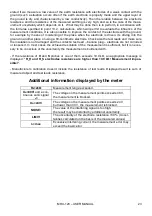
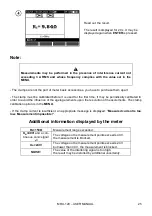
Page 25: ...s test lead banana plug electrode are not corroded or loosened In most cases the achieved resolution of the measurement is sufficient but it is neces sary to be conscious of the uncertainty the measurement is burdened with If the resistance of H and S probes or one of them exceeds 19 9 kΩ an appropriate message is displayed R_H and R_S electrodes resistance are higher than 19 9 kΩ Measurement impo...

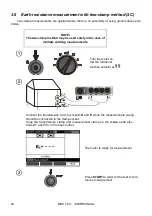
Page 26: ... of multiple earthing measurements Turn the meter on Set the rotational function selector at CAT IV 300V H E C 3 N 1 Connect the transmission clam to sockets H and E while the measurements clamp should be connected to the clamp socket Snap the transmission clamp and measurement clamp on the tested earth elec trode AT east 30 cm from each other The meter is ready for measurement Press START In orde...

Page 27: ... in order to avoid the influence of the ageing elements upon the resolution of measurements The clamp calibration option is in the MENU If the clamp current is insufficient an appropriate message is displayed Measured current is too low Measurement impossible Additional information displayed by the meter RE 150Ω Measurement range exceeded UN 40V and a con tinuous sonic signal The voltage on the me...

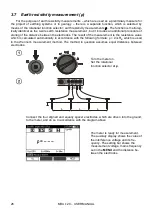
Page 28: ...ult of the measurement is the resistance value which is calculated automatically in accordance with the following formula ρ 2 LRE which is used in the Wenner s measurement method The method in question assumes equal distances between electrodes Turn the meter on Set the rotational function selector at ρ E L L L S H ES Connect the four aligned and equally spacer electrodes which are driven into the...

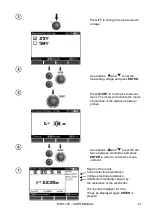
Page 29: ...ivate the mode of selection of the distance between probes Use buttons and to set the dis tance between electrodes and press ENTER In order to commerce meas urement Read out the result Current electrode resistance Voltage electrode resistance Additional uncertainty caused by the resistance of the electrodes The result is displayer for 20 s It may be displayed again ENTER is pressed ...

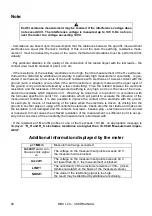
Page 30: ...urement uncertainty which depends on it What may be done then is to perform in accordance with the formulae specified in point 10 2 calculations which will permit to evaluate the influence of the measurement conditions It is also possible to improve the contact of the electrode with the ground for example by means of moistening of the place when the electrode is driven its driving into the ground ...

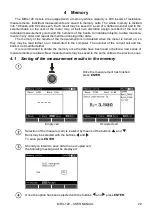
Page 31: ...s of the measurements is not deleted when the meter is turned on so they may be read further on or transmitted to the computer The number of the current cell and the bank is not modified either It is recommended to delete the memory once the data have been read or before a new series of measurements is realized New measurements may be saved in the same cells as the previous ones 4 1 Saving of the ...

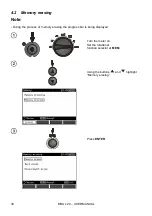
Page 32: ... 30 4 2 Memory erasing Note During the process of memory erasing the progress bar is being displayed Turn the meter on Set the rotational function selector at MEM Using the buttons and highlight Memory erasing Press ENTER ...

Page 33: ...y browsing Press ENTER Use the buttons and to select bank and the buttons and to select a cell Note During a memory search empty cells and banks are unavailable Meas 1 20 means the first measurement in a group of 20 cells 21 99 are empty and unavailable The same principle refers to banks If the memory is not filled in a continuous manner then empty measurements and banks are skipped during browsin...

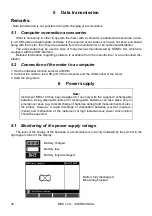
Page 34: ...he meter to a computer 1 Set the rotational function selector at MEM 2 Connect the cable to the USB port of the computer and the USB socket of the meter 3 Start the programm 6 Power supply Note Instrument MRU 120 has been designed for use only with the supplied rechargeable batteries Using disposable instead of rechargeable batteries can take place only in emergency cases e g total discharge of ba...

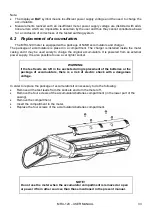
Page 35: ...y to charge the original accumulators It is powered from an external power supply It is also possible to use a car lighter socket WARNING If the test leads are left in the sockets during replacement of the batteries or the package of accumulators there is a risk of electric shock with a dangerous voltage In order to replace the package of accumulators it is necessary to do the following Remove all...

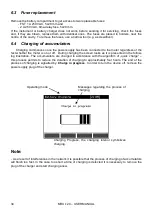
Page 36: ...e meter is on or off During charging the screen looks as it is presented in the follow ing illustration The accumulators are charged in accordance with the algorithm of quick charge this process permits to reduce the duration of charging to approximately four hours The end of the process of charging is signalled by Charge in progress In order to turn the device off remove the power supply plug of ...

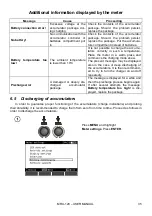
Page 37: ...rs correctly in such a temperature Place the meter in a warm place and commence the charging mode anew The present message may be displayed also in the case of deep discharging of the accumulators It is then recommend ed to try to turn the charger on and off repeatedly Precharge error A damaged or deeply dis charged accumulator package The message is displayed for a while and then the precharge pr...

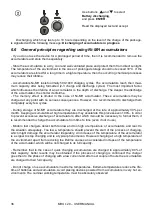
Page 38: ...ely every few cycles During storage of Ni MH accumulators they are discharged at the rate of approximately 30 per month Keeping accumulators at high temperatures may accelerate this process even 100 In order to prevent excessive discharge of accumulators after which it would be necessary to format them it is recommended to charge the accumulators from time to time even if not in use Modern fast ch...

Page 39: ...ce the following recommendations must be observed Disconnect all the test leads from the meter Clean the meter and all its accessories thoroughly Wind the long test leads onto the reels In the case the meter is to be stored for a prolonged period of time the batteries must be re moved from the device In order to prevent a total discharge of the accumulators in the case of a prolonged storage charg...

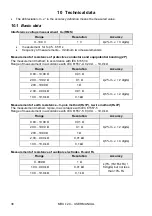
Page 40: ... 0 24 19 9 k Range Resolution Accuracy 0 00 19 99 Ω 0 01 Ω 2 m v 2 digits 20 0 199 9 Ω 0 1 Ω 200 1999 Ω 1 Ω 2 00 9 99 kΩ 0 01 Ω 5 m v 2 digits 10 0 19 9 kΩ 0 1 kΩ Measurement of earth resistance 3 pole method RE3P 4 wire method RE4P The measurement method 3 pole in accordance with IEC 61557 5 Range of measurement in accordance with IEC 61557 5 0 30 19 9 k Range Resolution Accuracy 0 00 19 99 Ω 0 0...

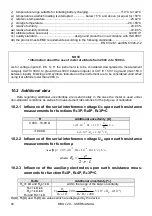
Page 41: ...54 d maximum interference voltage AC DC at which a measurement may be performed 24 V e maximum measured interference voltage 100 V f maximum interference current at which a measurement of the earth resistance by means of the clamp method is performed 3 A rms g frequency of the measurement current for 50 Hz mains 125 Hz for 60 Hz mains 150 Hz h measurement voltage and current for 2P U 24 V RMS I 20...

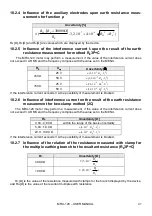
Page 42: ...instrument are to be considered valid when using it at altitude lower than 2000 m 10 2 Additional data Data regarding additional uncertainties are useful mainly in the case the meter is used under non standard conditions as well as for measurement laboratories for the purpose of calibration 10 2 1 Influence of the serial interference voltage UN upon earth resistance measurements for functions RE3P...

Page 43: ...ibility of measurement is blocked 10 2 6 Influence of interference current on the result of the earth resistance measurement for two clamp method 2C The MRU 120 meter may perform a measurement if the value of the interference current does not exceed 3 A RMS and the frequency complies with the value set in the MENU RE Uncertainty Ω 0 00 4 99 Ω within the range of the basic uncertainty 5 00 19 9 Ω 1...

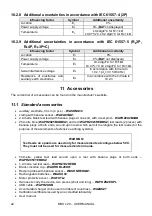
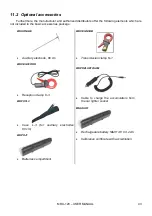
Page 44: ...essories auxiliary electrode 30 cm 4 pcs WASONG30 cramp with banana socket WAZACIMA1 2 2 metre black test lead with banana plugs at one end with a test prod WAPRZ2X2BLBB 25 metre blue WAPRZ025BUBBSZ and red WAPRZ025REBBSZ test leads 2 pieces with banana plugs at both ends wound upon reels which permit to elongate the test leads for the purpose of measurements of extensive earthing systems WARNING ...

Page 45: ...basic accessories package WASONG80 Auxiliary electrode 80 cm WACEGC3OKR Reception clamp C 3 WAFUTL3 Case L 3 for auxiliary electrodes 80 cm WAPOJ1 Batteries compartment WACEGN1BB Transmission clamp N 1 WAPRZLAD12SAM Cable to charge the accumulators from the car lighter socket WAAKU07 Rechargeable battery NiMH 4 8 V 4 2 Ah Calibration certificate with accreditation ...

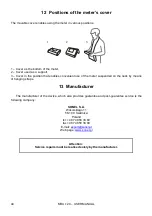
Page 46: ... enables convenient use of the meter suspended on the neck by means of hanging straps 13 Manufacturer The manufacturer of the device which also provides guarantee and post guarantee service is the following company SONEL S A Wokulskiego 11 58 100 Świdnica Poland tel 48 74 858 38 60 fax 48 74 858 38 09 E mail export sonel pl Web page www sonel pl Attention Service repairs must be realised solely by...

Page 47: ...s o luxmeters The Calibration Certificate is a document that presents a relation between the calibration standard of known accuracy and meter indications with associated measurement uncertainties The calibration standards are normally traceable to the national standard held by the National Metrological Institute According to ILAC G24 Guidelines for determination of calibration intervals of measuri...

Page 48: ...MRU 120 USER MANUAL 46 NOTES ...

Page 49: ...MRU 120 USER MANUAL 47 NOTES ...

Page 50: ...MRU 120 USER MANUAL 48 NOTES ...

Page 51: ......

Page 52: ...MRU 120 USER MANUAL 2 ...

Reviews: