|
S O N I C - E Q U I P M E N T. C O M
1. Work area safety
a. Do not expose the equipment to rain or snow.
b. Only use this equipment on a surface that is
stable, level, smooth and capable of sustaining
the load. Keep the surface clean, tidy and free
from unrelated materials and ensure that
there is adequate lighting.
c. Ensure children and other bystanders are kept
at a safe distance when using jack.
2. Personal safety
a. Remove loose clothing. Remove ties, watches,
rings and other loose jewelry, and contain long
hair.
b. Always wear ANSI approved safety goggles
when operating this jack.
c. Keep proper balance and footing, do not over-
reach and wear nonskid footwear.
d. Inspect the jack before each use. Do not use
if bent, broken, cracked, leaking or otherwise
damaged , any suspect parts are noted or it
has been subjected to a shock load.
e. Do not allow untrained persons to operate this
product.
3. Jack use and care
a. Store idle jack. When jack is not in use, store it
in a secure place out of the reach of children.
Inspect it for good working condition prior to
storage and before re-use.
b. Not suitable use by children or people with
reduced mental capacity.
c. Do not use under the influence of drugs or
alcohol.
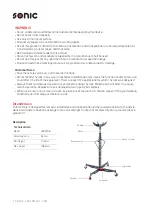
d. The maximum load capacity is 0.5 ton. Do not
exceed this rated capacity.
e. This jack is used as an aid in the removal and
installation of a transmission or a differential
as individual components. Do not use it for any
other purpose it is not designed to perform.
f. Do not use this transmission jack as a vehicle
lifting device or as a vehicle support.
g. Vehicle must be properly and adequately
supported before starting repairs.
h. Do not use this jack to lift or support assem-
blies such as a differential with axle, or a
transmission with bell housing which will be
bulky and difficult to balance. This may cause
the jack to tip over and lead to property dam-
age and/or serious personal injury.
i. Center load on the saddle and be sure the
setup is stable and secure.
j. Never move this jack with a load any higher off
ground than necessary and move it slowly and
carefully.
k. Transfer load immediately to appropriate
support device for service or repair.
l. Use a qualified person to maintain the equip-
ment in good condition. Keep it clean for best
and safest performance.
m. If the equipment needs repairing and/or there
are any parts that need to be replaced, have
it repaired by authorized technicians and only
use the replacement parts supplied by the
manufacturer.
ENG
| GENERAL SAFETY WARNINGS
WARNING!
Read and understand all instructions, failure to follow all instructions listed below may result in serious in-
jury. The warnings, cautions, and instructions discussed in this instruction manual cannot cover all possible
conditions or situations that could occur. It must be understood by the operator that common sense and
caution are factors that cannot be built into this product, but must be supplied by the operator.
Save all warning and instructions for future reference.


