background image

Getting Started Guide 7.0 27


3

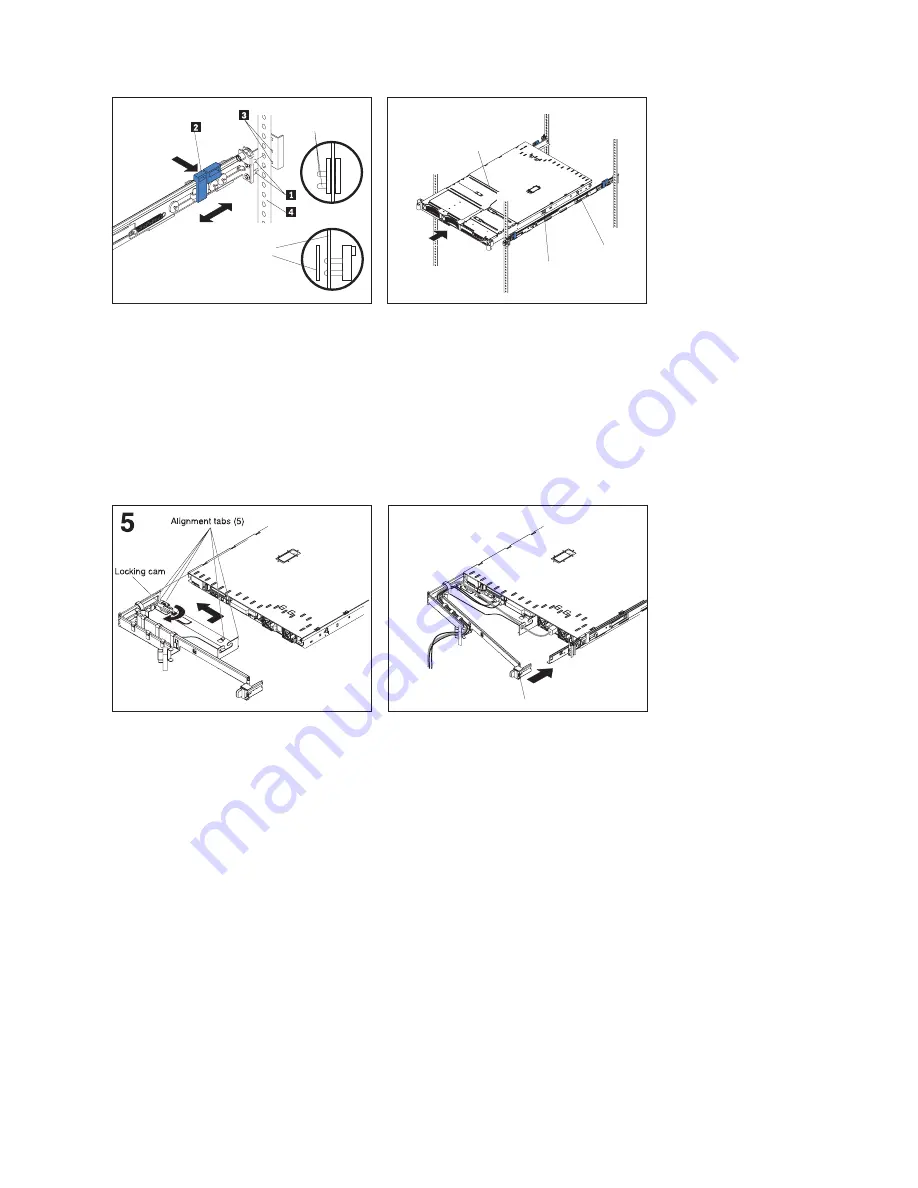
Pins extended through:
• Rack-mount flange
• Rail-mount flange

Pins not extended through:
• Rack-mount flange
• Rail-mount flange

Attach the front rail bracket to the rack:

Press the tab

2

away from the rail. Slide the front

rack-bracket pins

1

away from the rail-mount

flange

3

until the front rail bracket stays open.

Place the rack-mount flange

4

between the front

rack-bracket pins

1

and the rail-mount flange

3

.

Press the tab

2

away from the rail. The pins snap

forward and extend through the rack-mount flange
and the rail-mount flange.

Attention:

Make sure that the rail is securely

clamped against the rack-mount flange.

4

Server

Side release
latch

Rail-lock
pin

Insert the server into the rack cabinet:

Align the server on the slide rails and push the
server into the rack cabinet. If the rail-lock pins are
extended out, pull the side release latches toward
you, which lifts up the rail-lock pins. Push the
server into the rack the remainder of the way.

Install the cable-management arm:

Insert the cable-management arm into the five slots
in the rear of the server. When the
cable-management arm is inside all five slots, slide
the cable-management arm to the left by pulling the
locking cam back, away from the server.

6

Snap latch

Connect the cables and secure the
cable-management arm to the rack:

Pull the cable-management arm away from the
server, and connect the cables to the server. Route
the cables through the cable-management arm.

Move the cable-management arm toward the rail on
the right side, and snap the latch onto the rail.

Summary of Contents for Email Security 7.0 8000

Page 1: ...EMAIL SECURITY SonicWALL Email Security SonicWALL Email Security Solutions SonicWALL Email Security 7 0 8000 Getting Started Guide...

Page 2: ...ntent filtering policy management and content compliance capabilities in a single seamlessly integrated solution SonicWALL Email Security provides powerful protection without complexity Note z SonicWA...

Page 3: ...ail Security on page 9 Connect Directly to the SonicWALL Email Security Appliance on page 9 Login to the SonicWALL Email Security Appliance on page 9 Initial System Configuration on page 10 Activating...

Page 4: ...rds One Y Split power cable One Rack mount Kit not pictured The included power cords are intended for use in North America only For European Union EU customers power cords are not included Das eingesc...

Page 5: ...ication Code xxx xxx Record the authentication code found on the top right access panel of your SonicWALL Email Security appliance EmailSecurityIPAddress Select a free static IP address for your Sonic...

Page 6: ...your Son icWALL Email Security appliance default is password Email Server IP Record the IP address or hostname of your email server LDAP Server IP Record the IP address or hostname of your directory...

Page 7: ...ows SCSI drives in a RAID array to be hot swapped should one drive fail Power LED Indicates the SonicWALL Email Security appliance is powered on Power Button Allows the SonicWALL Email Security applia...

Page 8: ...ister your appliance Note z mysonicwall com registration information is not sold or shared with any other company Creating a mysonicwall com Account Creating a mysonicwall com account is fast simple a...

Page 9: ...ot already logged into mysonicwall com go to https www mysonicwall com and log in 3 Enter your serial number in the Quick Register field and click the Next button Follow the on screen instructions 4 C...

Page 10: ...figuration If the Alert light stays lit ensure that BOTH of the power supplies on the back of the SonicWALL Email Security Appliance are plugged in use the included y split cable for this purpose Conn...

Page 11: ...ose to accept the certificates in order to log into the SonicWALL Email Security appliance 3 Log into SonicWALL Email Security appliance using admin as the user name and password as the password Initi...

Page 12: ...liance Enter a fully qualified domain name For example emailsecurity example com Get all network settings from DHCP Select this if you want your SonicWALL Email Secu rity appliance to get dynamic IP s...

Page 13: ...nto your mysonicwall com account The mysonicwall com server automatically uses the serial number and authentication code that came with your Email Security appliance X To purchase or upgrade your Emai...

Page 14: ...L Email Security 1 Plug one end of the provided Ethernet cable into the LAN port on the back of your SonicWALL Email Security appliance 2 Plug the other end of the cable into an open port on your netw...

Page 15: ...t password for security reasons X To change the default password 1 Login to the SonicWALL Email Security appliance using the IP address you entered in Hostname and Networking on page 11 2 Enter a new...

Page 16: ...t into the Inbound destination server fields The inbound destination server is the email server that will accept good email after SonicWALL Email Security removes and quarantines junk email For exampl...

Page 17: ...sends junk mail to the user s junk box Deliver all messages to users does not separate junk mail from good email 13 Under Junk Box Summary to send daily summary messages about junk mail caught by Son...

Page 18: ...l mail account for example Yahoo mail or GMail 2 Create a new email message 3 Send the message 4 In the SonicWALL Email Security appliance administrative interface click the Auditing button on the top...

Page 19: ...ield enter the FQDN on your SonicWALL Email Security appliance such as esa example com Note The Exchange Server must be able to resolve this host name 5 Click OK On your SonicWALL Email Security appli...

Page 20: ...p on the domain in the TO field Messages that arrive at the SonicWALL Email Security appliance from any other IP address will be treated as an Inbound message and delivered directly to the Exchange se...

Page 21: ...ld 5 Type 255 255 255 0 in the Subnet Mask field 6 Click OK for the settings to take effect Windows 2000 1 From your Windows Start menu select Settings 2 Open Network and Dial up Connections 3 Click P...

Page 22: ...pe 8837 Model 15U Refer to safety documentation in this manual and to the complete IBM Safety and EMC information on the SonicWALL Resource CD included with this product Additional language safety and...

Page 23: ...22 Email Security Software...

Page 24: ...Getting Started Guide 7 0 23...

Page 25: ...24 Email Security Software For additional safety and regulatory information refer to the IBM documentation located on the SonicWALL Resource CD included with this product...

Page 26: ...ack cabinet v The slide rails in this kit come preset to the correct length for installation in an IBM rack cabinet and they are adjustable for other rack cabinets v The slide rails are marked RIGHT F...

Page 27: ...ot remove tab 5 unless you are installing the rails on a non IBM rail mount flange with a thickness greater than 3 175 mm 0 125 in If you remove tab 5 you must insert an M6 screw through the bottom ho...

Page 28: ...lock pin Insert the server into the rack cabinet Align the server on the slide rails and push the server into the rack cabinet If the rail lock pins are extended out pull the side release latches tow...

Page 29: ...the server installed you must secure the server to the rack If necessary disconnect the cables from the rear of the server then slide the server out of the rack 150 mm 6 in and insert the M6 screws i...

Page 30: ...ernet Explorer and Active Directory are trademarks or registered trademarks of Microsoft Corporation Adobe Acrobat and Acrobat Reader are either registered trademarks or trademarks of Adobe Systems In...

Page 31: ...30 Email Security Software...

Page 32: ...ed herein may be trademarks and or registered trademarks of their respective companies Specifications and descriptions subject to change without notice SonicWALL Inc 1143 Borregas Avenue T 1 408 745 9...

Reviews: