Page 64 SonicWALL SonicOS Standard Administrator’s Guide
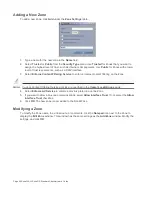
Adding a New Zone
To add a new Zone, click Add under the Zone Settings table.
1.
Type a name for the new zone in the Name field.
2.
Select Trusted or Public from the Security Type menu. Use Trusted for Zones that you want to
assign the highest level of trust, such as internal LAN segments. Use Public for Zones with a lower
level of trust requirements, such as a DMZ Interface.
3.
Select Enforce Content Filtering Service to enforce Internet content filtering on the Zone.
Note:
Custom Content Filtering Service policies are specified in the Users>Local Groups page.
4.
Select Enforce AV Service to enforce anti-virus protection on the Zone.
5.
If you want to allow intra-zone communications, select Allow Interface Trust. If not, select the Allow
Interface Trust checkbox.
6.
Click OK. The new zone is now added to the SonicWALL.
Modifying a Zone
To modify the Zone name, the virtual route, or comments, click the Notepad icon next to the Zone to
display the Edit Zone window. This window has the same settings as the Add Zone window. Modify the
settings, and click OK.
Summary of Contents for SonicOS Enhanced 2.2
Page 19: ...Page 6 SonicWALL SonicOS Standard Administrator s Guide...
Page 45: ...Page 32 SonicWALL SonicOS Standard Administrator s Guide...
Page 65: ...Page 52 SonicWALL SonicOS Standard Administrator s Guide...
Page 141: ...Page 128 SonicWALL SonicOS Standard Administrator s Guide...
Page 185: ...Page 172 SonicWALL SonicOS Standard Administrator s Guide...
Page 188: ...Page 175...
Page 189: ...Page 176 SonicWALL SonicOS Enhanced Administrator s Guide...

