3. Net-Log Set-up & Installation
The fourth, fifth and sixth buttons select the desired serial
message mode. The button marked with a “1” selects
minimum mode. In this mode, only details of fatal errors
are displayed. The button marked with a “2” selects
medium messaging mode. In this mode both fatal and
non-fatal error details are displayed. In maximum mode,
selected by pressing the button marked with a “3”, system
event details are also displayed.
The next button enables network communication
monitoring. This feature will display all input and output
communications on the connected Net-Log and is intended
for debugging purposes only – enabling it will severely
affect the network performance of the Net-Log.
The next two buttons are used to display and clear the on-
board message log on Net-Log. Each time Net-Log sends a
serial message, it adds it to its own internal text log. This
log is limited in size and only contains the most recent
error/event messages.
The next two buttons are also intended as debug tools
although there use will not affect Net-Log’s performance.
The first is used to display the current status of the
network interface on Net-Log. The second is used to
display record cut information.
The last button is a “Reset all” button. This will return the
connected Net-Log to its factory defaults. Please note -
use of this button will delete all audio on the connected
Net-Log.
Once all the required information has been entered into
the Net-Log you are ready to connect the unit to your
network.
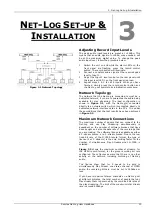
Ideally, the unit should be connected directly to a switch,
but if this is not possible or practical, connecting it to a
hub should be sufficient. If you are using the RJ45
connector on the rear of the Net-Log, you should use
twisted pair network cable (i.e. CAT5), wired “straight
through” as shown in
Figure
3.8
.
If you are connecting your Net-Log directly to a network
interface card in your PC, then you will require a
“crossover” cable, which is also shown in
Figure
3.8
.
When you have the Net-Log switched on and connected to
your PC or network, you can now run the Net-Log-Win
software. Read the next section on Start-up and Login,
which gives an explanation of the logging procedure and
how to enter your Net-Log into the device list.
Note: It is important to fully configure each Net-Log prior
to use. Once a successfully connection has been
established, refer to section 10 which details all the
configuration settings.
Sonifex Net-Log User Handbook
17
Summary of Contents for Net-Log
Page 1: ...Sonifex Net Log User Handbook...
Page 6: ...Contents Sonifex Net Log User Handbook...
Page 10: ...License Form Sonifex Net Log User Handbook 4...
Page 16: ...1 Introduction Sonifex Net Log User Handbook 10...
Page 24: ...3 Net Log Set up Installation Sonifex Net Log User Handbook 18...
Page 32: ...5 Recording Sonifex Net Log User Handbook 26...
Page 36: ...6 Playing Downloading Sonifex Net Log Win User Handbook 18...
Page 48: ...9 Serial Control Interface Sonifex Net Log Win User Handbook 30...
Page 56: ...11 The Administrator Sonifex Net Log Win User Handbook 38...
Page 62: ...13 Technical Specification Sonifex Net Log Win User Handbook 44...
Page 64: ...14 Glossary Sonifex Net Log Win User Handbook 46...


