5. Recording
Once recording has started, the Record Control button on
the front panel of the Net-Log will light up accordingly,
and a track list entry will also be created in the play
screen.
To stop the recording, press the “Stop” button. The Record
Control button will change accordingly and the track list
entry in the play screen will now contain an end-date and
time.
Program Recording
To set-up a program recording you must first make sure
that you have a channel enabled to do this. See the
Record Format tab of the Options screen – Section 10.
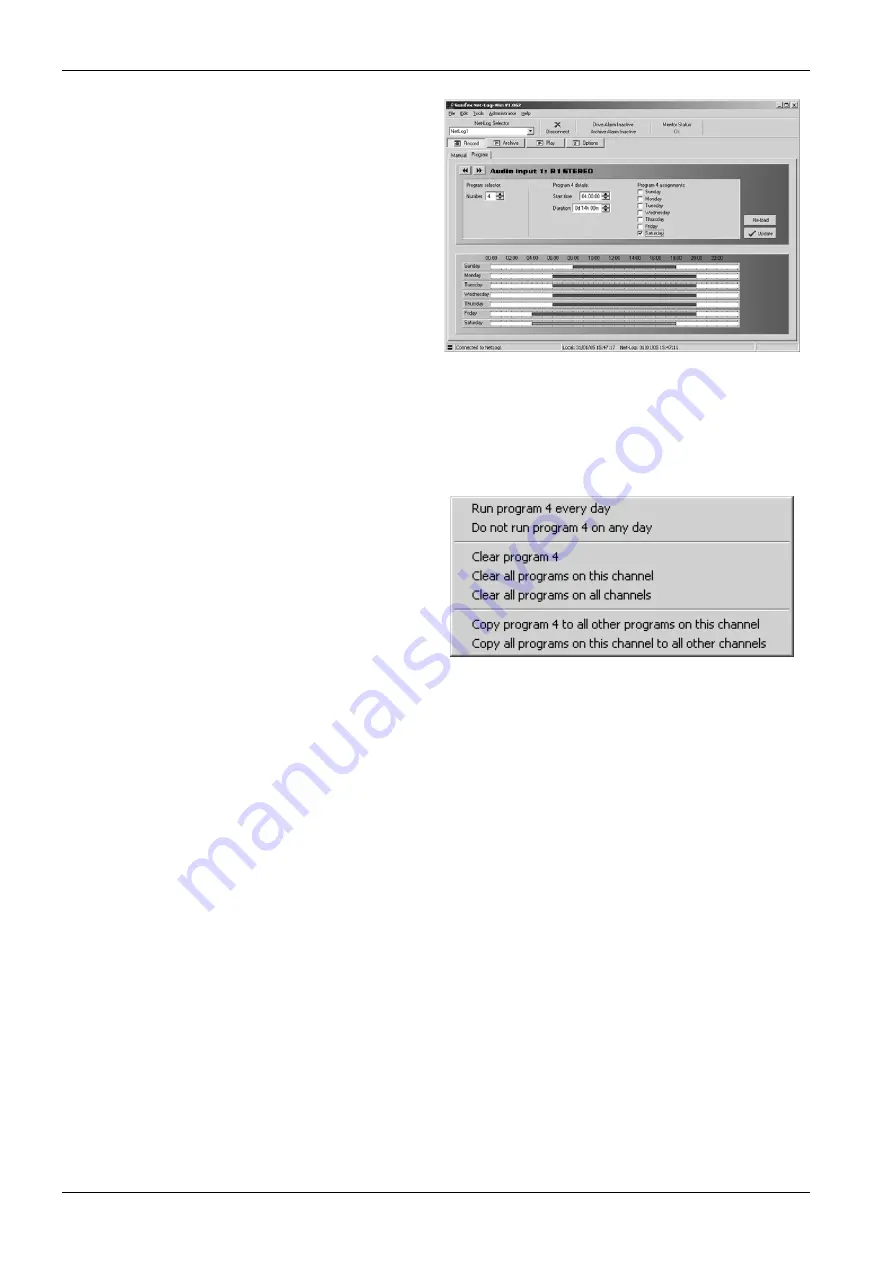
Once enabled, you can select the “Program” tab in the
Record screen. The Program Record screen will be
displayed (
Figure 5.2
).
This shows a time sheet for a complete week, with the
seven days of the week along the left-hand side and the
time of day along the top.
Select the record channel that you would like to program
by using the left/right arrow buttons.
The time sheet works by defining a Program number and
editing the start time and duration. The Program number
is then assigned to any of the days by selecting the
associated tick-box. Up to 20 Program numbers can be
defined.
A graphical representation of the program is displayed.
Note that if you alter a start-time or duration once
programmed, the graphic display will alter also to reflect
the changes.
Additional options are available to assist with setting up
the record programs. These options are accessed by
pressing the right mouse button whilst the cursor is
positioned over the record program screen. A popup menu
will be displayed as shown in
Figure 5.3
. The first two
options allows you to quickly assign the currently selected
program to either run every day or not run on any day.
The next three options can be used to clear programs.
Clearing a program resets the start time and duration to
defaults and removes all the day assignments. The last
two options allow you to make copies of programs.
Click on the “Update” button to send the program to the
Net-Log. The record start and stop times are stored on the
Net-Log and recording will now start and stop
automatically. Storing the information on the Net-Log
allows the recording to be made even if there is a network
problem at the time the recording state is due to change,
and allows everyone to see the record programs being
used.
If you need to change the program times for a particular
Net-Log, or just want to view them, the display will be
refreshed automatically when you select the Net-Log, or
you can press the “Re-load” button which gets the
information from the connected Net-Log.
If you make alterations in this screen and wish to cancel
them, then simply leave this screen, or press the “Re-
load” button to show the existing settings.
Figure 5.2 Program Record Screen
Figure 5.3 Program Record Popup Menu Commands
Sonifex Net-Log User Handbook
24
Summary of Contents for Net-Log
Page 1: ...Sonifex Net Log User Handbook...
Page 6: ...Contents Sonifex Net Log User Handbook...
Page 10: ...License Form Sonifex Net Log User Handbook 4...
Page 16: ...1 Introduction Sonifex Net Log User Handbook 10...
Page 24: ...3 Net Log Set up Installation Sonifex Net Log User Handbook 18...
Page 32: ...5 Recording Sonifex Net Log User Handbook 26...
Page 36: ...6 Playing Downloading Sonifex Net Log Win User Handbook 18...
Page 48: ...9 Serial Control Interface Sonifex Net Log Win User Handbook 30...
Page 56: ...11 The Administrator Sonifex Net Log Win User Handbook 38...
Page 62: ...13 Technical Specification Sonifex Net Log Win User Handbook 44...
Page 64: ...14 Glossary Sonifex Net Log Win User Handbook 46...


