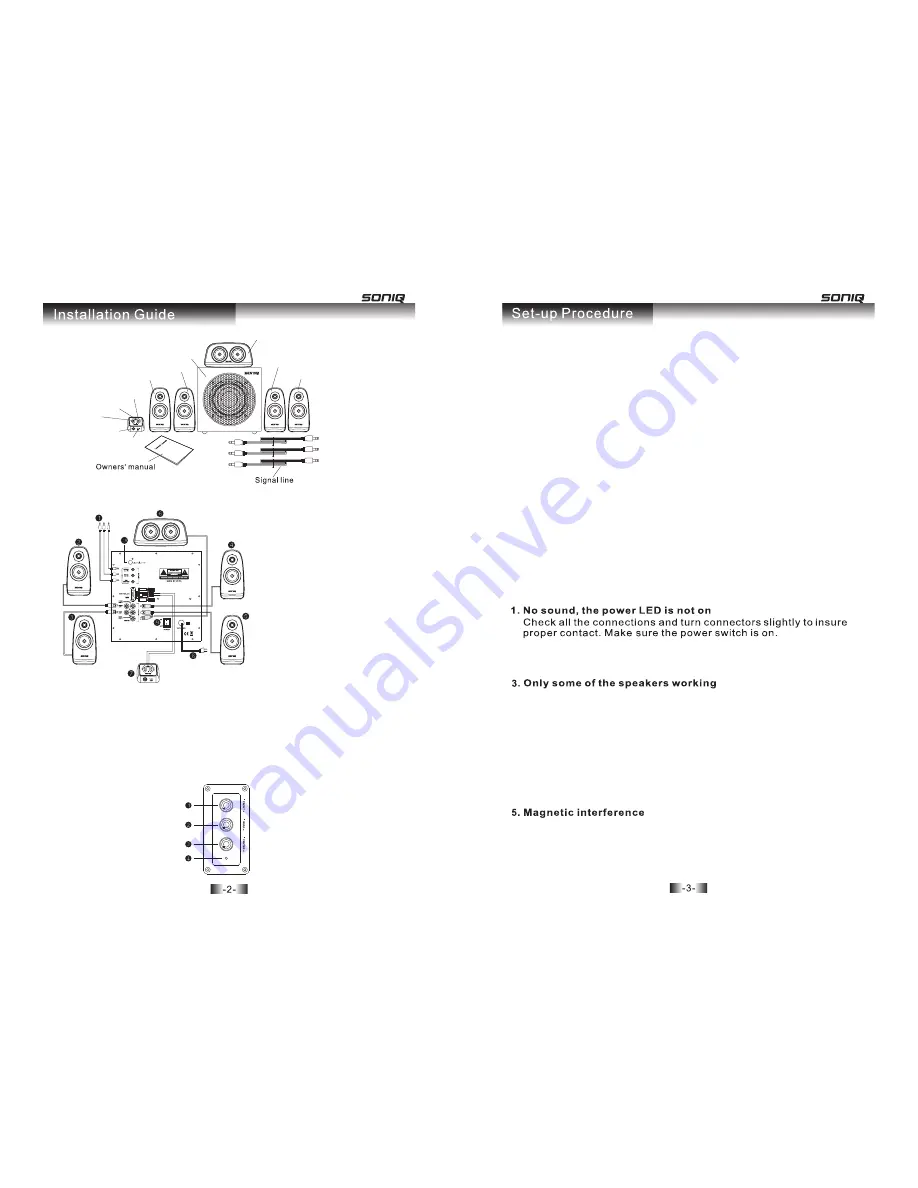
Layout of the back panel
This often happens on newly set up computers. There is sound from one
side when plugging the 3.5mm stereo mini-plug into the headphone jack
of CD-ROM. Because there is only one track of audio signal transmitted
from the audio equipment, please check the audio system carefully.
This system is magnetically shielded and it’s free from magnetic interfer-
ence even located near to the monitor or TV. But the amplifier magnetism
will cause magnetic interference or magnetization if the speakers are
located too close to the monitor or TV. Please locate the speakers at
least 30cm away from the monitor or TV.
1. Signal input terminal
(3.5mm plug)
2. White RCA plug for left
front satellite unit
3. White RCA plug for left
rear satellite unit (5M)
4. Red RCA plug for right
front satellite unit
5. Red RCA plug for right
rear satellite unit (5M)
6. Yellow RCA plug for center
satellite unit
7. VGA terminal for controller
8. AC power cord
9. Power on/off switch
10. 2.1/5.1 ST
2. No super bass
Adjust the bass control on the controller, and check if the audio signal
has frequency under 200Hz.
(
Figure 2)
(
Figure 3)
Troubleshooting
1. Connect the wire of the left satellite unit into the RCA socket on the back
panel of the subwoofer marked “FRONT LEFT” (see figure 2)
2. Connect the wire of the right satellite unit into the S terminal socket on
the back panel of the subwoofer marked “FRONT RIGHT”(see figure 2)
3. Connect the wire of the left satellite unit (5M) into the RCA socket on the
back panel of the subwoofer marked “REAR LEFT” (see figure 2)
4. Connect the wire of the right satellite unit (5M) into the RCA socket on the
back panel of the subwoofer marked “REAR RIGHT” (see figure 2)
5. Connect the wire of the center satellite unit into the RCA socket on the
back panel of the subwoofer marked “CENTER” (see figure 2)
6. Connect the wire of the controller into the VGA socket on the back panel
of the subwoofer marked “CONTROLLER” (see figure 2)
7. Connect the signal wire to the LINE OUT terminal (or the headphone jack
if a LINE OUT is unavailable) of the PC or other audio equipment.
(see figure 2)
8. Connect the AC power cord to an electrical outlet. Press the power switch
to turn on the speaker system, and turn your PC on, then play music with
the audio equipment. Adjust the volume control, bass control of the
speaker system, along with the controls of your PC or stereo system to
your liking. You could now enjoy your new Multimedia speaker system.
Turn off your computer and turn down all volume control before you start
setup procedure.
Check all the connections to ensure proper contact, and then choose
another PC or stereo system. If it can work well, it means there is no
problem with the multimedia speaker system; please check the audio
signal output system carefully.
4. There is sound from one side when plugging the 3.5mm stereo
mini-plug into the headphone jack of CD-ROM.
Layout of the side panel
1. Front control
2. Rear control
3. Center control
4. Power inciator
Headphone socket
Volume control
Bass control
Power indicator light
Right front unit
Center unit
Right rear unit
(
Figure 1)
Sub-woofer
Left front unit
Left rear unit
Mute switch
2.1/5.1 ST TRANSFER SWITCH USE:
In stereo input status, press the switch to set the speakers in 5.1 channel
audio output; bounce up the switch to set the speakers in 2.1 channel audio
output.
In 5.1 channel audio input status, press the switch to set the speakers in 2.1
channel audio output; bounce up the switch to set the speakers in real 5.1
channel audio output.
Summary of Contents for CSA50-AU
Page 1: ......


