background image


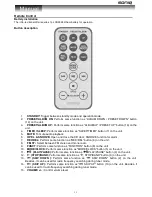
1.  Set at “USB” or “CARD” mode, then press STOP button (3). 

2.  Press MODE button (5), “MEM” will be flashing on LCD display. Moreover, it will indicate program number and 

digits for track number to be programmed. 

3.  Select  a  desired  track  by  pressing  SKIP  UP 

  (13)  or  SKIP  DOWN 

  (2)  button.  If  folder  selection  is 

required, pressing ALBUM DOWN (14) or ALBUM UP (16) button to search folder backward or forward. 

4.  Press MODE button (5) to confirm and store the track into memory. 

5.  Repeat steps 3 and 4 to enter additional tracks into the memory if necessary. 

6.  When all the desired tracks have been programmed, press PLAY/PAUSE 

  button (4) to play the tracks in 

assigned order. 

7.  Press  STOP    button  (3)  to  stop  playing  of  programmed  tracks,  press  STOP    button  (3)  again  to  cancel 

programming. 


Copying of MP3/WMA file 

The system allows you to copy the file from USB to SD or SD to USB by 1 file, 1 folder or all files. 


I) Copy 1 track 

1.  Insert the USB storage media or SD/MMC card, set in “USB” or “CARD” mode. 

2.  Press REC button (6) during the playback of the copying track, then “ONE” will be flashing on the display. Press 

REC button (6) again to confirm. 

3.  The USB or SD icon will be flashing on the display. Copying is performing now. 

4.  After completing of copy, unit will stop playback automatically. 

5.  Display will show “END” and back to USB or SD mode. 


II) Copy 1 folder 

1. 

Insert the USB storage media or SD/MMC card, set in “USB” or “CARD” mode. 

2.    Press ALBUM DOWN (14) or ALBUM UP (16) button to search desired folder for copying. 

3.    Press REC button (6), then “ONE” will be flashing on the display. Press SKIP UP 

  (13) / SKIP DOWN 


(2) button to select “DIR” on the display. Press REC button (6) again to confirm. 

4.    USB or SD icon will be flashing on the display. Copying is performing now.   

5.    When the USB or SD icon stops flashing, it means that the folder copying is completed. 


III) Copy all track 

1. 

Insert the USB storage media or SD/MMC card, set in “USB” or “CARD” mode. 

2. 

Press REC button (6), then “ONE” will be flashing on the display. Press SKIP UP 

  (13) / SKIP DOWN 


(2) button to select “ALL” on the display. Press REC button (6) again to confirm. 

4. 

USB or SD icon will be flashing on the display. Copying is performing now.   

5. 

When the USB or SD icon will stop flashing, it means that all track copying is completed. 


Remark: 

-  If press the REC button (6) during playback of USB or SD mode, the file will copy from USB to SD or SD to USB. 


File Delete from USB / SD Card 

The system is able to erase the file stored inside the USB drive or SD card by following:- 


I) Delete 1 track 

1. 

Press and hold DEL button (6) for 3-5 seconds during the playback of the desired track, then “ONE” will be 

flashing on the display. Press DEL button (6) again to confirm. 

2. 

“DEL” will be shown on the display. 

3.    “DEL” will disappear on the display, it means the track is deleted. 


II) Delete 1 folder 

1.  Insert the USB storage media or SD/MMC card, set in “USB” or “CARD” mode & set at stop mode after unit 

reading. 

2.  Press ALBUM DOWN (14) or ALBUM UP (16) button to search desired folder for deleting.   

3.  Press and hold DEL button (6) for 3-5 seconds, “DEL” will show on the display. Press SKIP UP 

  (13) / SKIP 

DOWN 

  (2) button to select “DIR” on the display. Press DEL button (6) again to confirm. 

4.  “DEL” will be shown on the display. After “DEL” disappears it means the desired folder is deleted. 

Summary of Contents for M302SK-AU

Page 1: ......

Page 2: ...1 M302SK TURNTABLE WITH CD MP3 CASSETTE PLAYER PLL RADIO AUX IN CLOCK ALARM REMOTE CONTROL AND BUILT IN SPEAKER INSTRUCTION MANUAL READ THIS INSTRUCTION MANUAL CAREFULLY BEFORE USE ...

Page 3: ...aker External power adaptor 45RPM adaptor remote control Location of Control 1 DUST COVER 2 SKIP DOWN BUTTON 3 STOP BAND BUTTON 4 PLAY PAUSE BUTTON 5 MODE CLOCK 6 REC DEL 7 SLEEP TIMER 8 FUNCTION 9 CD DOOR 10 CD DOOR BUTTON 11 EARPHONE JACK 12 USB SOCKET 13 SKIP UP BUTTON 14 ALBUM PRESET DOWN 15 STANDBY INDICATOR 16 ALBUM PRESET UP 17 LCD DISPLAY 18 POWER VOLUME KNOB 19 REMOTE CONTROL RECEIVER 20 ...

Page 4: ...button to select 12h 24h mode Press MODE button 5 again to confirm 3 Setting hour press SKIP UP 13 or SKIP DOWN 2 button to select the correct hour then press MODE button 5 again to confirm 4 Setting minute after step 3 is completed press SKIP UP 13 or SKIP DOWN 2 button to select the correct minute then press MODE button 5 again to confirm Setting alarm 1 During standby mode hold TIMER button 7 f...

Page 5: ...The number of stations can be found and stored depends on the reception of different area and countries Auto preset radio stations 1 During radio mode press the PLAY PAUSE button 4 the unit will automatically scan the radio frequency When the clear signal is found it will automatically store the radio station starting from program 1 2 The number of stations can be found and stored depends on the r...

Page 6: ... finishes In this case select the AUTO STOP ON OFF button 25 to OFF position then it will run to the end of the record but will not stop automatically turn off the unit by power button or switch back the AUTO STOP ON OFF button 25 to ON position to stop the platter rotate Then put back the tone arm to the arm park Phono encoding 1 Press FUNCTION button 8 to select PHON on display and then insert m...

Page 7: ...ng speed is 1 1 and according to the actual playing time of the tape The recording format is preset at MP3 bit rate 128 kbps Aux In Jack Encoding Press FUNCTION button 8 to select AUX on display then connect the external audio device such as CD player through the AUX IN JACK 20 Audio signal from the external audio device can be played through the system Aux in encoding 1 Press FUNCTION button 8 to...

Page 8: ...ill show the total number of MP3 WMA files And then user can press SKIP UP 13 or SKIP DOWN 2 button to select file forward or backward Skip up Skip down button During MP3 WMA playback press SKIP UP 13 button once to play the next file Press and hold SKIP UP button 13 continuously to speed up selecting forward During MP3 WMA playback press SKIP DOWN 2 button once to play the previous file Press and...

Page 9: ...flashing on the display Press SKIP UP 13 SKIP DOWN 2 button to select DIR on the display Press REC button 6 again to confirm 4 USB or SD icon will be flashing on the display Copying is performing now 5 When the USB or SD icon stops flashing it means that the folder copying is completed III Copy all track 1 Insert the USB storage media or SD MMC card set in USB or CARD mode 2 Press REC button 6 the...

Page 10: ...n to select tracks Skip up Skip down button During CD playback press SKIP UP 13 button once to play the next track Press and hold SKIP UP 13 button continuously to speed up selecting forward During CD playback press SKIP DOWN 2 button once to play the previous track Press and hold SKIP DOWN 2 button continuously to speed up selecting backward Folder searching Press ALBUM DOWN 14 or ALBUM UP 16 but...

Page 11: ...ODE button 5 on the unit or remote control display will show TS then the unit will stop recording momentarily and resume again A new file will have been created on the USB SD device representing a new track 2 Auto split operation procedure Before USB SD recording press FUNCTION button 8 to select audio source then press MODE button 5 on the unit or remote control display will show T ON which means...

Page 12: ...ZE function for alarm 7 REC DEL Perform same function as REC DEL button 6 on the unit 8 FM ST Select between FM stereo and mono radio 9 FUNCT Perform same function as FUNCTION button 8 on the unit 10 MODE CLOCK Perform same function as MODE CLOCK button 5 on the unit 11 PLAY PAUSE Perform same function as PLAY PAUSE button 4 on the unit 12 STOP BAND Perform same function as STOP BAND button 3 on t...

Page 13: ......

Reviews: