background image

12

SPECIFICATIONS ARE SUBJECT TO CHANGE WITHOUT NOTICE.

Dripping warning:

"Never expose this system to dripping liquids or to splashing and never place any liquid filled object, 
such as a vase for example, on top of this system".

Ventilation warning:

"Never interfere with the normal ventilation provided for this system when in normal use".

Troubleshooting:

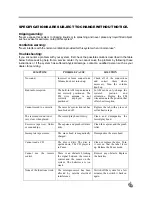
If you encounter a problem with your system, first check the possible solutions described in the table 
below before seeking help from a service center. If you cannot solve the problem by following these 
instructions or if the system has suffered physical damage, contact a qualified person such as your 
dealer, for servicing.

SYMPTOM 

POSSIBLE CAUSE 

SOLUTION 

No sound. 

Incorrect  or  loose  connections. 
Volume knob not turned up. 

Check  all  of  the  connections 
and 

correct 

them 

where 

necessary.  Turn  the  volume 
knob up. 

Bad radio reception. 

The built-in AM loop antenna is 
not  correctly  positioned.  The 
FM  wire  antenna 

is 

not 

correctly 

deployed 

and 

positioned. 

In  AM  mode  only,  change  the 
system's 

position 

and 

orientation.  Deploy  the  FM 
wire antenna in the position that 
offers best reception. 

Cannot record to a cassette. 

The cassette's protection tab has 
been broken off. 

Replace  the  tab  with  a  piece  of 
self adhesive tape. 

The recorded sound is not  
very clear when played. 

The record/play head is dirty. 

Clean  and  demagnetize  the 
record/play head. 

Excessive  tape  wow,  flutter 
or sound skips. 

The capstan and pinch roller are 
dirty. 

Clean the capstan and the pinch 
roller. 

Incomplete tape erasure. 

The  erase  head  is  magnetically 
charged. 

Demagnetize the erase head. 

Cannot read a CD. 

The  disc  is  dirty.  The  disc  is 
upside  down.  The  CD  player  is 
in Pause. 

Clean  or  replace  the  disc.  Turn 
it  over  so  that  the  label  faces 
up. Release the Pause mode. 

Cannot  use  the  remote 
control. 

There  is  an  obstacle  blocking 
the  signal  between  the  remote 
control  and  the  sensor  on  the 
system.  The  batteries  are  too 
weak. 

Remove  any  obstacle.  Replace 
the batteries. 

None of the functions work. 

The  microprocessor  has  been 
affected  by  outside  electrical 
interference. 

Switch off the system for a few 
minutes,  then  switch  it  back  on 
again. 


Summary of Contents for Qplay MC9

Page 1: ...Web www soniqav com Customer Hotline 1300 765 663...

Page 2: ...pt to remove screws or open the system s case There are no user serviceable parts inside Always refer servicing to qualified service personnel DANGER RISK OF ELECTRIC SHOCK DO NOT OPEN WARNING TO REDU...

Page 3: ...T REVIEW MEMORY BUTTON 16 TUNING SKIP SEARCH UP BUTTON POWER STANDBY BUTTON 17 PLAY PAUSE PAUSE BUTTON 18 MEMORY SET TIME BUTTON 19 STOP BAND BUTTON 20 TUNING SKIP SEARCH DOWN BUTTON 21 VOLUME KNOB 22...

Page 4: ...SELECTOR 110 220 V OPTIONAL 42 MAINS POWER CORD 32 CASSETTE KNOB DOOR 33 MEMORY BACKUP BATTERY COMPARTMENT COVER 34 FM ANTENNA 35 FM ANTENNA TERMINAL 75 OHM OPTIONAL 36 AM ANTENNA TERMINAL OPTIONAL 3...

Page 5: ...STOP BAND BUTTON 10 PLAY PAUSE BUTTON 11 TUNING SKIP SEARCH UP BUTTON FORWARD 12 13 REPEAT MEMORY UP BUTTON 14 SNOOZE BUTTON 15 VOLUME DOWN BUTTON 16 VOLUME UP BUTTON 17 BATTERY COMPARTMENT COVER MEMO...

Page 6: ...onnected to the mains power outlet it is placed in Standby mode You can press the POWER button on the system or on the remote control to switch the system ON or OFF Standby To completely power down th...

Page 7: ...TANDBYmode and SNOOZE is shown on the display 2 Five minutes later the system automatically starts changing to theTIMER ON mode and starts to play music TIMER blinks on the display 3 The system automa...

Page 8: ...button to open the cassette door Before playing take up any slack in the cassette tape To do this use a pencil or pen Simply insert the pencil or pen through the center of the reel and turn it in orde...

Page 9: ...has been loaded and that its protection tab has not been removed It is possible to record on a cassette after its protection tabs have been removed by covering the open slots with a piece of self adhe...

Page 10: ...yed 2 If the INTRO button is pressed again the CD will change to the normal playing mode Stop play 1 Press the STOP BAND button if you wish to stop playback The number of tracks that can be played fro...

Page 11: ...tons do not work properly then press the Reset button on the back of the system BEAT CUT FM MODE MONO STEREO SWITCH If a beat can be heard during recording move the BEAT CUT FM MONO STEREO switch on t...

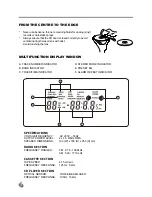
Page 12: ...WINDOW A TRACK NUMBER INDICATOR B BAND INDICATOR C TRACK TIME INDICATOR D STEREO MODE INDICATOR E PRESET EQ F ALARM REPEAT INDICATOR SPECIFICATIONS VOLTAGE FREQUENCY AC 230V 50Hz OUTPUT POWER LEVEL 2...

Page 13: ...ectly deployed and positioned In AM mode only change the system s position and orientation Deploy the FM wire antenna in the position that offers best reception Cannot record to a cassette The cassett...

Reviews: