background image

6

4.

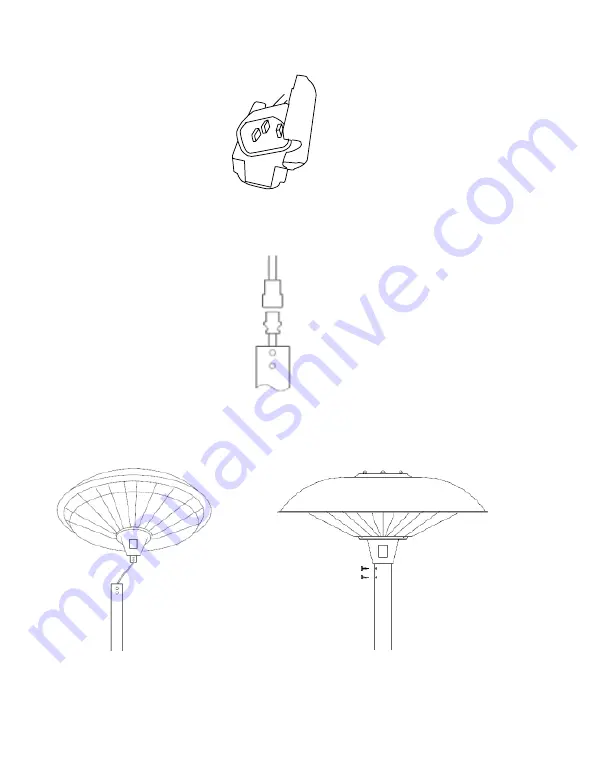
 Schutzkappe vom Stecker entfernen und das ca 2 m lange Kabel durch das zusam-

mengesetzte Rohr ziehen.

5.

 Stecken Sie den Stecker in die Steckdose, welches sich im Heizkopf befindet. Die 

Schutzkappe wieder auf den zusammengeschlossenen Stecker montieren, um ein 
unvorhergesehenes Auseinanderreissen zu vermeiden.

6.

 Schieben Sie den Heizungskopf auf das Oberrohr. Die Rillen des Heizkopfs müssen 

auf die Löcher des Rohrs ausgerichtet sein. Mit den 2x8mm Schrauben fixieren.

Summary of Contents for WARMEPILZ ELEKTRISCH 2100

Page 1: ...WÄRMEPILZ ELEKTRISCH 2100 Aussenheizung Bedienungsanleitung ...

Page 2: ...EX 1 Sicherheitshinweise 3 2 Montageanleitung 5 3 Platzierung 8 4 Elektrischer Anschluss 9 5 Inbetriebnahme 9 6 Wartung und Pflege 10 7 Technische Angaben 10 8 Garantie Entsorgung Technische Änderungen 11 D ...

Page 3: ...on Kindern die 8 Jahre oder älter sind sowie von Personen mit re duzierten körperlichen sensorischen oder geistigen Fähigkeiten oder einem Mangel an Erfahrung und Wissen genutzt werden sofern sie beaufsichtigt werden oder Anweisun gen bezüglich der sicheren Nutzung des Geräts erhalten haben und die damit verbun denen Gefahren verstehen Kinder dürfen nicht mit dem Gerät spielen Kinder dürfen die Re...

Page 4: ...as Gerät nicht mit Gegenständen oder bauen Sie es ein Dieses Produkt wird bei Benutzung heiss seien Sie beim Anfassen vorsichtig und erlauben Sie Kinder und Haustieren nicht in der Nähe zu spielen Das Gerät darf nicht eingesetzt werden unter folgenden Bedingungen In Räumen mit explosionsgefährdeten Atmosphären In Räumen mit aggressiven Atmosphären In Räumen mit hoher Lösemittelkonzentration In Räu...

Page 5: ...raubversschluss ab Bild 1 Das zweite Rohr kann nun aus dem ersten herausgezogen werden bis es die maximale Höhe erreicht hat Bild 2 Den schwarzen Schraubvershluss aufsetzen Bild 3 Den schwarzen Schraubvershluss zudrehen Bild 4 3 Schrauben Sie nun das untere mit dem oberen Rohr zusammen D 2 Montageanleitung 1 2 3 4 ...

Page 6: ...n die Steckdose welches sich im Heizkopf befindet Die Schutzkappe wieder auf den zusammengeschlossenen Stecker montieren um ein unvorhergesehenes Auseinanderreissen zu vermeiden 6 Schieben Sie den Heizungskopf auf das Oberrohr Die Rillen des Heizkopfs müssen auf die Löcher des Rohrs ausgerichtet sein Mit den 2x8mm Schrauben fixieren ...

Page 7: ... Kabell unter dem Standfuss mit den zwei M4x30 und zwei M4x50 Schrauben 8 Das Gerät kann nun mittels Öffnen des schwarzen Schraubverschluss auf die ge wünschte Höhe eingestellt werden Den Schraubverschluss immer gut zu schrauben Fertig Ein Tisch kann als Zubehör montiert werden ...

Page 8: ...ät herum einen Mindestabstand von 1m befindet Benutzen Sie das Heizgerät drinnen versichern Sie sich dass sich oberhalb des Gerä tes mindestens 0 4m Platz befindet Halten Sie das Gerät weit genug von entflammbaren Geräten Markisen Vorhängen Sonnenschirmen UPVC Fenstern sowie anderen Plastikartikeln etc fern Positionieren Sie Kabel und Verlängerungen immer so dass sie keine Gefahr für Älte re Kinde...

Page 9: ...t vorzugehen Versichern Sie sich dass sich der Kontrollschalter in der Aus Stellung befindet Ste cken Sie den Stecker in eine passende Steckdose innerhalb des Hauses ein Wählen Sie durch die Taste Switch die gewünschte Heizstufe I 900 W II 1200 W I II 2100 W Auf der Position 0 ist das Gerät ausgeschaltet Die Heizelemente erwärmen sich und glühen orangefarben Obwohl die Garensonne Spritzwassergesic...

Page 10: ...ane aufbewahrt werden Bei extremem Wetter Frost oder Sturm wird empfohlen das Heizgerät drinnen oder an einem geschützten Ort aufzubewahren Versichern Sie sich dass das Raumheizgerät vor der Benutzung trocken ist und wischen Sie eventuelle Feuchtigkeit zuerst ab Pflege 1 Schalten Sie das Heizgerät aus 2 Ziehen Sie anschliessend das Netzkabel aus der Steckdose 3 Reiben Sie das Gehäuse mit einem Feu...

Page 11: ...ede Garantieleistung vorzulegen Die Garantie beträgt 24 Monaten ab dem Kaufdatum Entsorgung Das Gerät muss fachgerecht entsorgt werden Das Gerät kann bei jedem Fachhändler kostenlos zur Entsorgung abgegeben werden Technische Änderungen Technische Änderungen in Technik und Design vorbehalten Bitte behalten Sie das Verpackungsmaterial für das Gerät auf CE Konformitätserklärung Das Gerät entspricht f...

Page 12: ...ach Tel Int 41 71 987 60 60 Tel Nat 0848870850 info sonnenkoenig ch www sonnenkoenig ch Firma Armin Schmid Peter Henlein Strasse 5 D 89331 Burgau Tel 0180 500 64 35 info sonnenkoenig ch www sonnenkoenig ch Festnetz 14 Cent Minute Mobilnetz bis 42 Cent Minute ...

Page 13: ...WÄRMEPILZ ELEKTRISCH 2100 Chauffage extérieur Manuel de l utilisateur F ...

Page 14: ...1 Consignes de sécurité 15 2 Assemblage 17 3 Emplacement 20 4 Raccordement électrique 21 5 Mise en marche 21 6 Maintenance et Entretien 22 7 Détails techniques 22 8 Garantie Mise au rebut Modifications techniques 23 ...

Page 15: ... à une utilisation inappropriée ou incorrecte Cet appareil peut être utilisé par des enfants âgés de 8 ans et plus et par des personnes à capacités physiques sensorielles et mentales réduites ou sans expérience et sans les connaissances nécessaires à condition qu ils soient assistés ou qu ils aient reçu des instructions concernant l utilisation en toute sécurité de l appareil et qu ils comprennent...

Page 16: ...ue vous le touchez et ne laissez pas les enfants et animaux de compagnie jouer à proximité L appareil ne doit pas être employé dans les conditions suivantes Dans des atmosphères explosives Dans des atmosphères agressives Dans les lieux où l atmosphère comprend une forte concentration en solvants Dans des lieux extrêmement poussiéreux À proximité de piscines ou dans des lieux humides En cas de dout...

Page 17: ...le mandrin noir fig 1 Tirez sur la seconde partie du tube pour la sortir de l intérieur du premier tube jusqu à atteindre la hauteur maximale fig 2 Introduisez de nouveau le mandrin noir fig 3 Serrez le mandrin noir fig 4 3 Vissez le tube intermédiaire au tube inférieur 2 ASSEMBLAGE 1 2 3 4 ...

Page 18: ...iche du câble d alimentation à la prise située sur la tête de chauffage Insérez le boîtier de la fiche pour éviter que le câble d alimentation et la prise de la tête de chauffage ne se détachent 6 Enfoncez la tête de chauffage sur le tube supérieur Alignez les rainures de la tête de chauffage avec les trous du tube et fixez les au bon endroit à l aide des vis de 2 x 8 mm ...

Page 19: ...et deux vis M4x50 8 Relevez ou rabaissez le tube supérieur à la hauteur souhaitée et serrez le en vissant le bouton vers le bas sur le tube intermédiaire Vous avez terminé Il est possible d y ajouter la table en option Tête de chauffage Tube supérieur Tube intermédiaire Tube inférieur Base ...

Page 20: ...1 m autour de l appareil Si vous utilisez l appareil de chauffage en intérieur assurez vous d avoir un espace d au moins 0 4 m au dessus de l appareil Tenez l appareil à l écart d objets inflammables de stores rideaux parasols fenêtres en UPVC autres articles en plastique etc Placez toujours le câble et les rallonges de façon à ce qu ils ne représentent aucun risque pour les personnes âgées enfant...

Page 21: ...océder pour utiliser l appareil de chauffage Vérifiez que l interrupteur est en position éteinte Branchez l appareil sur une prise adaptée à l intérieur de la maison Choisissez le niveau de chauffage voulu à l aide du bouton Switch I 900 W II 1200 W I II 2100 W En position 0 l appareil est éteint Les résistances se mettent à chauffer et deviennent orange Même si l appareil de chauffage est protégé...

Page 22: ...us une housse de protec tion ou une bâche En cas de conditions météorologiques extrêmes de gel ou de tempête il est recom mandé de ranger l appareil à l intérieur ou dans un lieu protégé Assurez vous que l appareil de chauffage est sec avant de l utiliser et essuyez au préalable toute éventuelle présence d humidité Entretien 1 Éteignez l appareil de chauffage 2 Débranchez l appareil du secteur 3 E...

Page 23: ...restation de garantie La période de garantie est de 24 mois à compter de la date d achat Elimination L appareil doit être jeté de manière appropriée L appareil peut dans tous les cas être remis gratuitement à tout revendeur spécialisé Modifications techniques Sous réserve de modifications de la technique et du design S il vous plaît conserver les matériaux d emballage de l appareil CE Konformitäts...

Page 24: ...ach Tel Int 41 71 987 60 60 Tel Nat 0848870850 info sonnenkoenig ch www sonnenkoenig ch Maison Armin Schmid Peter Henlein Strasse 5 D 89331 Burgau Tel 0180 500 64 35 info sonnenkoenig ch www sonnenkoenig ch Festnetz 14 Cent Minute Mobilnetz bis 42 Cent Minute ...

Page 25: ...WÄRMEPILZ ELEKTRISCH 2100 Riscaldatore per esterni Manuale dell utente I ...

Page 26: ... Avvertenze per la sicurezza 27 2 Assemblaggio 29 3 Posizionamento 32 4 Connessione elettrica 33 5 Messa in funzione 33 6 Pulizia e manutenzione 34 7 Dettagli tecnici 34 8 Garanzia Smaltimento Modifiche tecniche 23 ...

Page 27: ... conforme o cattivo Questo elettrodomestico può essere usato da bambini che abbiano compiuto gli 8 anni di età e da persone con capacità fisiche sensoriali o mentali ridotte oppure che manchino di esperienza e conoscenza purché abbiano ricevuto assistenza o formazione per un uso sicuro dell elettrodomestico e ne comprendano quindi i rischi connessi I bambini non devono giocare con l apparecchio Op...

Page 28: ... e non si dovrebbe permettere ai bambini o gli animali domestici adi giocare nelle vicinanze L apparecchio non deve essere utilizzato nelle seguenti condizioni In ambienti con atmosfera esplosiva In ambienti con atmosfera aggressiva In ambienti con un alta concentrazione di solventi In ambienti con altra concentrazione di polvere Vicino a piscine o in zone umide In caso di condizioni di esercizio ...

Page 29: ...are il mandrino nero fig 1 Dall interno del primo tubo estrarre il secondo fino a raggiungere l altezza massima possibile fig 2 Reinserire attraverso il secondo tubo il mandrino nero fig 3 Avvitare il mandrino fig 4 3 Avvitare il tubo intermedio al tubo inferiore 2 ASSEMBLAGGIO 1 2 3 4 ...

Page 30: ...cavo 5 Collegare la spina del cavo di alimentazione alla presa collegata alla testa del riscaldatore Reinserire la custodia in plastica la quale protegge i due spinotti ed evita che si stacchino tra loro 6 Fissare la testa del riscaldatore sul tubo superiore Allineare le scanalature della testa del riscaldatore ai fori del tubo e fissarle con le viti 2 x 8 mm ...

Page 31: ...8 Per modificare l altezza del tubo fino a raggiungere quella desiderata svitare il mandrino e abbassare o alzare il tubo superiore Avete terminato È possibile ottenere il tavolo come accessorio opzionale Testa del riscaldatore Tubo superiore Tubo intermedio Tubo inferiore Base ...

Page 32: ... m attorno all apparecchio Se il riscaldatore viene usato in interni assicuratevi di avere almeno 0 4 m di spazio sopra l apparecchio Tenere l apparecchio abbastanza lontano da qualsiasi dispositivo infiammabile tende da sole tende ombrelloni finestre infiammabili UPVC e altri oggetti in plastica ecc Inserire sempre il cavo ed eventuali prolunghe in modo tale che non siano causa di rischio per bam...

Page 33: ...arecchio seguendo i seguenti passi Controllare se l interruttore di controllo sia in posizione OFF Inserire la spina in una presa adatta all interno della casa Utilizzare l interruttore Switch per selezionare il livello di calore desiderato I 900 W II 1200 W I e II 2100 W In posizione 0 l apparecchio è spento Gli elementi riscaldanti si scaldano e splendono di color arancio Anche se il riscaldamen...

Page 34: ...n condizioni meteorologiche estreme come gelo o tempesta si consiglia di stoccare il prodotto in un luogo riparato Prima di utilizzare l apparecchio assicurarsi che esso sia asciutto e privo di polvere se cosí non fosse provvedere a pulire e o asciugare l apparecchio Manutenzione 1 Spegnere il riscaldatore 2 Quindi scollegare il cavo di alimentazione dalla presa di corrente 3 Pulire l involucro co...

Page 35: ...e deve essere presentata per ogni prestazione in garanzia Il periodo di garanzia è di 24 mesi dalla data di acquisto Smaltimento Provvedere ad un corretto smaltimento del prodotto L apparecchio può essere consegna to gratuitamente per il relativo smaltimento a qualsiasi rivenditore specializzato Modifiche tecniche Con riserva di eventuali modifiche tecniche e di progettazione CE Dichiarazione di C...

Page 36: ...l Int 41 71 987 60 60 Tel Nat 0848870850 info sonnenkoenig ch www sonnenkoenig ch Ditta Armin Schmid Peter Henlein Strasse 5 D 89331 Burgau Tel 0180 500 64 35 info sonnenkoenig ch www sonnenkoenig ch Telefono fisso 14 Cent Minute Telefono mobile bis 42 Cent Minute ...

Page 37: ...GB WÄRMEPILZ ELEKTRISCH 2100 Outdoor Heating User manual ...

Page 38: ...38 INDEX 1 Safety information 39 2 Assembly 41 3 Placement 44 4 Electrical connection 45 5 Operations 45 6 Maintenance and care 46 7 Specifications 46 8 Warranty Disposal Technical change 47 GB ...

Page 39: ...nd knowledge if they have been given supervision or instruction concerning use of the appliance in a safe way and understand the hazards involved Children shall not play with the appliance Cleaning and user maintenance shall not be made by children without supervision Please make sure to place the device on a suitable and waterproof surfaces so that spilled liquids can not cause harm Repairs to el...

Page 40: ...ditions In rooms with an explosive atmosphere In rooms with an aggressive atmosphere In rooms with a high concentration of solvents In rooms with an extremely high exposure to dust Near swimming pools or in a wet area In case of any questionable operating conditions it is recommended to contact the Technical Department at Sonnenkönig or a specialist dealer If the electric heater is used under inap...

Page 41: ...ew the black mandrel pic 1 Pull the second part of the tube out from the inside of the first tube until you reach the maximum possible height pic 2 Insert the black mandrel again pic 3 Tighten the black mandrel pic 4 3 Connect the middle tube to the bottom tube by screwing them together 2 ASSEMBLY 1 2 3 4 ...

Page 42: ... to the socket in the heater head Insert the cover of the plug to avoid disconnection of the power cord and the socket in the heater 6 Push the heater head onto the top tube Align the grooves of the heater head to the holes of the tube and fix them in the right position using the 2 x 8 mm screws 7 Fix the power cord to the rubber base by using two M4X30 and two M4x50 screws GB ...

Page 43: ...r retract the top tube to the desired height and tighten it to the middle tube by screwing the knob down Complete It is possible to add the table as an accessory Heater Head Top Tube Middle Tube Bottom Tube Base GB ...

Page 44: ...e is maintained If the heater is used indoors make sure you have at least 0 4 m of space above the appliance Keep the appliance far enough away from any flammable devices awnings curtains sunshades UPVC windows and other plastic items etc Always place the cable and any extension cords in such a way that they do not pres ent a risk to the elderly children and pets Minimum distance Minimum distance ...

Page 45: ...use the heater follow these steps Check whether the control switch is in the OFF position Plug the appliance plug into a suitable socket inside the house Use the Switch knob to select the desired heat level I 900 W II 1200 W I II 2100 W In position 0 the appliance is turned off The heating elements heat up and glow orange Even though the heater is splash proof do not use it outside when it rains o...

Page 46: ...ide under a dust cover or a tarpaulin sheet In extreme weather conditions frost or storm it is recommended to store the heater inside or in a sheltered place Before using the heater make sure it is dry and wipe away any moisture that may be present Maintenance 1 Turn off the heater 2 Then unplug the power cord from the socket 3 Wipe the casing with a damp cloth Do not use benzene solvents or any a...

Page 47: ...sal Please remove the heater properly You can bring the product to any specialist dealer fort he removal Technical changes Technical changes in technique and design are possible Please save the packaging materials of the unit CE declaration of Conformity This device complies with the following standards EN 60335 2 80 2003 A1 2004 A2 2009 EN 60335 1 2012 EN 62233 2008 8 Warranty Disposal Technical ...

Page 48: ...ch Tel Int 41 71 987 60 60 Tel Nat 0848870850 info sonnenkoenig ch www sonnenkoenig ch Firma Armin Schmid Peter Henlein Strasse 5 D 89331 Burgau Tel 0180 500 64 35 info sonnenkoenig ch www sonnenkoenig ch Festnetz 14 Cent Minute Mobilnetz bis 42 Cent Minute ...

Reviews: