background image

Installation Instructions


for RackMac

 Pro Computer Mounting Module

Summary of Contents for RackMac Pro

Page 1: ...Installation Instructions for RackMac Pro Computer Mounting Module ...

Page 2: ......

Page 3: ...dule Installation Steps 2 A Prepare RackMac Pro for Computer Mounting Module Installation B Install Mac Pro Into Computer Mounting Module C Install Computer Mounting Modules Into Enclosure 3 Specifications Precautions and Support Information 7 Specifications Safety Precautions Contacting Customer Service Visit Our Website Contents ...

Page 4: ...This page left intentionally blank ...

Page 5: ...gh cables attached to the back panel 5 HDMI Port This port connects to the Mac Pro through a cable attached to the back panel This port supports Sonnet s locking HDMI cable 6 Gigabit Ethernet Ports These RJ 45 ports connect to the Mac Pro through cables attached to the back panel Mac Pro Bottom Cover Label This label is applied to the bottom of the Mac Pro to cover its labeling except for the seri...

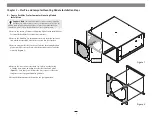
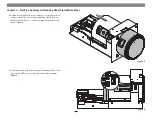
Page 6: ...enclosure and then remove and set aside the assembly Figure 1 4 Remove the four screws securing the two plates together using a Phillips screwdriver and then set aside the screws and plates Figure 2 Note that you will reuse the four screws to secure the faceplate to the Computer Mounting Module 5 Reinstall the rackmount enclosure into the equipment rack Figure 1 Figure 2 blank plate face plate ass...

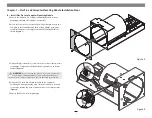
Page 7: ...Mounting Module as shown Figure 3 3 Using a Phillips screwdriver loosen but do not remove the six screws securing the Computer Mounting Module s top bracket to its bottom bracket Figure 4 4 Using the 5 64 inch hex wrench included in the Computer Mounting Module s packaging back out the module s power switch set screw by turning the screw counter clockwise 10 complete turns Figure 4 5 Remove the Ma...

Page 8: ... carefully insert the computer top first into the Computer Mounting Module as shown lining up the Mac Pro s ports with the openings in the module s top bracket Figure 5 7 Adjust the Mac Pro within the Computer Mounting Module so that its power and HDMI ports are centered in the bracket openings Figure 6 Figure 6 Figure 5 ...

Page 9: ...uter s power cable to the Computer Mounting Module s power port and to a powered outlet If the computer does not turn on by itself go to the next step If the computer does turn on by itself disconnect the power cable Loosen the set screw by turning it 1 4 turn counter clockwise Connect the power cable again and repeat this step until the computer does not turn on when the power cable is connected ...

Page 10: ...kMac Pro s rackmount enclosure until they stop Figure 9 2 Turn the six thumbscrews clockwise to secure the Computer Mounting Modules to the rackmount enclosure Figure 10 3 OPTIONAL STEP Apply a bottom cover label to each Mac Pro by peeling off the backing material aligning the cutout the area without ink over the words Serial Number and the computer s serial number and making sure the words Mac Pr...

Page 11: ...d check this User s Guide for helpful information When you call Customer Service have the following information available so the customer service staff can better assist you Product name Date and place of purchase Computer model USA Customers If further assistance is needed please contact Sonnet Customer Service at Tel 1 949 472 2772 Monday Friday 7 a m 4 p m Pacific Time E mail support sonnettech...

Page 12: ...he Mac logo and Mac Pro are trademarks of Apple Inc registered in the United States and other countries Thunderbolt and theThunderbolt logo are trademarks of Intel Corporation in the U S and or other countries Other product names are trademarks of their respective owners Product specifications subject to change without notice Printed in the USA UG RACK PRO B MM E B 080316 ...

Reviews: