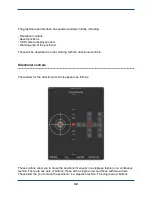
move the positioner in small steps, while the double-arrow ones move the positioner in large
steps. The step sizes are specified, in microns, by the
Large step
and
Small step
text
boxes. For reference, 1000 microns = 1 mm and 10000 microns = 1 cm. Unless otherwise
indicated, all distance inputs in the control software are specified in microns.
The buttons in the left crosshairs control movement in the X axis (horizontal) and in the Y axis
(vertical). The vertical buttons to the right of this crosshairs provide movement in the Z axis. If a
movement step cannot be made in a direction because it would go past the limits of the
positioner, the button for that movement will be greyed out and inactive.
To move the positioner in a more continuous fashion, use the trackball on the left hand side of
the window. The positioner will move faster as you drag the ball closer to the outer edge of the
circle. The movement will scale up or down with the step sizes specified in the
Large step
.
These controls will be disabled as certain times, such as when a movement is in progress, a
pattern is being dispensed, or a calibration run is being performed.
Toolbar items
At the top of the main interface there are several toolbar items. The first the
Home
item, which
will cause the positioner to lift the Z axis to its home position, then rapidly move the X and Y
axes back to their home points.
Warning
: The home move travels over a large distance and can be very fast, so make
sure that all objects and personnel are clear of the positioner’s working range before
clicking on this button.
The next item is a
Find surface
item. The electronic surface sensing technology within the
Microplotter dispense head can be used to detect the exact surface height, a very useful
function for exactly aligning the dispenser above the surface quickly. This automatic surface
height determination can be activated using the
Find surface
item, but that item will remain
greyed out until a dispenser has been attached and calibrated by following the instructions in
the later
Surface height sensing and calibration section
. Once
Find surface
has been clicked, the positioning system will slowly move the dispenser closer and closer to the
surface until contact has been registered. Should this take too long, if it is clear that the
dispenser was improperly calibrated, or if the dispenser is overshooting the surface for some
other reason, clicking on the
Abort
button (the one that has the red circle with a slash through
it, at the center of the standard movement controls) will cut short the process.
The next is an option to quickly lift up the dispenser, convenient for replacing dispensers or
substrates without worrying about accidentally touching the dispenser tip on a surface. This
movement is activated by clicking on the
Go to safe height
item.
There are a few more toolbar items at the top of interface that will be covered in the next few
pages
33
Summary of Contents for MICROPLOTTER II
Page 1: ...MICROPLOTTER II MANUAL REVISION 2 2 ...
Page 2: ...SONOPLOT INC 3030 LAURA LANE SUITE 120 MIDDLETON WI 53562 608 824 9311 CONTACT SONOPLOT COM 2 ...
Page 4: ...Dispenser refurbishing 59 Revision History 61 4 ...
Page 6: ......
Page 10: ......
Page 21: ...Fully installed Microplotter II system 19 ...
Page 22: ......
Page 58: ......
Page 62: ......
Page 64: ......
Page 66: ...60 ...


